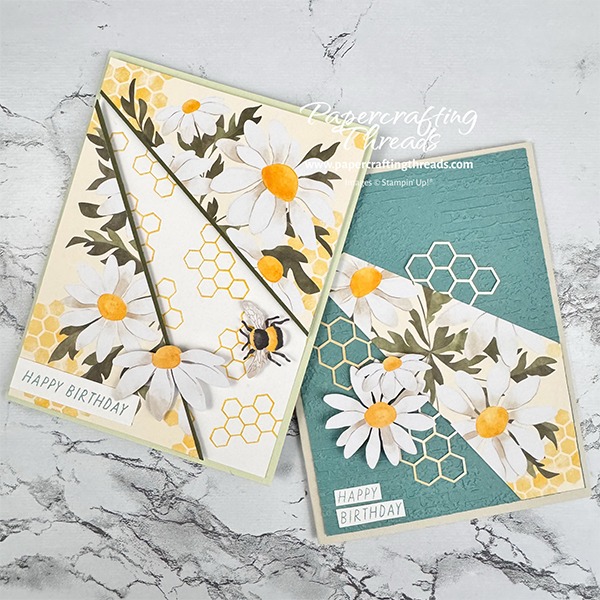
What’s better than making a beautiful handmade card? Making **TWO** at the same time! 🎉
Today, I’m sharing a fun and easy 2-for-1 Split Front Card Technique. This technique is perfect for maximizing your supplies while creating a coordinated card set. Whether you’re a seasoned cardmaker or just getting started, you’ll love how simple (yet impressive!) this design is. While I used the lovely Daisy Daydream March 2025 Paper Pumpkin Kit for parts of my cards, feel free to substitute any patterned paper in your stash. Let’s get started!
cutting & scoring guide
| Paper Dimensions | Score Short Side | Score Long Side | ||||
| Card #1 | ||||||
| 5½” x 8½” Soft Sea Foam cardstock base | 4¼” | |||||
| 4″ x 5¼” daisy pattern card base or patterned paper for split | ||||||
| 4″ x 5¼” Basic White cardstock (cut 2, one for inset and one for liner) | ||||||
| ½” strip of Mossy Meadow cardstock (cut 2) | ||||||
| Card #2 | ||||||
| 5½” x 8½” Basic Beige cardstock base | 4¼” | |||||
| 4″ x 5¼” Lost Lagoon cardstock | ||||||
| 4″ x 5¼” Basic White cardstock for liner |
Card #1 Split front card technique
I cut down the daisy patterned front of one of the card bases from the kit to the dimensions listed above. With its cheerful daisies, adorable bees, and honeycomb patterns, this kit is basically springtime in a box! 🌼🐝 Want your own Paper Pumpkin Kit delivered to your door? Subscribe to future kits here. I digress. Save the back half of that card base for another card.
With a pencil and ruler, measure down ½” and ¾” from the left top corner and make tick marks. Make another tick mark along the bottom edge 3″ from the left side. And make the final tick mark 3″ down from the top right corner.
Place the ½” tick mark in the center of the cutting groove on the Stampin’ Trimmer, pivot the right side edge until the 3″ tick mark is aligned in the groove and cut.
Next, place the ¾” tick mark in the center of the cutting groove, pivot the bottom edge 3″ mark until it’s aligned in the groove and cut. The daisy pattern should now be in three pieces. Set aside the middle piece for the second card.
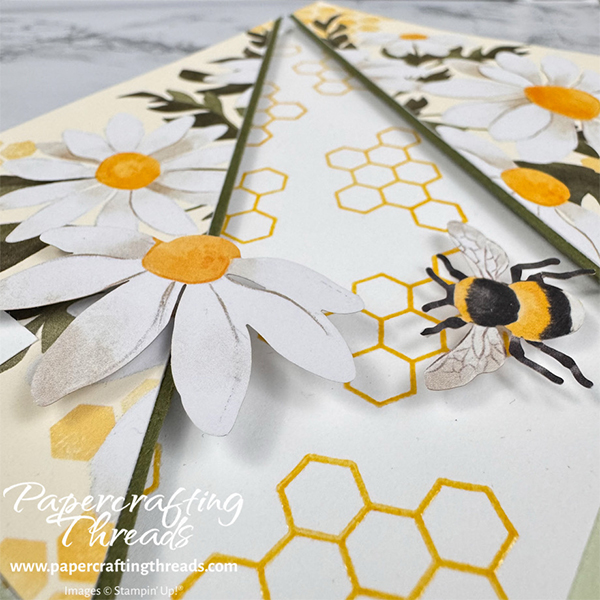
Add liquid glue to the back of the diagonal edge of the right triangle and adhere to one of the ½” strips of Mossy Meadow cardstock, leaving a scant border. Trim the overhanging edges using the daisy paper as a guide. Repeat for the remaining piece of daisy paper. Add strips of foam adhesive to the backs of the altered pieces and set aside.
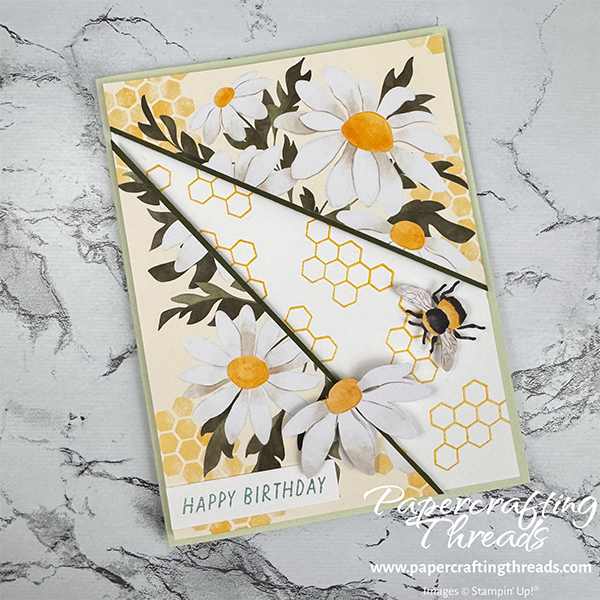
decorate the inset
Ink the smaller open weave honeycomb image from the kit first in Versamark ink, then in Crushed Curry ink. Stamp and repeat in a diagonal pattern on the Basic White cardstock from the lower right to the upper left of the cardstock. Sprinkle with clear embossing powder and heat set.
Adhere the Basic White cardstock to the card base. Remove the liners from the foam adhesive strips and add the triangles as shown.
Place dimensionals on the back of one of the diecut daisies and one of the bees. Adhere to card front.
Stamp the greeting ‘happy birthday’ in Lost Lagoon ink on a scrap of Basic White cardstock and adhere in bottom left corner.
Finally, create a liner by stamping the bee image in Tuxedo Black Memento ink on the lower right corner of a piece of Basic White cardstock. Stamp the body in Crushed Curry ink. Stamp the wings in second generation Lost Lagoon ink and adhere the liner to inside of card.
card #2 — split front card technique
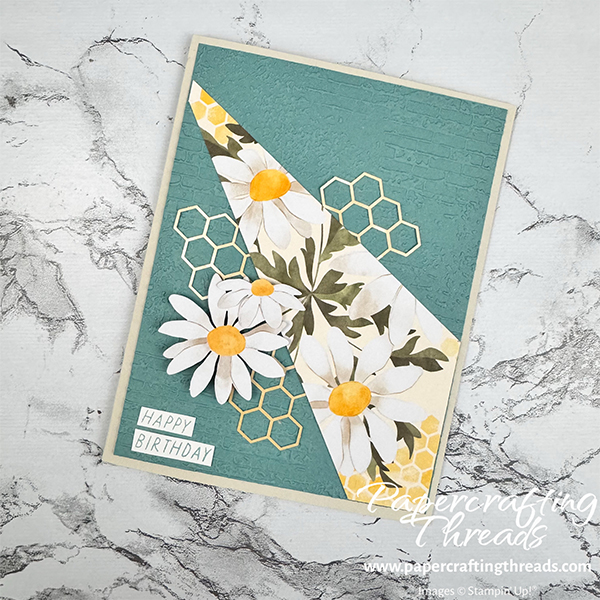
Run the Lost Lagoon cardstock through the Cut and Emboss machine with the Exposed Brick 3D embossing folder. Adhere with liquid glue to the Basic Beige folded card base.
Adhere the center daisy panel left over from the first card using liquid glue and placed at a diagonal.
Squeeze some liquid glue onto a Silicone Craft Sheet, pick up with a sponge, and dab onto the back of the diecut honeycomb pieces from the kit. Tuck under the edges of the daisy patterned paper.
Add dimensionals to the back of two of the diecut daisies from the kit and adhere as shown.
Stamp ‘happy birthday’ in Lost Lagoon ink on a strip of Basic White cardstock, cut greeting apart and adhere to lower left corner of card front.
Then create a liner by stamping the open weave honeycomb image in Crushed Curry ink on the lower right corner of a piece of Basic White cardstock and adhere to inside of card.
I made a video if you need more of a visual tutorial, and posted it over on my YouTube channel, link is below. Which card is your favorite? I’m hard pressed to choose.
If you found this tutorial helpful, consider a contribution to my coffee fund ☕️ Coffee → Creativity → Content → More Coffee (help fuel the cycle!)
Leave a Reply