Cutting cardstock can be intimidating when you first start out, but it doesn’t have to be. Basically, cutting cardstock for card bases is as simple as cutting full sheets of cardstock in half. Follow these simple step-by-step instructions and become a master cardstock cutter with the Stampin’ Trimmer.
Cutting Cardstock for Standard Cards
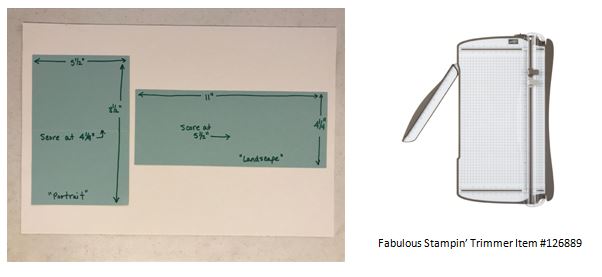
When using 8-1/2” by 11” cardstock for cards, there are two basic ways of cutting the cardstock to make standard cards that fit in Stampin’Up’s medium (5-3/4” by 4-3/8”) envelopes.
- If the sheet of cardstock is held in the “portrait” layout, the top and bottom of the sheet measure 8-1/2” and the right and left sides are 11.”

- If the sheet of paper is held in the “landscape” layout, the top and bottom of the sheet measure 11” and the right and left sides are 8-1/2.”

- To make two 5-1/2” by 4-1/4” cards that open like a book (portrait), cut the paper horizontally at 5-1/2” along the 11” side to make two pieces that measure 8-1/2” by 5-1/2”. Score each piece at 4-1/4” along the 8-1/2” side.
- For two 5-1/2” by 4-1/4” cards that open like a tablet (landscape), cut the paper vertically at 4-1/4” along the 8-1/2” side to make two pieces that measure 4-1/4” by 11”. Score each piece at 5-1/2” along the 11” side.
- When I am using the Stampin’ Up! trimmer cutting cardstock, after I cut the full-size sheet of cardstock using the dark gray blade in half in either book or tablet form, I then rotate the cut cardstock 90 degrees and use the scoring blade (light gray) to score it in half.
Cardstock Mats
Card making uses mats or matting to layer papers. Cut mats for standard cards as follows:
For a:
- 1/16” border, cut cardstock mat at 4-1/8” x 5-3/8”
- 1/8” border, cut cardstock mat at 4” x 5-1/4”
- 1/4” border, cut cardstock mat at 3-3/4” x 5”
Stampin’ Trimmer
This is by far my most used and loved tool! I use it all the time to cut cardstock as it is accurate and simple to use. This trimmer was specially designed to make stable and straight cuts.
Why I Love My Stampin’ Trimmer
- Lightweight, portable, personal paper cutter – 6-1/4″ wide cutting base, Extend ruler to 14-1/2″ to use full measuring area
- Trimmer base is marked in 1/4″ increments, right-side grid helps you measure and cut very thin strips
- Has space at the top and bottom so you don’t have to take the cutting and scoring blades out when you’re not using them
- Locks in place for secure storage or transport
- Has a stabilizing leg to provide a sturdy and steady cutting surface for longer cuts
- The precision tip on the cutting blade allows you to pinpoint precisely where you’re cutting
- The point on the side of the handle shows you where the blade will cut, making it easy to see exactly where your cuts and scores will begin
- Nonskid feet keep the Stampin’ Trimmer securely in place on your work area
- Storage compartment holds scoring and cutting tools such as Bone Folders and extra scoring and cutting blades
- Includes 1 cutting blade and mat and 1 scoring blade, additional mats, cutting and scoring blades sold separately
NOTE: The Stampin’ Trimmer has a very sharp cutting blade; handle with care.


Leave a Reply