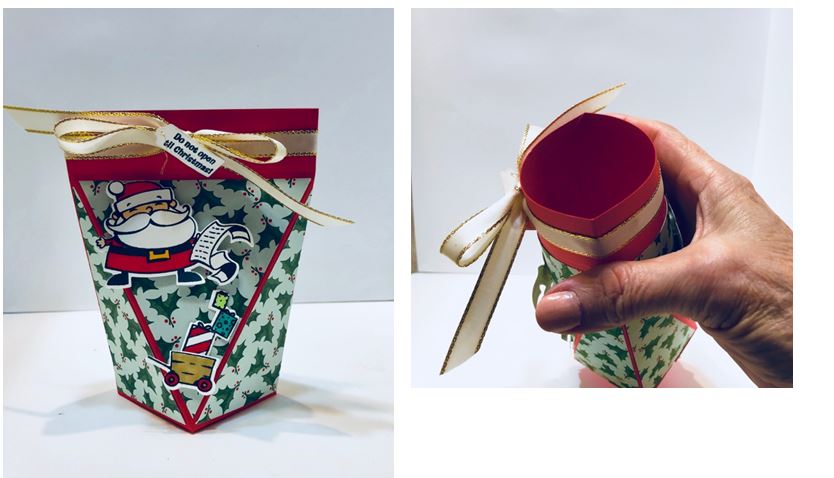
One of my favorite suites in the 2018 Holiday catalog is Santa’s Workshop. I love the Santa’s Workshop Specialty Designer Series Paper that has flocking on several of the designs and the characters in the Signs of Santa Bundle are so cheerful! I also love making little boxes to hold treats and this self closing treat box is easy to make and unique. I have a tutorial for you below. Enjoy making this treat box.
Signs of Santa Self Closing Treat Box
Stamp Set – Signs of Santa
Ink – Tuxedo Black Memento Ink
Stampin’ Blends –
Shaded Spruce Duo
Light Smoky Slate
Dark Petal Pink
Dark Poppy Parade
Dark Mango Melody
Light Soft Suede
Paper with cutting measurements –
Poppy Parade Cardstock 8 ½” x 8”
Santa’s Workshop Specialty Designer Series Paper, holly pattern 3 ¾” x 3 ¾”
Whisper White cardstock 2 ¾ “ x 2 ½”
Accessories –
Big Shot Die-Cutting Machine
Magnetic Platform
Santa’s Signpost Framelits Dies
Stampin’ Trimmer
Gold 3/8” Metallic Edge Ribbon
Gold Metallic Thread
Bone Folder
Tear & Tape
Multipurpose Liquid Glue
Mini Stampin’ Dimensionals
Mini GlueDots
INSTRUCTIONS:
1. Score the large piece of Poppy Parade Cardstock as shown in the diagram.
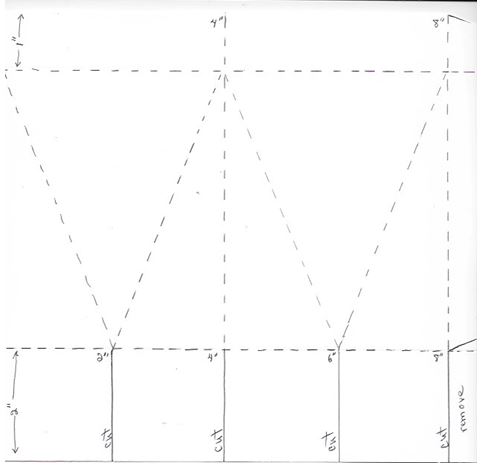
- Cut the bottom flaps up to the score line. Trim the side flap at the bottom as shown.
- Put Tear & Tape on the right side of the side flap and on the wrong side of bottom flaps 1 and 4.
- Fold on all score lines and burnish with bone folder.
- Pinch one edge of the DSP square in half to find the ½ point. Put this point and an opposite corner on the Stampin’ Trimmer and cut. Repeat from that ½ point to the other corner. You now have 3 triangles. Repeat with the other square.
- Use Multipurpose Liquid Glue to adhere these triangles to the right side of the foil sheet. Use small amounts of glue but be sure to get the points glued down.
- Now adhere the side flap to the opposite edge of the box. Close up the bottom. Open the top of the box and use the bone folder to press the inside flaps down.
- Stamp Santa, Mrs. Santa, the wagon, the presents, and the saying “Do not open until Christmas” on the Whisper White cardstock with Memento ink. Color them with the Stampin’ Blends. Cut them out with the corresponding dies.
- Adhere Santa, the wagon and presents with to the front and Mrs. Santa to the back of the box with Stampin’ Dimensionals.
- Put glue dots along the front and back of the top of the box. Wrap 26” of the ribbon around the top and tie in a bow in the front.
- Adhere the tag to the middle of the bow with a glue dot or Stampin’ Dimensional.
Fill the self closing treat box with a favorite treat and give to a special person in your life.

Leave a Reply