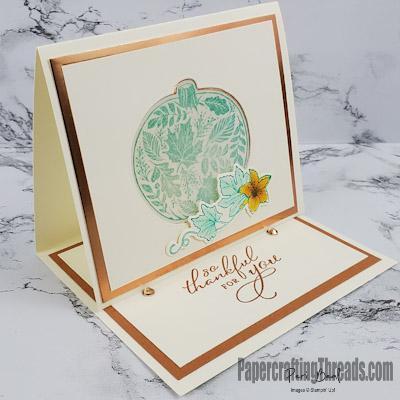
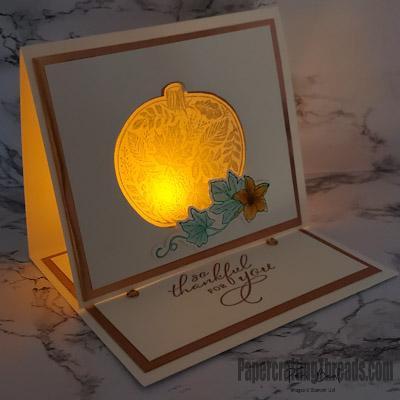
A pop-up Easel Tealight card perfectly fits World Kindness Day. Can you imagine your friend’s delight when this card arrives in their mailbox? My pop-up Easel Tealight Card folds flat and fits in a regular envelope. Then the recipient props up the front and inserts a battery-operated tea light and watches the pumpkin begin to glow.
And can you picture these lit up easels as place settings at a Friendsgiving or Thanksgiving table? There’s still plenty of time to make a batch, so keep on reading for my free tutorial.
Supply List For Tealight Easel Card
Very Vanilla cardstock base: 4 ¼” x 11”, score at 3-5/8” and 7 ¼”
Very Vanilla cardstock panels (2): 3-1/8” x 3 ¾”
Copper Foil panel: 3-3/8” x 4”
Cinnamon Cider cardstock panel: 3-3/8” x 4”
Vellum cardstock: 3” x 3”
Versamark Ink
Bermuda Bay Classic Ink
Clear Embossing Powder
Heat Tool
Pretty Pumpkin Stamp Set
Detailed Pumpkins Die Set
Light Pool Party Stampin’ Blend
Dark Pool Party Stampin’ Blend
Light Calypso Coral Stampin’ Blend
Dark Calypso Coral Stampin’ Blend
Dark Daffodil Delight Stampin’ Blend
Pool Party Classic Marker
Cinnamon Cider Classic Ink
Champagne Rhinestones
Battery operation tealight
Step by Step Instructions
Start by inking the pumpkin stamp in Versamark ink, then in Bermuda Bay Classic Ink and stamping the image on the Vellum cardstock. Emboss image with Clear Embossing Powder.
TIP: Preheat Heat Tool for 20 seconds. Heat embossing powder with heat tool aimed at the reverse side. Do not overheat.
Line up Very Vanilla panel centered on end panel of Very Vanilla cardstock base, and diecut pumpkin shape through both layers.
Line up that same Very Vanilla panel (that has pumpkin shape cut out) on center of Copper Foil panel, place pumpkin die in recessed space and cut out pumpkin shape.
Sandwich the layers as follows: Very Vanilla pumpkin panel, Copper Foil pumpkin panel, Vellum Embossed pumpkin and the Very Vanilla pumpkin card base. Adhere all layers together, avoiding the embossed pumpkin area.
Stamp sentiment on Very Vanilla cardstock layer and adhere to Cinnamon Cider cardstock layer. Adhere this to the bottom third of the card. Add two Champagne Rhinestones to just above and to opposite sides of the sentiment, acting as a stopper for the easel.
Stamp the leaves and blossom image on scrap Very Vanilla cardstock with Bermuda Bay Classic Ink. Color the leaves with Pool Party Blends. And color the blossom with Calypso Coral Blends and the Dark Daffodi Delight Blend. Color the vine with the Pool Party marker. Adhere to base of embossed pumpkin with Glue Dots.
Insert battery-operated tealight.

Leave a Reply