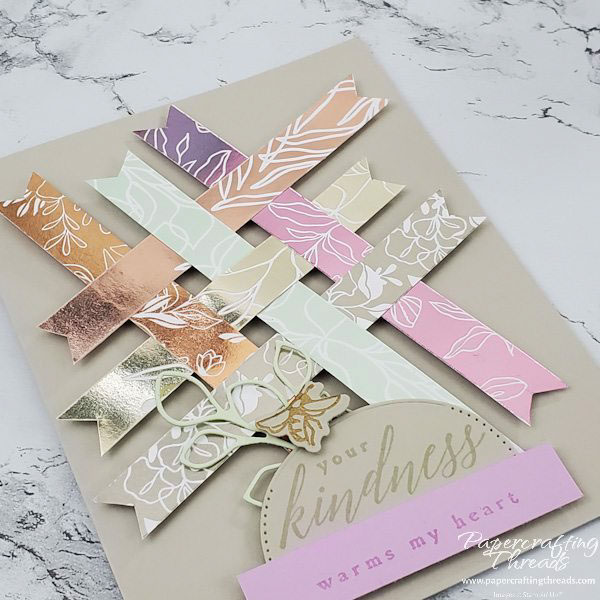
A Woven Background Card is a perfect way to use up those scraps. Or, if you’re a paper hoarder and just can’t bear to cut up those beautiful 12×12 sheets of designer paper, this card employs the ‘sliver’ method. Cut off just a sliver at a time. And before you know it, you’ll be using your paper stash.
Cutting & Scoring
| Paper Dimensions | Score Long Side | |
| 5-1/2″ x 8-1/2″ Sahara Sand cardstock base | 4-1/4″ | |
| Scraps of Sahara Sand cardstock | ||
| 1/2′ x 5″ strips of Splendid Day patterned paper | ||
| Scrap of Fresh Freesia | ||
| Scrap of Soft Sea Foam |
Step by Step Instructions for Woven background card
Stamp the bee image from the Splendid Thoughts stamp set in Versamark Ink on a scrap of Sahara Sand and heat emboss with gold embossing powder. Stamp the sentiment shown in Sahara Sand ink on Sahara Sand cardstock. Diecut the bee and the sentiment. Diecut the botanical from Soft Sea Foam cardstock. Set aside.
Here comes the fun part. I cut 6 half-inch wide strips, all of them different patterns, from the Splendid Day patterned paper. Shorten the strips to about 5″
Weave the strips together loosely, leaving about ¼” between strips and using grid paper as a guide. A drop of multipurpose glue at the strip intersections holds the woven strips together. Cut each strip at a different length.
Then flag each end. I used paper snips to do this by cutting a little way into the middle of each strip and then cutting from each corner to the top of the first cut.
While I initially intended to use the soft color side of the patterned paper, I had a nice surprise when I flipped the weave over and decided I actually liked the foil side better.
Load up the back of the woven piece with dimensionals, especially at the intersections of the strips and use cut up bits of dimensionals on the extended portions.
I adhered my woven piece on the card front on the diagonal for an added bit of interest.
My sentiment was raised up on dimensionals. I then stamped ‘Happy Birthday’ on another 1/2′ strip of Fresh Freesia cardstock, hand trimmed the ends to fit across the bottom of the first sentiment. A glue dot on the front of the botanical holds it in place tucked in behind the sentiment. And lastly, the bee tops off everything.
Check out the YouTube video for a visual reference. A big THANK YOU to my friend and fellow demo, Kadie, who gave me the idea for the weaving.
alternate versions of woven background card
This version has a different sentiment. The sentiment was originally one stamp. I masked off the different parts before inking.
And I couldn’t stop there and came up with this flat version. I diecut two of the half circles and layered them over white glittered organdy ribbon. Which version is your favorite?


Leave a Reply