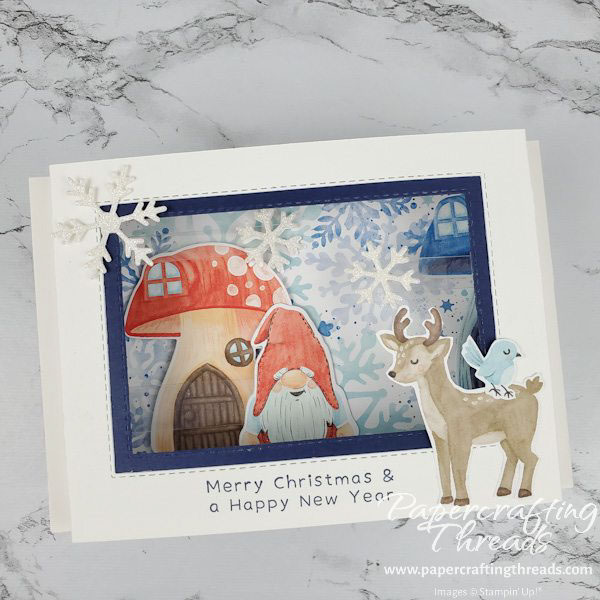
Make a Shadow Box Card for your gnomies! This card does it all…fits in a regular envelope, pops up, and stands on its own. Let’s get started 🙂
Scoring & cutting guide
| Paper Dimensions | Score Long Side | |||
| 4-1/4″ x 7-1/2″ Thick Basic White cardstock (2 pcs) | 1/2″ and 1″ each end | |||
| 4” x 5-1/4” Night of Navy cardstock | ||||
| 4” x 5-1/4” Storybook Gnomes patterned paper | ||||
| Scraps of Storybook Gnomes patterned paper, glimmer paper, Basic White Cardstock | ||||
| Narrow Window Sheet strips |
I started with one of the pieces of Thick Basic White cardstock in landscape position after scoring. Then I inked and stamped my greeting in Night of Navy ink at the center bottom, right between the score lines on either end. This will become the front of the card.
I centered the largest rectangle from the Stitched Rectangle dies and held it in place with Post It Removable Labeling Tape. This tape is leaves no residue and doesn’t tear the cardstock after removal. I die cut it with the Cut & Emboss machine. Next, I centered the next smallest rectangle from the Stitched Rectangles dies on the piece of Night of Navy cardstock 4” x 5-1/4”and cut it out.
Then I accordion-folded the ends of the front piece, burnishing the folds with a bone folder. I applied glue to the front side of the Night of Navy piece and centered the white piece over the top. Next I folded and burnished the score lines on the remaining Thick Basic White card. These folds mirror the front piece. I adhered a piece of snowflake patterned paper 4” x 5-1/4” to the inside of the card back.
Diecut or fussy cut images from the Storybook Gnome patterned paper. Try diecutting a mushroom house that was on the edge of the paper – every image is useable! I also diecut snowflakes from glimmer paper and Basic White card stock with the Frosted Flurry die set.
creating the scene in the shadow box card
Then I assembled my scene with lots of dimension — dimensionals on the back of the full mushroom house and multipurpose glue on the partial house. I set the partial house off on the right side and up a little bit to add depth and distance.
Add a wide strip of window sheet to the back of the diecut gnome with Tear N Tape. Then add multipurpose glue and sandwich the window sheet strip with another die cut gnome from Basic White. Assembl double-sided snowflakes the same way, using narrower strips of window sheet and rolled up glue dots for adhesive.
Figure out where each moveable piece should go, and add a strip of Tear N Tape on the top accordion fold to hold in place. Once all moveable pieces are positioned, add another strip of Tear N Tape over each one. Place multipurpose glue on the bare spots before lining up the edges of the front viewing window over the bottom scene and press to adhere. Trim off the excess window sheet.
Then it’s time to decorate the front window. I added a large snowflake and assorted woodland animals. And don’t forget the back! A critter here will bring a smile along with your written message.
The finished Shadow Box card will fit in an envelope, though I wouldn’t pop this in the mail as is to be fodder for the postal machines. But I would put it in an envelope as part of a gift. Can you imagine the giftee’s reaction at opening a card that pops up like this? Check out the video to see this card in action!

Leave a Reply