Papercrafting Threads

  • Tutorials
    • PDF Tutorials
    • 3D Projects
    • Cardmaking
    • Fun Fold
    • Product Tips & Tricks
    • Projects
    • Techniques
  • Catalogs
  • Shop & Specials
    • Shop My Stampin’ Up! Online Store
    • Special Offers
    • Buy Me A Coffee
    • My Favorite Things on Amazon
    • Gift Certificates
  • Contact Me
  • Join the Fun
    • Join the Fun
    • Special Join Offers
  • Calendar of Events
  • Paper Pumpkin
    • Paper Pumpkin Kits
    • Paper Pumpkin Stamp Case Inserts
  • Nav Social Menu

    • Email
    • Facebook
    • Instagram
    • Pinterest
    • YouTube

Flower Crown – Paper Florist Part 3

July 22, 2023 Leave a Comment

22 Jul
Flower crown made with watercolor paper flowers wired onto a eucalyptus leaf base

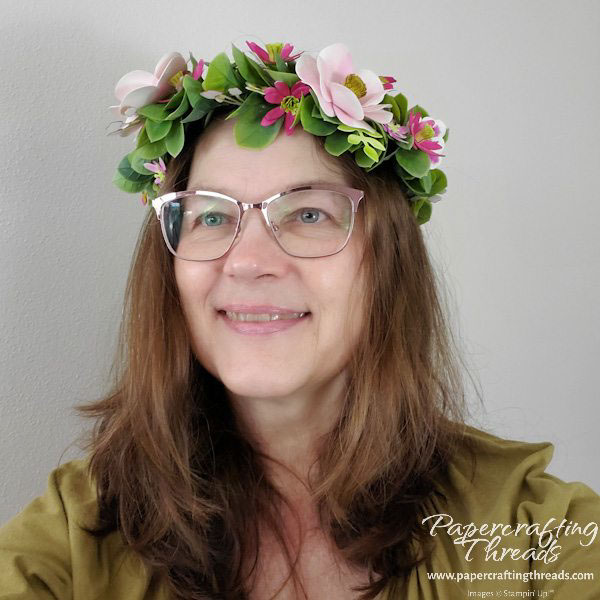
Feel like a princess with a Flower Crown made from watercolored paper flowers! In this Part 3 I show you how to attach wire stems to watercolor paper flowers. Then the flowers are attached to a purchased eucalyptus base culminating in this sweet crown. Let’s get started.

supply list

  • Assorted watercolor paper flowers (see Part 2 here if you missed it)
  • Scrap Lemon Lime Twist cardstock
  • 3/8″, 1/2″ and 1″ circle punches
  • Take Your Pick Tool with paper piercer tip
  • 22 gauge green flexible paddle wire
  • Needle nose pliers
  • Wire snips or old scissors
  • Hot glue gun and glue sticks
  • Ready made eucalyptus base

step by step instructions for flower crown

Begin by punching out various sized circles from the Lemon Lime Twist cardstock to match the sizes of the flowers. Then poke a hole in all of the circle centers with the paper piercer tip on the Take Your Pick Tool.

Assorted circles with hole being punched with paper piercer

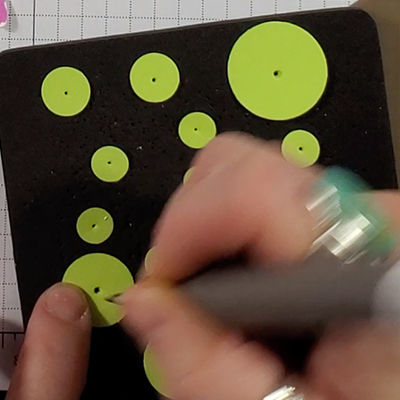
Cut approximately 4-inch lengths of the paddle wire with the wire snips. Hold one of the pieces of wire vertically and with the needle nose pliers, bend a small loop on the top end. Then bend the loop to 90 degrees, creating a ‘hook’.

Floral wire with loop on end
Floral wire with loop bent at 90 degrees into a hook

Slide one of the circles up the length of the wire and snug it firmly under the wire hook. Add a dollop of hot glue on top to secure the hook to the circle. And quickly add the flower on top, pressing gently until the glue sets.

Floral wire hook threaded onto circle
Hot glue on sepal with flower head about to be attached
Bottom of paper flower being wired onto stem

Once all of the wire stems are on the watercolor flowers, set the eucalyptus base in front of you. Take one of the largest flowers and nestle it amongst the leaves. Then wrap the wire tightly 2-3 times around the base, pushing the leaves aside. I positioned the two largest flowers off towards each side as I didn’t want them smack in the middle.

Then add in the next largest sized flowers and continue adding flowers, grouping some of them together and scattering some out along the sides. Once all the wired flowers are attached, cut off any excess wire.

I added the filler flowers (the ones that look like a cluster of three mini tulips) by putting a little hot glue directly on the paper stem and attaching them to either eucalyptus leaves or the underneath side of the wired flowers.

Up close view of Flower Crown with eucalyptus leaf base and watercolored paper flowers and leaves

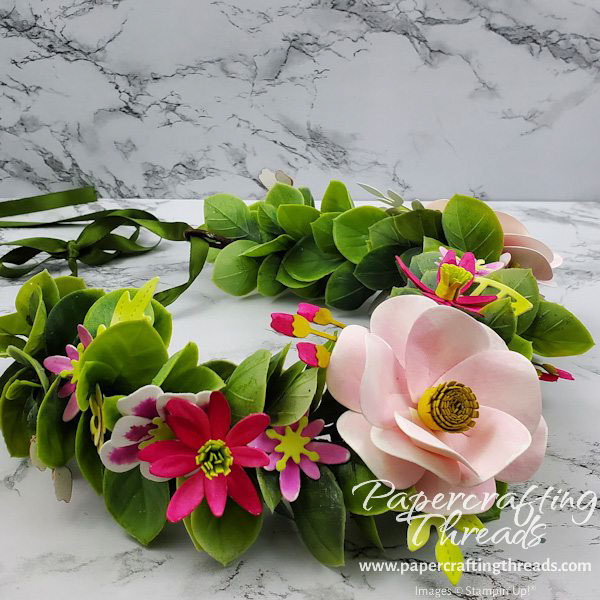
I also attached watercolored Lemon Lime Twist diecut leaves in the same manner as the filler flowers. The contrasting color of the leaves adds a nice variation to the greenery.

Woman wearing Paper Flower Crown in shades of pinks and greens

Comment who you’d make a flower crown for!!

Share:

Leave a Comment
see more related posts: 3D Projects· Projects

Previous Post: « Watercolor Paper Florist Part 2
Next Post: Three Ways to Add Color »

Reader Interactions

Leave a Reply Cancel reply

Your email address will not be published. Required fields are marked *

Primary Sidebar

Peri Beal

Cheesehead. Avid reader. Antique hunter.

Shop Online

Shop with me and get a FREE PDF tutorial bundle delivered to your inbox AND a handmade card via snail mail

Search

Papercrafting Threads

Gift Certificates
  • Email
  • Facebook
  • Instagram
  • Pinterest
  • YouTube

Sign up for my Newsletter

Sign up for my newsletter and get a free PDF tutorial as my welcome thank you!

Almost there...

Please check your email to confirm your subscription

Retired Product
Privacy Policy

The Fine Print

Just so you know... This is a personal website and I am responsible for its content. Stampin' Up!® does not endorse the use of or contents of the classes, services, or non-Stampin' Up! products I offer.

Sign up for my Newsletter

Sign up for my newsletter and get a free PDF tutorial as my welcome thank you!

Almost there...

Please check your email to confirm your subscription

Footer

  • Calendar of Events
  • 3D Projects
  • Cardmaking
  • Fun Fold
  • Product Tips & Tricks
  • Projects
  • Techniques
  • Of Interest
  • Catalogs
  • Join the Fun
  • Contact Me
  • Email
  • Facebook
  • Instagram
  • Pinterest
  • YouTube

PAPERCRAFTING THREADS

Copyright © 2025 · Refined theme customized by Catherine Carroll

Privacy Policy · Affiliate Disclosure