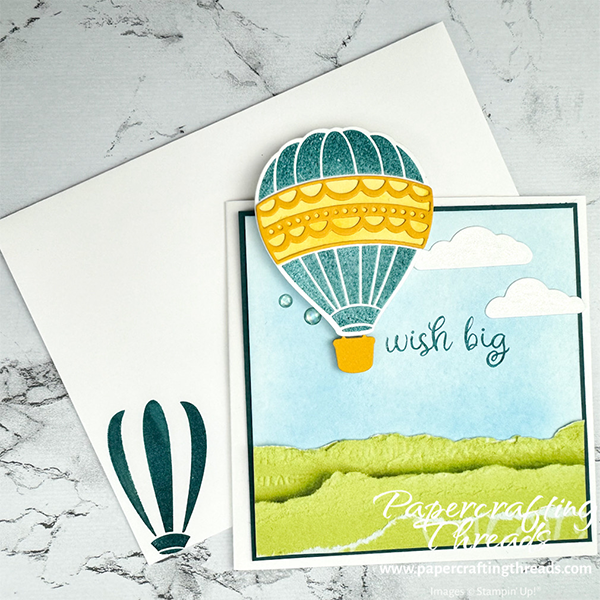
Create a Square Card with an Edge that fits in a standard card envelope! Designer Series Paper creates the textured grass in the foreground. The hot air balloon floats over the top edge of this spring-y card and reminds us to wish big. Let’s get started!
cutting & scoring guide
| Paper Dimensions | Score Long Side | |||||
| 8-1/2″ x 11″ Basic White cardstock base | 4-1/4″ | |||||
| 4″ x 4″ Pretty Peacock cardstock for mat | ||||||
| 3-7/8″ x 3-7/8″ Basic White cardstock plus scraps | ||||||
| 1-1/2″ x 3-7/8″ Masterfully Made DSP | ||||||
| Scrap of Crushed Curry cardstock |
instructions for the square card with an edge
Ink the large hot air balloon image from the Hot Air Balloon stamp set in Versamark Ink, then in Pretty Peacock and stamp on a scrap of Basic White cardstock. Sprinkle with clear embossing powder and heat set. Diecut the outline of the balloon with the Hot Air Balloon Dies.
Use a Blending Brush to add Crushed Curry ink to another scrap of Basic White cardstock. Diecut the solid center of the balloon.
Diecut the ornate center of the ballon from Crushed Curry cardstock and two clouds from Basic White cardstock. Tear one long edge of the Masterfully Made DSP. TIP: Pull the paper backwards so there is no white edge showing.
Apply Azure Afternoon ink to Basic White square measuring 3-7/8″ x 3-7/8″ with a Blending Brush, covering the top three quarters. Adhere the torn edge DSP to the bottom, representing grass.
Layer the piece onto the square piece of Pretty Peacock cardstock. Fold Basic White card base in half and burnish with bone folder. Then adhere onto the card front.
Assemble the hot air balloon by adding the solid blended Crushed Curry band to the front of the balloon with the diecut ornate band on top. Adhere the basket. Apply Dimensionals to the back of the balloon towards the bottom.
Position the balloon to rise over the top edge, being careful that the full length of the card is less than 5-1/2″. Stamp the sentiment with Pretty Peacock ink in the sky. Add Wink of Stella to the two clouds and adhere to the front of the card. Tuck two Glossy Dots near the balloon.
Ink the narrow balloon image with Pretty Peacock ink, stamp off once, and stamp inside the card. Ink and stamp another balloon on the front corner of an envelope.
Want to make cards exactly like this one? Get the supplies here in my online store today. Or use what you have in your stash – I’d love to see what you make!

Leave a Reply