Papercrafting Threads

  • Tutorials
    • PDF Tutorials
    • 3D Projects
    • Cardmaking
    • Fun Fold
    • Product Tips & Tricks
    • Projects
    • Techniques
  • Catalogs
  • Shop & Specials
    • Shop My Stampin’ Up! Online Store
    • Special Offers
    • Buy Me A Coffee
    • My Favorite Things on Amazon
    • Gift Certificates
  • Contact Me
  • Join the Fun
    • Join the Fun
    • Special Join Offers
  • Calendar of Events
  • Paper Pumpkin
    • Paper Pumpkin Kits
    • Paper Pumpkin Stamp Case Inserts
  • Nav Social Menu

    • Email
    • Facebook
    • Instagram
    • Pinterest
    • YouTube

Panoramic Panel Card Tutorial

March 22, 2024 Leave a Comment

22 Mar
Panoramic Panel Card in white and berry burst with daisy field cut into panels with space in between.

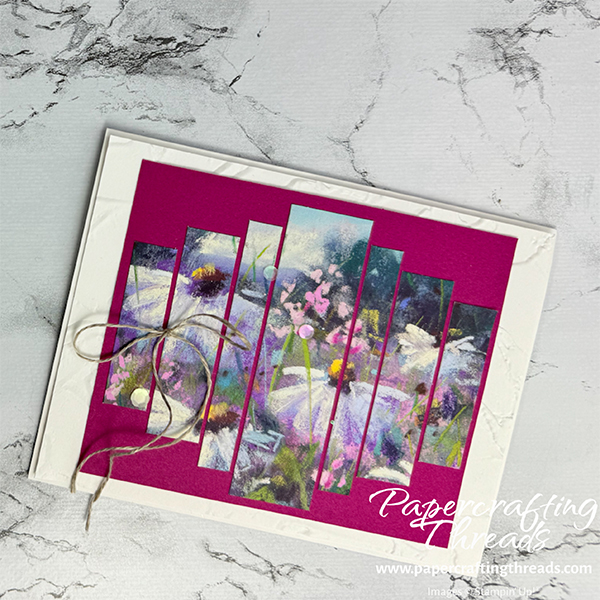
Take a gorgeous scenic panel and stretch it out into a Panoramic Panel Card with this March 2024 Paper Pumpkin Kit Alternative. It’s slicing and dicing and reassembling all made easy. Don’t have the kit? Not to worry! Use any piece of patterned paper with a scene. This tutorial easily adapts.

cutting & scoring guide

Paper DimensionsScore Long Side
8-1/2″ x 11″ Basic White cardstock base4-1/4″
4-1/8″ x 5-3/8″ Basic White cardstock for embossing
3-3/4″ x 4-1/2″ Berry Burst cardstock for mat
3-1/2″ x 4″ scenic patterned paper
Cutting & Scoring Guide for a Panoramic Panel Card

step by step instructions for panoramic panel card

Choose the scene for the card’s focal point, keeping in mind that the corners of the scene will be omitted. I used the front panel of the landscape oriented card base from the Paper Pumpkin Kit. Cut the panel to 3-1/2″ x 4″. Slice the panel into strips as shown in the template below. I cut both 1/2″ pieces, then the 5/8″, etc., and lined them up off to the side as I went.

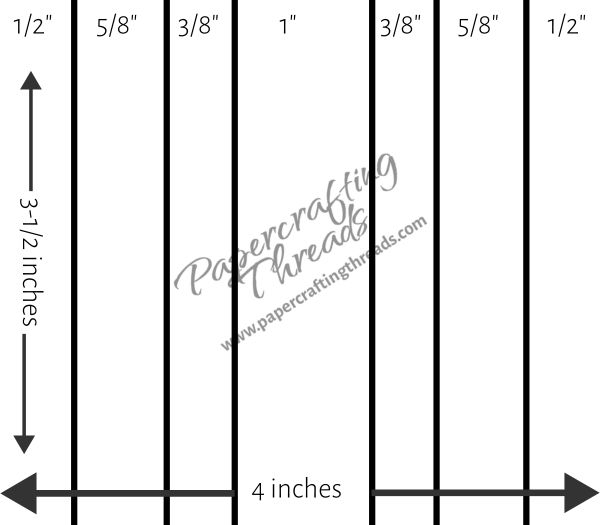
Once all of the strips are cut and lined up to recreate the original scene, cut BOTH ends of each strip as shown in the table below. Because the final design is graduated, the same amount is cut from BOTH ends of each strip is to keep the scene lined up.

Strip WidthCut from BOTH ends
1/2″3/4″
5/8″1/2″
3/8″1/4″
1″none
Amount to cut from BOTH ends

Reassemble the scene on the piece of Berry Burst cardstock. Use liquid glue to adhere in place, leaving approximately 1/16″ space between panels and even space between the top and bottom edges of each strip.

Emboss the Basic White cardstock piece with the Painted Textures 3D embossing folder. Adhere the Berry Burst panel to the embossed panel. Adhere to the front of the Basic White card base.

Add a linen thread bow and scatter multifaceted sequins as shown in the original picture. I also adhered a strip of the leftover paper from the scene inside the card.

Check out my YouTube channel below for a short video tutorial. Be sure to like, subscribe and share!

Share:

Leave a Comment
see more related posts: Cardmaking· Paper Pumpkin Alternative

Previous Post: « Square Card with an Edge Tutorial
Next Post: Twisted Ribbon Card Technique »

Reader Interactions

Leave a Reply Cancel reply

Your email address will not be published. Required fields are marked *

Primary Sidebar

Peri Beal

Cheesehead. Avid reader. Antique hunter.

Shop Online

Shop with me and get a FREE PDF tutorial bundle delivered to your inbox AND a handmade card via snail mail

Search

Papercrafting Threads

Gift Certificates
  • Email
  • Facebook
  • Instagram
  • Pinterest
  • YouTube

Sign up for my Newsletter

Sign up for my newsletter and get a free PDF tutorial as my welcome thank you!

Almost there...

Please check your email to confirm your subscription

Retired Product
Privacy Policy

The Fine Print

Just so you know... This is a personal website and I am responsible for its content. Stampin' Up!® does not endorse the use of or contents of the classes, services, or non-Stampin' Up! products I offer.

Sign up for my Newsletter

Sign up for my newsletter and get a free PDF tutorial as my welcome thank you!

Almost there...

Please check your email to confirm your subscription

Footer

  • Calendar of Events
  • 3D Projects
  • Cardmaking
  • Fun Fold
  • Product Tips & Tricks
  • Projects
  • Techniques
  • Of Interest
  • Catalogs
  • Join the Fun
  • Contact Me
  • Email
  • Facebook
  • Instagram
  • Pinterest
  • YouTube

PAPERCRAFTING THREADS

Copyright © 2025 · Refined theme customized by Catherine Carroll

Privacy Policy · Affiliate Disclosure