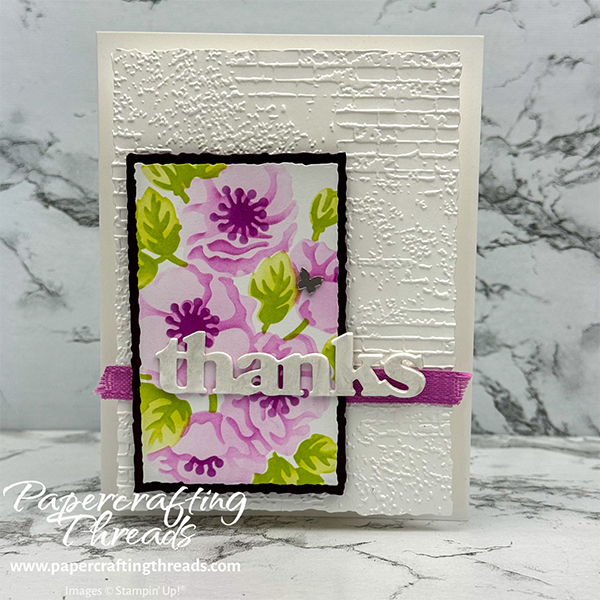
This Floating Front Panel Card looks like a painting hung in a gallery. A simple piece of cardstock pops the front panel up and off the card base. Plus learn how to create the gorgeous flowers with the Enduring Beauty Decorative Masks (stencils). Create a custom size diecut. Make your own chipboard Lettering. Add Shimmer with Enamel Effects and change embellishment from brass to silver. We’ve got lots to cover so let’s get started!
cutting & scoring guide
| Paper Dimensions | Score Short Side | Score Long Side | ||||
| 5-1/2″ x 8-1/2″ Basic White card base | 4-1/4″ | |||||
| 4″ x 5-1/2″ Basic White panel for mechanism | 1/2″, 1″ * 1-1/2″ (on BOTH ends) | |||||
| 4-1/4″ x 5-1/2″ Basic White for embossing & die cutting | ||||||
| 2-1/2″ x 4″ Basic White for stenciling & diecutting | ||||||
| Scrap of Basic White for diecutting lettering | ||||||
| 2-3/4″ X 4″ Blackberry Bliss for mat |
step by step instructions For floating front panel
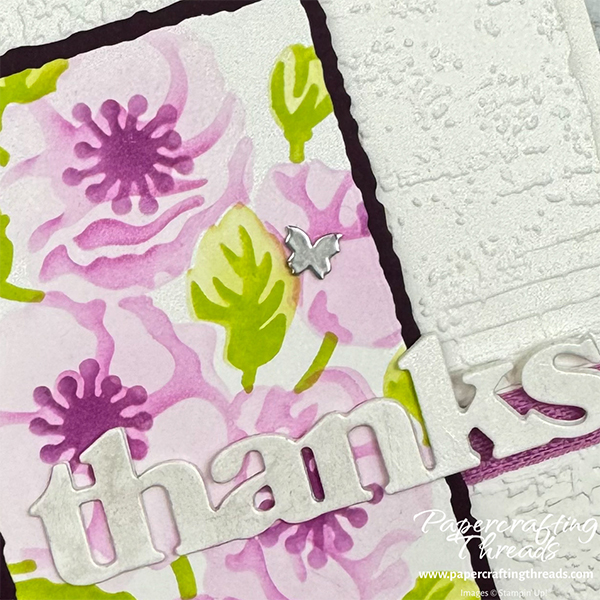
Begin by temporarily adhering the mask labelled #1 from the Enduring Beauty Decorative Masks to the work surface. Use a pencil to trace around the notched corner as a future guide. Using a Blending Brush, load up with Petunia Pop ink and lightly fill in the floral shape. Remove mask. Place mask #3 in position using the traced notch as a guide. Load up the Blending Brush with Petunia Pop ink and apply with a heavier hand. Remove mask. Place mask #5 in position using the traced notch as a guide. Load up the Blending Brush with Blackberry Bliss ink and apply a dark layer.
Remove mask. Place mask #2 in position using the traced notch as a guide. Load up the Blending Brush with Lemon Lime Twist ink and fill in the leaf bodies with a light layer. Remove mask. Place mask #4 in position using the traced notch as a guide. Load up the Blending Brush with Lemon Lime Twist ink and apply with a heavier hand.
Remove the last mask and be prepared to gasp. The images are breathtaking!
custom size diecut hack
Using the Deckled Rectangles dies, and counting the smallest die as #1, take out rectangles 4, 5 and 8. Diecut a rectangle shape filled with the flower image using #4. Diecut a rectangle from the Blackberry Bliss cardstock with #5. Position the floral image over the Blackberry Bliss with a scant margin on the top and left. Then reposition die #5 and cut again so the narrow margin frames the floral image.
And diecut the second largest piece of Basic White with #8. Run this large piece through the Cut and Emboss Machine with the Exposed Brick 3D embossing folder.
make your own chipboard lettering
Diecut the word ‘Thanks’ from the Thanks & Beyond Paper Pumpkin Add-On Dies three times from a scrap of Basic White cardstock. Adhere all three together with Multipurpose Liquid Glue.
add shimmer with enamel effects
Use a damp Water Painter (or paintbrush) to add silver Metallic Enamel Effects evenly over the surface of the word.
change embellishment from brass to silver
Pick up one of the Brushed Brass Butterflies with a reverse tweezers. Press the top into a Versamark ink pad. Sprinkle silver Embossing Powder on top and heat set. Let cool.
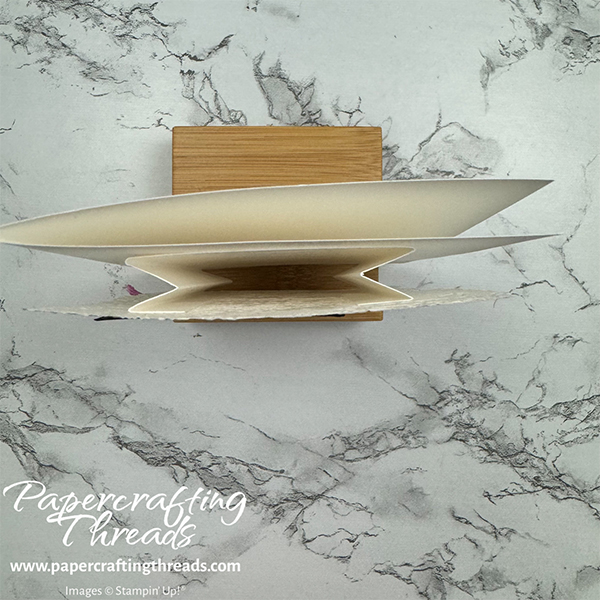
Floating Front Panel Card Mechanism
After scoring the 4″ x 5-1/2″ Basic White panel at 1/2″, 1″ * 1-1/2″ on BOTH ends, accordion-fold the pleats. Add liquid glue to the top strip of each pleat and adhere to the back of the embossed brick panel. Then spread liquid glue on the large platform and adhere to the folded card front. The pleats act as ‘springs’ to lift up the panel!
Cut a piece of the Petunia Pop ribbon, fray the ends and adhere with Tear ‘N Tape towards the lower third of the card front. Adhere the floral image to the Blackberry Bliss mat, then pop up on Dimensionals and adhere over the ribbon. Add pieces of Dimensional to the back of the ‘k’ and the ‘s’ of the THANKS and glue to the back of the other letters. Adhere over floral image. Place silver butterfly over one of the floral images.
I love the added dimension, the card folds down for mailing and it’s a wow for the recipient when they open the envelope. And no special supplies needed for the mechanism. The Floating Front Panel is a fabulous technique to add to any basic card layout.
Go check out the video I posted over on my YouTube channel if you need a visual with any of the steps.

Leave a Reply