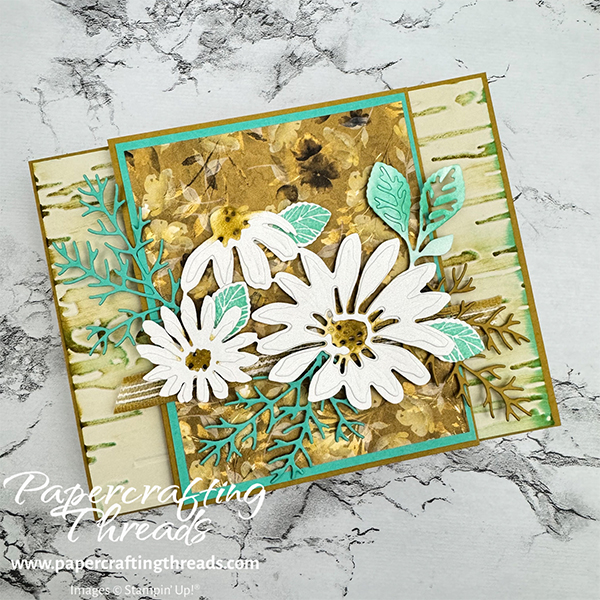
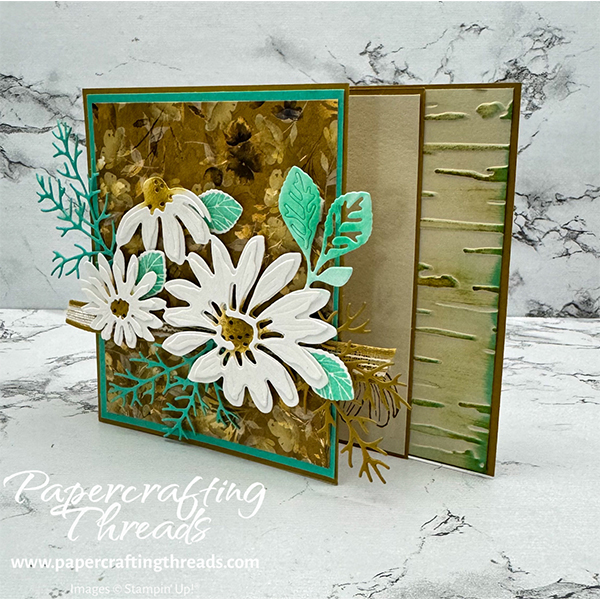
Create a Z Hinge Fun Fold Card perfect for fall with a woodsy feel! Birch bark, daisies along a pop of color and textured ribbon add flair. The card folds flat for mailing and then pops up for display. Let’s get started.
| Paper Dimensions | Score Short Side | Score Long Side | ||||
| 4¼” x 5½” Wild Wheat cardstock base plus scrap for die cutting | ||||||
| 4¼” x 6″ Wild Wheat cardstock hinge mechanism | 1¼” and 2½” | |||||
| 4⅛” x 5⅜” Basic Beige cardstock for embossing | ||||||
| 3½” x 4¼” Wild Wheat cardstock for platform | ||||||
| 3⅜”x 4⅛” Summer Splash cardstock for mat plus scraps for die cutting | ||||||
| 3¼” x 4″ Regal Winter wheat patterned DSP | ||||||
| 3⅜”x 4⅛” Basic Beige cardstock for liner | ||||||
| Scraps of Basic White for die cutting |
step by step instructions
Diecut the large daisies (three connected flowers plus leaves) and one each of the detailed layers for the daisies from the Cheerful Daisies die set from scraps of Basic White cardstock. Diecut one of the feathery foliage dies from a scrap of Wild Wheat and cut two from Summer Splash cardstock. Stamp three of the small veined leaves from the Cheerful Daisies stamp set with Summer Splash ink on Basic White cardstock and diecut.
Sponge Wild Wheat ink on the centers of the three daisies and adhere the matching detail layer to each with dots of liquid glue. Use a Blending Brush to add Summer Splash ink to the attached pair of leaves. Stamp the half daisy, center and stem on the lower right corner of the Basic Beige liner piece.
Run the large piece of Basic Beige through the Birch Wood 3D Embossing Folder so the birch bark runs in landscape position. Use the direct-to-paper technique to swipe Wild Wheat ink across the front of the embossed cardstock. Swipe Summer Splash across the embossed cardstock. Set all aside.
z hinge fun fold card mechanism & assembly
Valley fold the 2½” score line on the prepped Wild Wheat cardstock mechanism. Mountain fold the remaining score line, forming a ‘Z’ shaped fold with a tail.
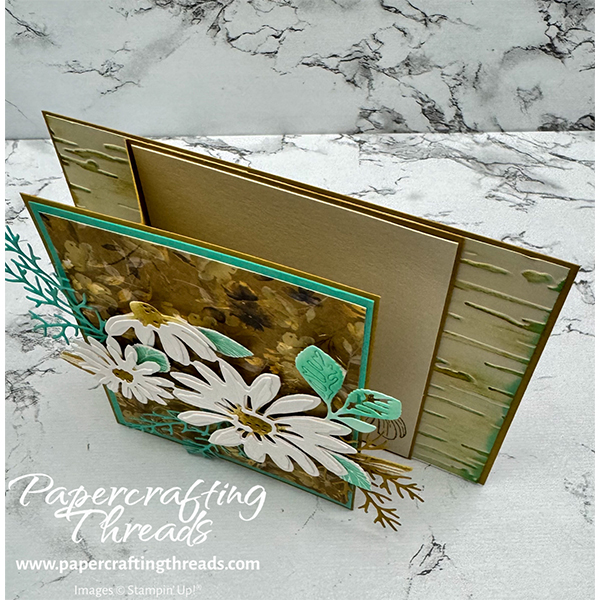
Adhere the embossed and inked Basic Beige cardstock to the front with Liquid Glue. Center the Z hinge mechanism on the front of the card and adhere with Liquid Glue.
Adhere the DSP, Summer Splash mat and Wild Wheat platform in layers with even borders. With the flap closed, add Liquid Glue to the top of the flap and press to adhere the matted layers.
Adhere a length of Wild Wheat ⅜” Rustic Striped Ribbon to the lower third of the layers, trim so the ends extend just a bit beyond.
Use dimensionals to adhere the daisies to the front panel. Adhere the foliage with glue dots in a pleasing manner.
Glue the Basic Beige liner to the inner layer of the card.
Full supply list can be found here. And I made a video showing the exact step by step instructions to make your own.

Leave a Reply