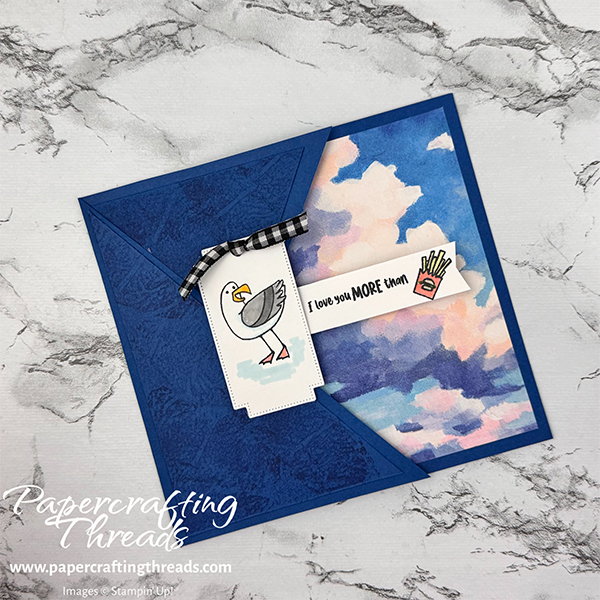
The Swing Arm Card combines the charming Friendly Seagulls stamp set with an interactive swing arm mechanism that will make your recipients smile! There’s something magical about cards that move, and this design delivers the greeting in style. Whether you’re new to interactive cards or a seasoned paper crafter, you’ll love how this simple mechanism adds an extra special touch to your projects. The best part? Once you master this technique, you can use it with countless other stamp sets to create your own moving masterpieces! Let’s get started!
cutting & scoring guide
| Paper Dimensions | Score Short Side | Score Long Side | ||||
| 5½” x 10″ Blueberry Bushel cardstock base | 4″, 5″ & 6″ | |||||
| ¾” x 3¼” Blueberry Bushel cardstock ‘arm’ mechanism | ½”, 1¼” & 2½” | |||||
| 3⅝” x 5⅛” Blueberry Bushel cardstock for textured layer | ||||||
| 3⅝” x 5⅛” Everyday Skies patterned paper | ||||||
| 3¾” x 5¼”Basic White cardstock for back liner | ||||||
| ¾” x 3″ Basic White cardstock for greeting | ||||||
| Basic White scrap for die cutting frame | ||||||
| ¼” x 3″ Window Sheet strip for greeting support |
step by step instructions
Fold the middle score line on the Blueberry Bushel card base as a mountain fold. Fold the outer two score lines as valley folds. Position the base with the folds on the left, open the card and adhere the Everyday Skies patterned paper to the inside right of the card.
I used the extra cute Friendly Seagulls stamp set for my card – full supply list here. Get the Friendly Seagulls stamp set FREE with any $60 purchase during Sale-A-Bration! Stamp the seagull holding the french fries in its beak in Tuxedo Black Memento ink on the lower right corner of the Basic White liner cardstock. Ink and stamp the squawking seagull on the scrap of Basic White and diecut with the frame from Greetiings of the Season dies. Stamp the greeting on the strip of Basic White and stamp the fry box next to it.
I colored the fry box and seagulls with Stampin’ Blends alcohol ink markers. Colors I used:
Buns: Light Crumb Cake Blend
Lettuce: Dark Granny Apple Green
Fries: Light Lemon Lolly
Fry Box: Light Calypso Coral
Seagull Feet: Light Calypso Coral
Beaks: Dark Daffodil Delight
Wings: Light & Dark Smoky Slate
Body Highlight: Light Balmy Blue
Grounding: Light Balmy Blue
Returning to the card base, cut the front of the card diagonally from the top left corner to the lower right corner. Flip the cut piece so the right angle of the triangle is on the top left. (This will eventually form the rest of the card front.)
Cut the 3⅝” x 5⅛” Blueberry Bushel piece diagonally from corner to corner. Turn the top triangle so it will fit as a layer on the previously cut top of the card base.
Make a reusable smoosh bag by stuffing a wadded up piece of paper towel in a small baggie and sealing it. Pounce the baggie on a pad of Blueberry Bushel ink. Then pounce the inked up bag on the surface of the two Blueberry Bushel triangles, creating texture. Wipe baggie clean to use on future projects. Next, adhere one textured triangle to the lower right triangle of the card base. Adhere the second to the cut off right triangle with the right angles in the upper left corner.
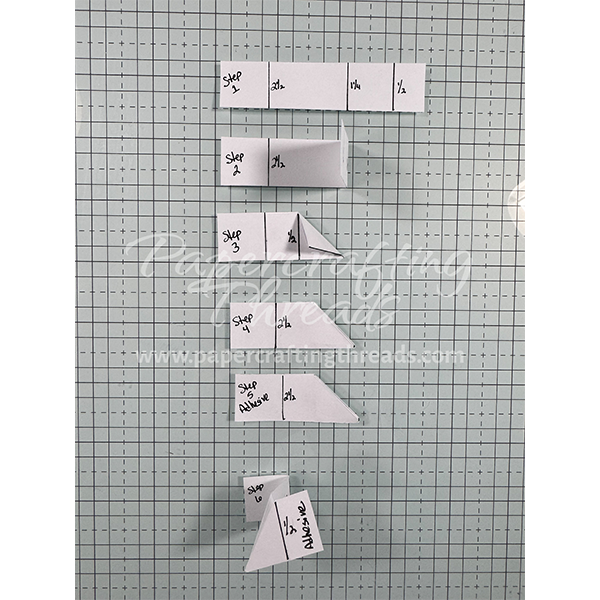
Mechanism for the swing arm card
Position the Blueberry Bushel strip as shown in Step 1 below. Fold the right section from the 1¼” scoreline over to the left until it touches the 2½” score line. Then fold the top right corner of the square-ish right side down to the ½” scoreline. Fold back and forth to loosen up the fold. Then open the strip and fold the right side back, forming a point as shown in Step 4. (This looks a bit like a paper airplane now.)
With the card base open and the mechanism strip folded as seen in Step 5, add adhesive as shown. Place the mechanism in the center back panel of the card base with the left edge butted up to the first fold and close the card, pressing from the outside to adhere. Open the base, add adhesive where shown in Step 6 and close the card to adhere. The mechanism should now open and then close when the front flap is open and closed.
Add two glue dots to one end of the window sheet strip and adhere in the second upside down right triangle of the mechanism with the extra length of the window sheet strip pointing towards the right. Then close the card. If the window sheet strip extends beyond the top edge of the card base, trim it.
decorATING THE SWING ARM CARD
Adhere the large panel with the seagull in the lower left corner to the back of the card base. Flag the end of the greeting strip. Add a line of glue dots on the extended window sheet arm. Line up the greeting and adhere, making sure the greeting strip does not extend past the edges of the card when closed.
Take the remaining Blueberry Bushel right triangle with the textured panel and adhere on the inside of the card to the one-inch wide half of the center. Then add more adhesive to the left edge of the textured panel (but not going all the way to the top) and press to adhere the front triangle.
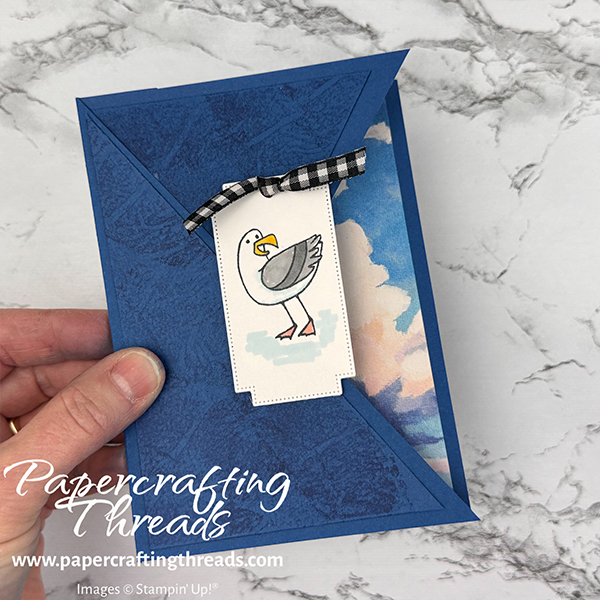
Finally, place dimensionals along the intersection of the front two triangles and adhere the die cut seagull. Cut a length of black and white gingham, tie in a knot and adhere with a glue dot to the die cut.
Need a visual? Check out my video on my YouTube channel.
If you found this tutorial helpful, consider a contribution to my coffee fund ☕️ Coffee → Creativity → Content → More Coffee (help fuel the cycle!)

Leave a Reply