Papercrafting Threads

  • Tutorials
    • PDF Tutorials
    • 3D Projects
    • Cardmaking
    • Fun Fold
    • Product Tips & Tricks
    • Projects
    • Techniques
  • Catalogs
  • Shop & Specials
    • Shop My Stampin’ Up! Online Store
    • Special Offers
    • Buy Me A Coffee
    • My Favorite Things on Amazon
    • Gift Certificates
  • Contact Me
  • Join the Fun
    • Join the Fun
    • Special Join Offers
  • Calendar of Events
  • Paper Pumpkin
    • Paper Pumpkin Kits
    • Paper Pumpkin Stamp Case Inserts
  • Nav Social Menu

    • Email
    • Facebook
    • Instagram
    • Pinterest
    • YouTube

Corner Pop Out Fun Fold

February 10, 2025 Leave a Comment

10 Feb
Corner Pop Out Fun Fold with white card base, strips of red diagonal stripes on edges and three hearts. A gold filigree heart, a red watercolored heart and a flirty flamingo speckled heart burst forth from the center top fold.

Create a Corner Pop Out Fun Fold perfect for surprising and delighting your special someone! I’m so excited to share this fun fold technique with you because it’s one of those designs that makes people say “wow” when they open their card.

The best part about this design is how the corner element adds such an unexpected twist to what looks like a regular card from the outside. It’s like hiding a little bit of crafting magic inside each creation. Let’s get started!

cutting & scoring guide

Paper DimensionsScore Short SideScore Long Side
5½” x 8½” Paper Pumpkin cardstock base4¼”
5¼” x 8″ Basic White cardstock for pop out liner4″
2½” x 3¼” Scrap of any color cardstock for corner template
Cutting & Scoring Guide for Corner Pop Out Fun Fold Card

step by step instructions

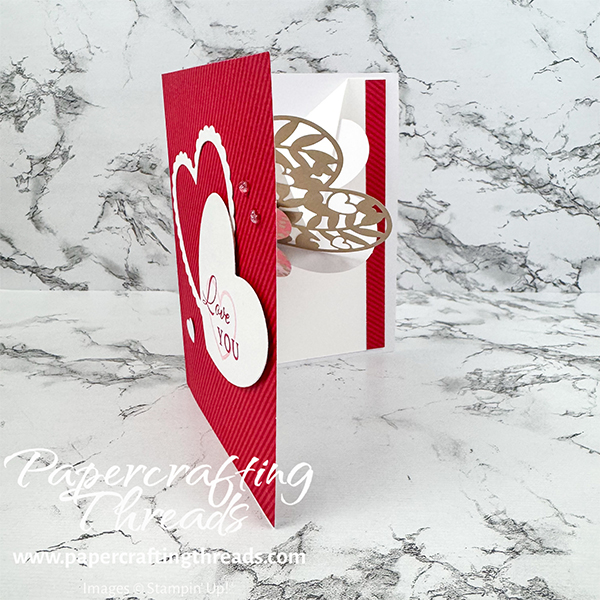
Cut the corner template in half diagonally. With the Basic White cardstock liner folded like a regular card in front of you, align the template on the top left corner of the liner with the longer side of the triangle along the top edge of the card. Score along the hypotenuse. Flip the liner over to the back, align the template again and score. The front and back of the card base should now have matching diagonal score lines. Fold on the diagonals to create the pop out mechanism.

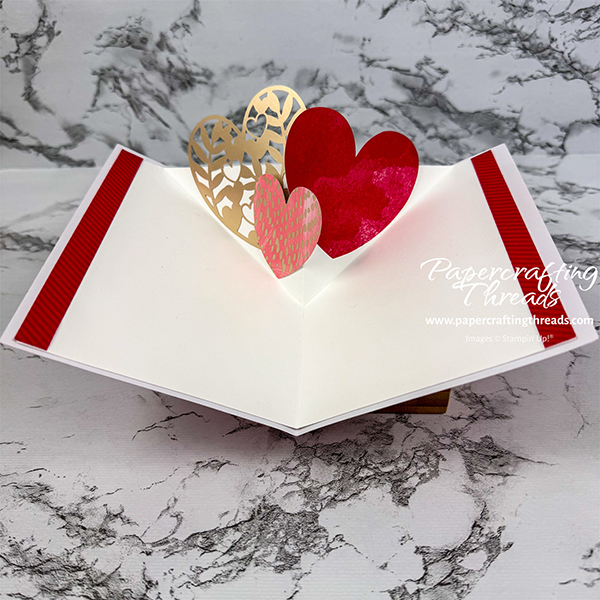
I used the card base from the January 2025 Hearts for You Paper Pumpkin Kit for my card. Add liquid glue to the back of the liner and adhere inside the card base. Use glue on the front of the liner and close the front flap of the card base to adhere.

Add hearts to the two triangular pop out sections at the top. Hearts should be adhered to one or the other triangle, not both, for the mechanism to work. Adhere strips of leftover pieces of cut up envelopes to the edges of the liner.

Corner Pop Out Fun Fold card partially opened. Card front is red diagonal stripes with large white hearts. Pop out mechanism shows hearts popping up from the center of the card with red stripe on the edge.

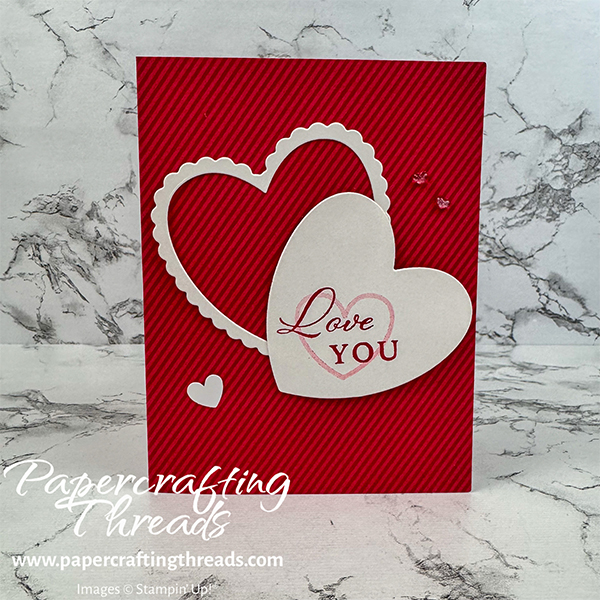
Decorate the front with Basic White die cut hearts using the Spring is in the Air Add-On dies. Add a small negative heart from one of the card front elements. Add two of the sparkle heart gems.

Valentine Card front featuring red diagonal stripes, a scalloped heart outline, a large white heart with 'Love You' stamped in red, a tiny white heart and two pink sparkle heart gems.

Want to see how it comes together? Pop over to my YouTube channel where I demonstrate each step of this lovely Valentine’s design in a Short.

Want more fun card-making inspiration like this? Paper Pumpkin’s monthly craft kits are packed with exclusive projects and supplies to spark your creativity. Try it out – with a satisfaction guarantee and the flexibility to cancel anytime, there’s nothing to lose and so much crafting fun to gain!

If you found this tutorial helpful, consider a contribution to my coffee fund ☕️ Coffee → Creativity → Content → More Coffee (help fuel the cycle!)

Share:

Leave a Comment
see more related posts: Cardmaking· Fun Fold· Paper Pumpkin Alternative· Product Tips & Tricks

Previous Post: « Use Die Cut Negatives as Stencils
Next Post: Fold Back Fun Fold Card »

Reader Interactions

Leave a Reply Cancel reply

Your email address will not be published. Required fields are marked *

Primary Sidebar

Peri Beal

Cheesehead. Avid reader. Antique hunter.

Shop Online

Shop with me and get a FREE PDF tutorial bundle delivered to your inbox AND a handmade card via snail mail

Search

Papercrafting Threads

Gift Certificates
  • Email
  • Facebook
  • Instagram
  • Pinterest
  • YouTube

Sign up for my Newsletter

Sign up for my newsletter and get a free PDF tutorial as my welcome thank you!

Almost there...

Please check your email to confirm your subscription

Retired Product
Privacy Policy

The Fine Print

Just so you know... This is a personal website and I am responsible for its content. Stampin' Up!® does not endorse the use of or contents of the classes, services, or non-Stampin' Up! products I offer.

Sign up for my Newsletter

Sign up for my newsletter and get a free PDF tutorial as my welcome thank you!

Almost there...

Please check your email to confirm your subscription

Footer

  • Calendar of Events
  • 3D Projects
  • Cardmaking
  • Fun Fold
  • Product Tips & Tricks
  • Projects
  • Techniques
  • Of Interest
  • Catalogs
  • Join the Fun
  • Contact Me
  • Email
  • Facebook
  • Instagram
  • Pinterest
  • YouTube

PAPERCRAFTING THREADS

Copyright © 2025 · Refined theme customized by Catherine Carroll

Privacy Policy · Affiliate Disclosure