
Craft a quick and easy custom Candy Bar Box for Halloween. Whether it’s for special ghouls and goblins, family, friends or coworkers, the spooky patterned paper and an adorable trick or treater are sure to bring smiles. Not to mention the full size chocolate bar instead of the usual bite-size. Let’s get started!
cutting & scoring guide
| Paper Dimensions | Score Short Side | Score Long Side | ||||
| 5 ¾” x 7 ½” Basic Black cardstock | ½”, 2 ¾”, 3 ¼” & 5½” | ½” & 1” on both ends | ||||
| 2” x 5¼” Petunia Pop cardstock mat | ||||||
| 1 ⅞” x 5 ⅛” Spooky Sweet patterned paper | ||||||
| 1 ¾” x 2” Basic Black cardstock for sentiment | ||||||
| Scrap of Petunia Pop cardstock for die cutting |
candy bar box step by step instructions
Cut and score the large piece of Basic Black cardstock as noted above using a paper trimmer. I love Stampin’ Up!’s paper trimmer, partly because the arm swings out to accommodate 12″ x 12″ paper, but even more handy is the ruler that extends on the right side of the cutting blade. Fold and burnish all score lines. Position the long narrow flap at the bottom (this will be the back edge of the box). Cut on the second scoreline in from the right up to the second scoreline from the bottom. Remove these four rectangles. Remove the middle square and the top square. Cut in and miter the edges on the remaining squares. Repeat on the left side.

Round the corners of the extended flaps with a corner round punch. Flip the cardstock over so the scorelines are valley folds facing up. Position the long narrow flap on the right side. Fold on the first inner spine scoreline to the left of the narrow flap. Add liquid glue to the flap. Fold the left side half-inch flap over the narrow flap, pressing and burnishing to adhere.
On one end, fold in the tabs and the flap. Insert full size candy bar (I used a 1.55 oz Hershey’s chocolate bar). Fold in the tabs and the flap on the remaining end.
If you are finding this tutorial helpful, consider a contribution to my coffee fund ☕️ Coffee → Creativity → Content → More Coffee (help fuel the cycle!)
decorating the candy bar box
Decorate as shown with a Petunia Pop cardstock mat and a strip of Spooky Suite patterned paper. Wrap a length of Petunia Pop Iridescent ribbon around the box and tie in a bow.
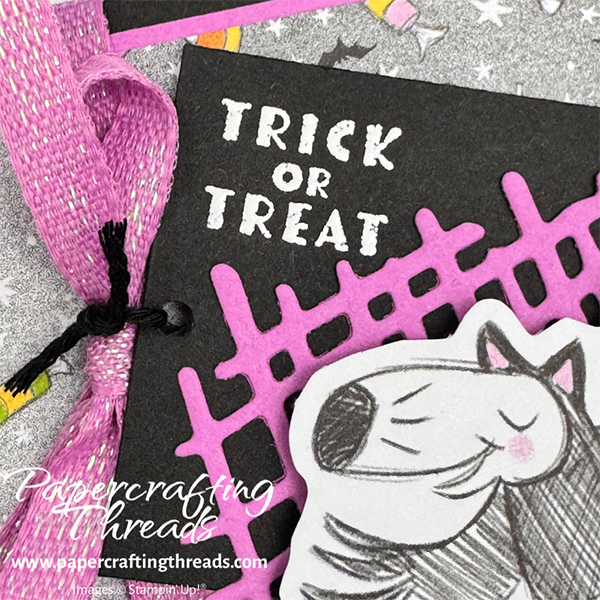
Stamp the sentiment in Versarmark ink on the rectangle of Basic Black cardstock. Heat set with white WOW embossing powder. Diecut the hatch pattern from the Perfectly Pears die set out of the scrap of Petunia Pop cardstock. Dot with liquid glue on the back and adhere to the black tag at an angle. Press the trick or treater out of the die cut sheet from Spooky Sweet paper pack, pop up on Dimensionals and add to tag. Punch an ⅛” hole on the left side of the tag, thread a length of black baker’s twine through the hole and tie in a knot around the Petunia Pop bow.
I’ve posted a video over on my YouTube paper crafting channel — click on the graphic above to watch and then share it with a crafty friend. And by the way, what do you think the cute little critter is? I’ve finally settled on a dog in a raven costume 🐦⬛ based on the nose, whiskers and ears!!

Leave a Reply