
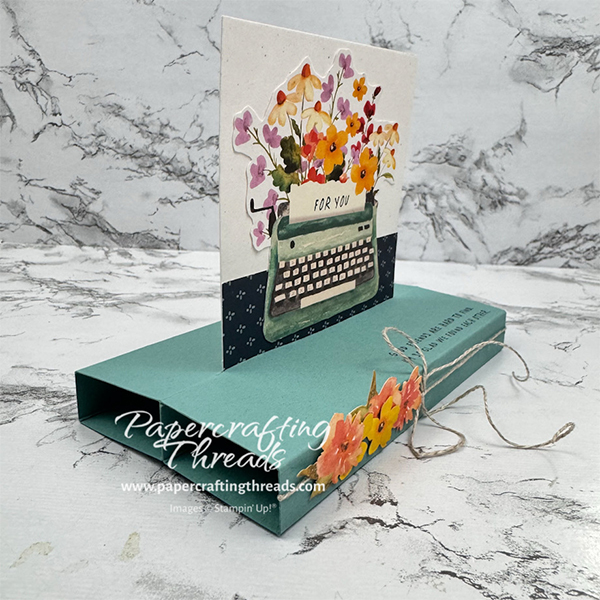
Make a Freestanding Pop Up Card – Typewriter Edition! My card looks unassuming when it’s pulled from the envelope, then surprise! A retro typewriter and a gorgeous bouquet of flowers rise magically from the base. I am beyond delighted with how this card turned out from my initial idea. Let’s get started!
cutting & scoring guide
| Paper Dimensions | Score Long Side | ||||
| 5½” x 8½” Lost Lagoon cardstock base | ⅝”, 2⅛” & 2¾” each end | ||||
| 3¾” x 4¼” cardstock for pop up |
step by step instructions
Cut and score cardstock base from Lost Lagoon cardstock as noted in table. After scoring each end, also score down the middle of the long side at 4¼”.
Then, using the vertical ruler on the Stampin’ Trimmer, and still at 4¼” on the long side, pull the cutting blade downward, from ⅞” to 4⅝”, cutting a slot.
I used the Farmhouse Florals August 2025 Paper Pumpkin Kit for decorating. For the actual popup portion, I cut one of the blank sections of card base down to 3¾” x 4¼”. Then I fussy cut the typewriter full of flowers from the other section of the same card base. I cut close around the typewriter portion but left white space around the florals. I also trimmed one of the envelope flaps into a large rectangle, adhered the large rectangle to the bottom portion of the popup and trimmed off the excess with snips.
Don’t get Paper Pumpkin kits? You can subscribe to future boxes here at my online store. Cancel anytime, but I think you’re going to love the kits – I know I do!
Fold and burnish all of the scorelines on the Lost Lagoon card base. Stamp greeting from the Paper Pumpkin kit in Secret Sea ink just above the third scoreline from the bottom. Stamp greeting on the paper in the typewriter.
Insert the pop up into the slot slightly. Apply Tear and Tape liberally to the bottom flap. Apply a small strip just the width of the pop up on the top flap. Working from the backside of the card base, remove the liner from the bottom flap. Pull the pop up down, line up the bottom edges, make sure the sides are even and press to adhere.
Remove the liner from the top flap, fold over the flap and sandwich the pop up between the two flaps, pressing to adhere.
If you are finding this tutorial helpful, consider a contribution to my coffee fund ☕️ Coffee → Creativity → Content → More Coffee (help fuel the cycle!)
decorating the freestanding pop up card
Push the pop up into standing position. Feed a length of linen thread through the base and tie a floofy bow just to the left of the greeting. Add a wadded up glue dot behind the gathered section of the bow to hold it in place.
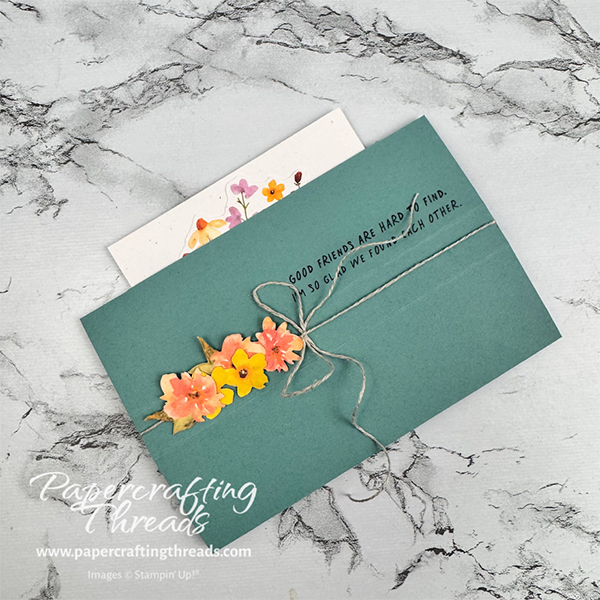
Add glue dots to the backs of the floral die cuts and adhere along the base. The floral elements can poke up above the scoreline but not below, or the base won’t lie flat when the card is popped up. Write a message on the back of the pop up, push the pop up down and into the slot. Now the card fits in a standard envelope. And the lucky recipient can pop it up for display.
Can’t quite visualize how it comes together? I posted a how-to video over on my YouTube channel, so check it out!
Thanks for reading/watching my tutorial today!

Leave a Reply