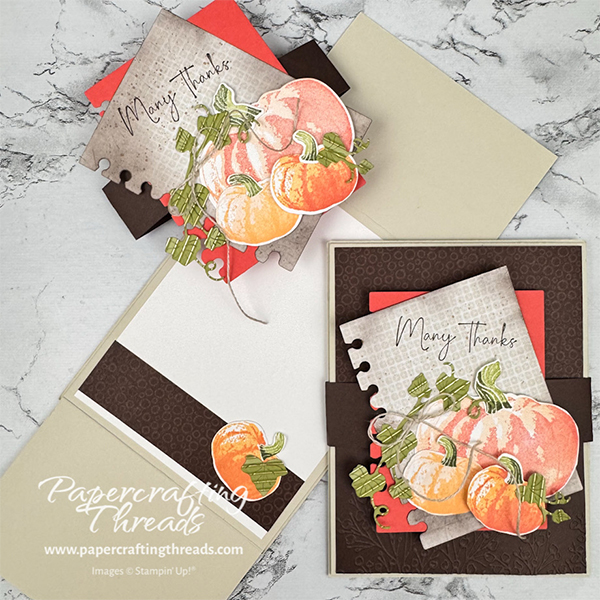
A Vertical Gatefold card is a great alternative to a basic fun fold. This tutorial shows how easy it is to create a show stopper card loaded with techniques. And the Beautiful Pumpkins Bundle of stamps and dies use two of my favorite types of stamps together, creating absolutely stunning imagery loaded with depth and dimension just by using ink. Let’s get started!
cutting & scoring guide
| Paper Dimensions | Score Short Side | Score Long Side | ||||
| 4¼” x 5½” Basic Beige cardstock base | ||||||
| 4⅛” x 11″ Basic Beige cardstock gatefold | 2¾” rotate & 2⅞” | |||||
| 3⅞” x 5⅛” Basic White cardstock liner | ||||||
| Scrap of Basic White for stamping pumpkins and stems | ||||||
| 2⅝” x 4″ Gathering Together patterned paper for top gate | ||||||
| Scraps of Gathering Together for die cutting leaves & page | ||||||
| 2¾” x 4″ Early Espresso cardstock for bottom gate | ||||||
| 1″ x 10″ Early Espresso cardstock for belly band | ||||||
| Scrap of Calypso Coral cardstock for die cutting page |
step by step instructions
Begin with stamping the images from the Beautiful Pumpkins stamp set on a scrap of Basic White. As I mentioned in the my intro, this set combines Two-Step Stampin’ (layer two or more images to create one final image with extra texture and dimension in multiple colors) AND it’s Distinktive (special texture gives added depth and dimension in a single step, creating photo-realistic images).
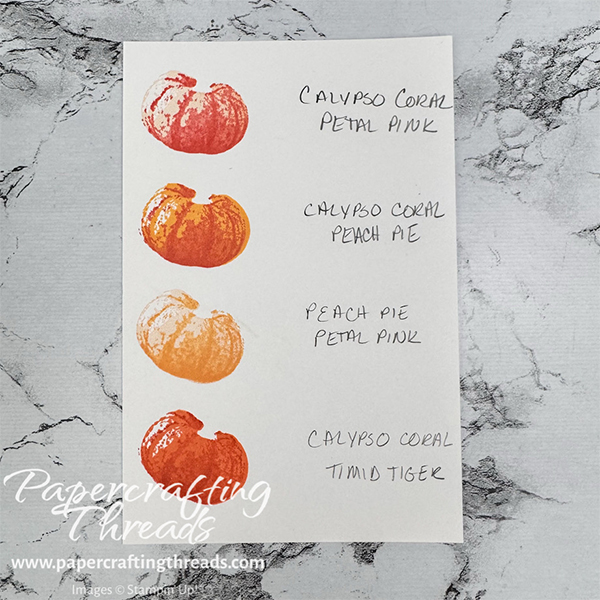
I inked the large pumpkin detail image with Calypso Coral ink and stamped. Then I inked the large more solid image and stamped over the top, lining up the ‘bumps’ around the edges. But no worries if the overlapping images aren’t perfect – just adds to the handmadeness!
Repeat this with the smaller pumpkin images, stamping two with a combination of Calypso Coral/Peach Pie inks and a third with a Peach Pie/Petal Pink combo.
I created a little cheat sheet of color combinations shown below to keep in the stamp case for reference. While I didn’t use the last color combo for this project, I now know what that combo would look like. I also haven’t gotten around yet to using Pumpkin Pie ink, but I will 🎃
Next I inked the pumpkin stems with Old Olive ink, rocked & rolled in Mossy Meadow ink and stamped on the scrap of Basic White cardstock. Then I die cut all of the pumpkins and stems with the matching Beautiful Pumpkins die set. Glue stems to pumpkins.
I also die cut the vines/leaves from a scrap of the green/gold striped patterned paper from the Gathering Together DSP.
From the Just a Note die set, I used the notepaper die to cut one from the tiny beige square pattern of the same DSP. And I cut a second notepage from a scrap of Calypso Coral cardstock.
assembly of the vertical gatefold card
Fold the top and bottom flaps towards each other on the large scored piece of Basic Beige cardstock. I positioned the bottom flap overlapping the top flap. Adhere this piece to the Basic Beige cardstock standard-sized base.
If you are finding this tutorial helpful, consider a contribution to my coffee fund ☕️ Coffee → Creativity → Content → More Coffee (help fuel the cycle!)
Adhere the patterned paper to the top flap. Run the plain piece of Early Espresso through an embossing machine with the Pressed Flowers Embossing Folder. Then adhere to the bottom flap.
Open the Vertical Gatefold card, and adhere the Basic White liner to the interior. Add the small strip of patterned paper towards the bottom, leaving a small gap. Adhere a small pumpkin to the bottom right corner. Add one of the leaves with flat adhesive towards the top of the pumpkin. Fold the card.
Fold the 1″ x 10″ Early Espresso strip around the middle of the card, adhering the ends in the middle of the front of the card. Trim any excess.
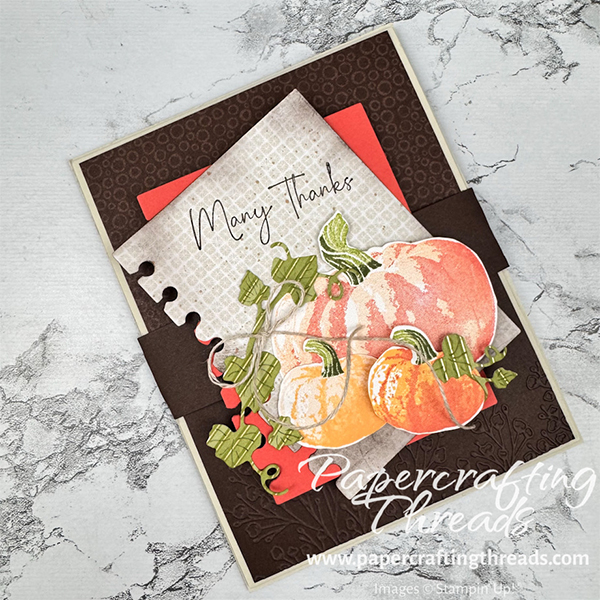
decorating the vertical gatefold card
Adhere the Calypso coral notepaper onto the belly band. Position the patterned paper over the top, ink the greeting from Gathering Moments stamp set with Early Espresso and stamp. Use a blending brush to add Early Espresso ink around the edges. Splatter with Bronze Stampin’ Blend ink.
Attach the largest pumpkin on top of the note page with flat glue on the left side and a dimensional on the right side. Adhere the left pumpkin with liquid glue. Use a dimensional on the left side of the remaining pumpkin and adhere.
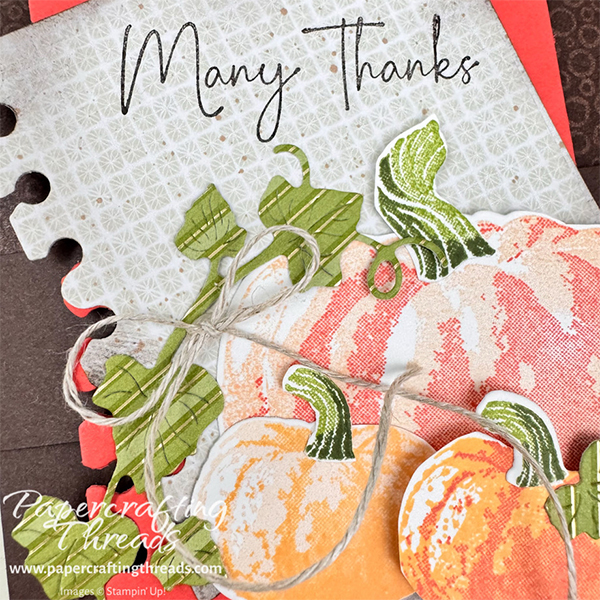
Add liquid glue to the backs of some of the leaves and adhere as shown. Tie a bow with a length of linen thread. Then wad up a glue dot, place it behind the center of the bow and press to adhere to card front.
Don’t you love all the textures and dimension in this card? From the mix of two-step and Distinktive, to the embossing, inking and splattering, this Vertical Gatefold Card is so full of life. Click here to see my full supply list – you’re going to want this stamp set in your collection today! I can’t wait to play with more color combinations.
And in case you’d like a video on how this card comes together, I made a how-to video over on my YouTube channel.

Leave a Reply