Papercrafting Threads

  • Tutorials
    • PDF Tutorials
    • 3D Projects
    • Cardmaking
    • Fun Fold
    • Monday Mashup
    • Product Tips & Tricks
    • Projects
    • Techniques
  • Catalogs
  • Shop & Specials
    • Shop My Stampin’ Up! Online Store
    • Special Offers
    • Buy Me A Coffee
    • My Favorite Things on Amazon
    • Gift Certificates
  • Contact Me
  • Join the Fun
    • Join the Fun
    • Special Join Offers
  • Calendar of Events
  • Paper Pumpkin
    • Paper Pumpkin Kits
    • Paper Pumpkin Stamp Case Inserts
  • Nav Social Menu

    • Email
    • Facebook
    • Instagram
    • Pinterest
    • YouTube

Mini Bubble Holder

September 27, 2025 Leave a Comment

27 Sep
Mini Bubble Holder - 3 different versions. Far left is black base with Petunia Pop patterned paper on top with stamped black stars. Cat handle of bubble wand rises from base. Base has bewitched sentiment stamp with polar bear dressed as a fairy with a magic wand. Holographic gems scattered at end of wand. Middle holder has orange base with black, grey and orange patterned papers. Sentiment is 'Too cute to spook' across top with black stars cascading down front. Bubble wand head is an orange pumpkin. A bat dressed as a ghost with a pumpkin treat holder and a crow on a pair of pumpkins go across the bottom. Far right holder has a skull themed handle with a cauldron full of a green bubbling brew adhered to the base. Black bats fly across the top portion.

Hey there Halloween peeps! Dress up mini bubbles with my custom Mini Bubble Holder. The detailed tutorial below will have you crafting simple shelf inserts to raise the bubbles up and hold them upright in place securely. Tailor the cardstock and patterned paper to coordinate with the color of the bubble wands and you have a speedy make with ordinary craft supplies. Let’s get started!

cutting & scoring guide

Paper DimensionsScore Short SideScore Long Side
2¼” x 11″ Pumpkin Pie cardstock base3¾” & 4¼”
2¼”x 5″ Pumpkin Pie cardstock for shelves1″, 1½”, 3½” & 4″
2″ x 3⅜” Spooky Sweet patterned paper for upper
2″ x 3⅝” Spooky Sweet patterned paper for bottom
Cutting & Scoring Guide for Mini Bubble Holder

step by step instructions

Cut the smaller strip of scored Paper Pumpkin cardstock in half at 2½”, creating two equal pieces. Fold and burnish on the scorelines. Place one of the pieces on a self-healing cutting mat and using a blade (like an exacto knife), cut an ‘X’ in the middle with one leg running from one score line to the other and the other approximately the same length in the opposite direction. Turn over and fold back each triangle, creating an opening about ½” in diameter. Check that the mini bubble holder will fit inside the opening, remove it, and set both aside.

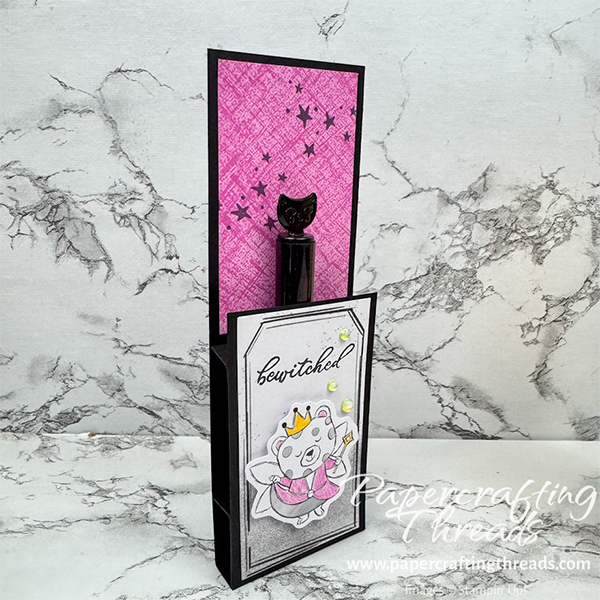
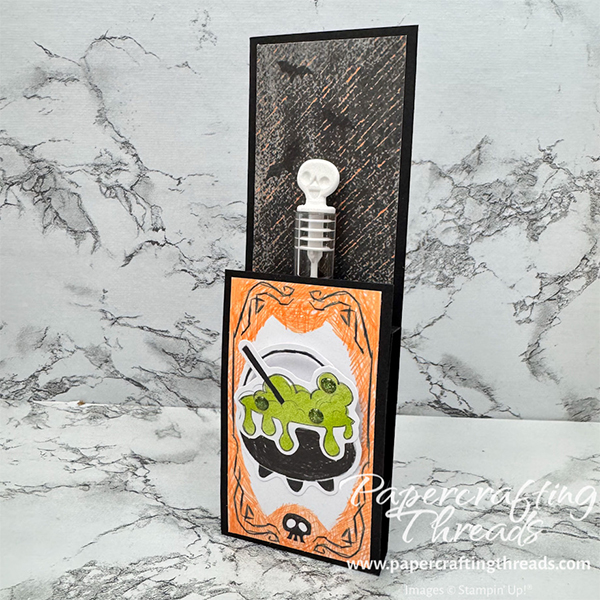
Fold and burnish all other scorelines. Ink the sentiment from the Sweet Halloween stamp set in Tuxedo Black Memento ink and stamp at the top of the lighter Spooky Sweet patterned paper strip. Ink and stamp the stars image and stamp randomly down the same paper and on the darker patterned paper strip. Adhere the two strips on the Pumpkin Pie cardstock strip as shown.

Love the stamp and patterned paper that I used? See my supply list here in my online store. Get yours today before they sell out!

putting it all together

Add adhesive to the back side of the Pumpkin Pie platform WITHOUT the opening. Position inside the folded base, lining up the sides and the bottom edge with the scoreline. Press to adhere.

Next, add adhesive to the back side of the Pumpkin Pie piece WITH the opening. Position about ¼” below the upper patterned paper, lining up the sides and press to adhere.

Then add liquid glue to the front side of the bottom platform, fold up the holder making sure the sides align and press to adhere. Adjust as necessary to square up the bottom.

And lastly, add liquid glue to the front side of the top piece with the opening and press the front of the holder to adhere, lining up the sides.

If you are finding this tutorial helpful, consider a contribution to my coffee fund ☕️ Coffee → Creativity → Content → More Coffee (help fuel the cycle!)

decorating the mini bubble holder

Fussy cut the bat from the patterned paper and adhere to the front bottom section of the holder. Punch out the die cut from the patterned paper pack and adhere with Stampin’ Dimensionals slightly over the bat image.

Mini Bubble Holder has orange base with black, grey and orange patterned papers. Sentiment is 'Too cute to spook' across top with black stars cascading down front. Bubble wand head is an orange pumpkin. A bat dressed as a ghost with a pumpkin treat holder and a crow on a pair of pumpkins go across the bottom.

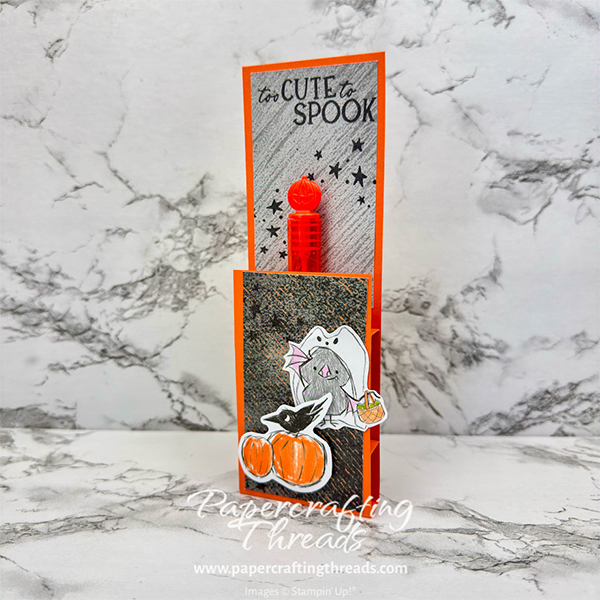
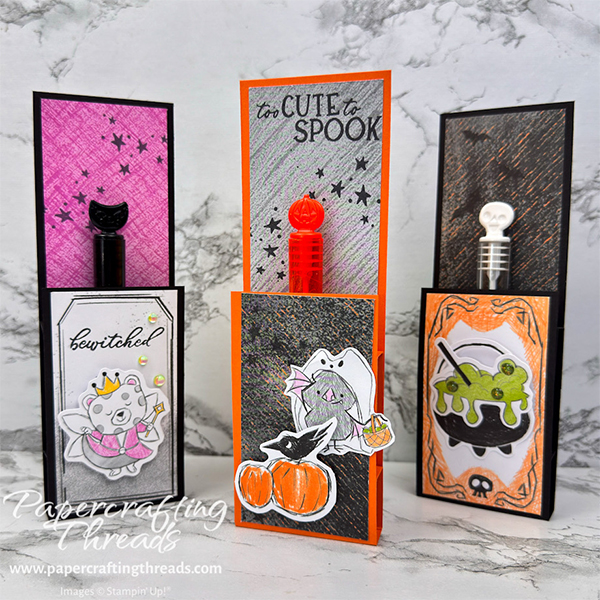
Insert the mini bubbles into the opening, and there you have it — a customized Mini Bubble Holder! I’ve made several versions to match the emblem and color of the bubble toppers, see below. I’ve swapped out the Pumpkin Pie cardstock for Basic Black, used different stamp images and added embellishments like Holographic Sparkle Dots or Low Profile Sparkle Dots. All patterned paper and die cuts are from the Spooky Sweet DSP pack.

Mini Bubble Holder - has a black base with Petunia Pop patterned paper on top with stamped black stars. Cat handle of bubble wand rises from base. Base has bewitched sentiment stamp with polar bear dressed as a fairy with a magic wand. Holographic gems scattered at end of wand.
Mini Bubble Holder has a skull themed handle with a cauldron full of a green bubbling brew adhered to the base. Black bats fly across the top portion.

I’ve put together a YouTube video tutorial as well – check it out over on my channel.

Share:

Leave a Comment
see more related posts: 3D Projects· Projects

Previous Post: « Tuck & Fold Box
Next Post: Best Ever Time to Join — ended 10/31/2025 »

Reader Interactions

Leave a Reply Cancel reply

Your email address will not be published. Required fields are marked *

Primary Sidebar

Peri Beal

Cheesehead. Avid reader. Antique hunter.

Shop Online

Shop with me and get a FREE PDF tutorial bundle delivered to your inbox AND a handmade card via snail mail

Search

Papercrafting Threads

Gift Certificates
  • Email
  • Facebook
  • Instagram
  • Pinterest
  • YouTube

Sign up for my Newsletter

Sign up for my newsletter and get a free PDF tutorial as my welcome thank you!

Almost there...

Please check your email to confirm your subscription

Retired Product
Privacy Policy

The Fine Print

Just so you know... This is a personal website and I am responsible for its content. Stampin' Up!® does not endorse the use of or contents of the classes, services, or non-Stampin' Up! products I offer.

Sign up for my Newsletter

Sign up for my newsletter and get a free PDF tutorial as my welcome thank you!

Almost there...

Please check your email to confirm your subscription

Footer

  • Calendar of Events
  • 3D Projects
  • Cardmaking
  • Fun Fold
  • Product Tips & Tricks
  • Projects
  • Techniques
  • Of Interest
  • Catalogs
  • Join the Fun
  • Contact Me
  • Email
  • Facebook
  • Instagram
  • Pinterest
  • YouTube

PAPERCRAFTING THREADS

Copyright © 2026 · Refined theme customized by Catherine Carroll

Privacy Policy · Affiliate Disclosure