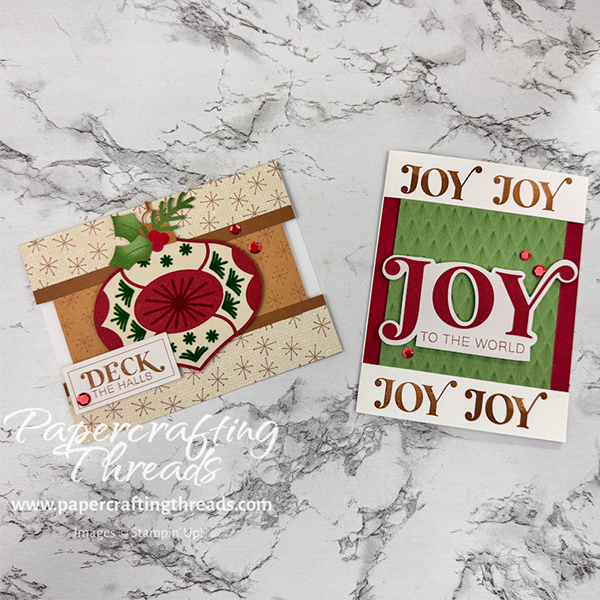
Master my Spanner Cards with this eye-catching cardmaking tutorial! Spanner Cards combine classic sophistication with a clever design twist—revealing a peek of color along the sides. In this step-by-step tutorial, you’ll create two stunning variations using featuring classic, traditional colors that never go out of style, while exploring two different layouts. Whether you’re a seasoned cardmaker or just beginning your paper crafting journey, these stunning Spanner Cards will add a touch of handmade charm to your next greeting. Let’s get started!
cutting & scoring guide
| Paper Dimensions | Score Short Side | Score Long Side | ||||
| DECK THE HALLS Card | ||||||
| 5¼” x 5½” Basic Beige linen cardstock base from kit | 4¼” | |||||
| 1″ x 5½” Basic Beige linen cardstock cut from kit | ||||||
| 1¼” x 5½” Pecan Pie cardstock (cut two) | ||||||
| 3¾” x 4⅞” snowflake panel cardstock from kit | ||||||
| JOY Card | ||||||
| 5½” x 8½” Basic White cardstock base | 4¼” | |||||
| 3½” x 5½” green tree pattern cardstock cut from kit | ||||||
| ½” x 5½” red star pattern cardstock cut from kit (cut two) |
step by step instructions for Deck the halls card
Begin with one of the Basic Beige linen-textured card bases from the Cozy Christmas October 2025 Paper Pumpkin kit. We’re going to cut away most of the front. With that end result in mind, place the front half of the card towards the left side of the paper trimmer cutting track and butt the edge up to the 3¼” mark and cut. Set aside the card base. Slice a 1″ x 5½” strip from the leftover section. Save the large piece for another project.
Ink the snowflake image stamp from the kit with Pecan Pie ink and randomly stamp snowflakes on the small 1″ strip of the ‘card front’. Randomly stamp snowflakes on the 1″ strip of Basic Beige linen-pattern. Stamp the greeting ‘Deck the halls’ on one of the rectangular labels from the kit.
Adhere one of the Pecan Pie strips behind the 1″ Basic Beige linen-pattern strip. Adhere the other Pecan Pie strip behind the 1″ flap of the card front. I used liquid glue so I had time to reposition. Glue the red die cut bauble from the kit to the top of the Basic Beige/green flocked bauble.
Returning to the card base, position the Pecan Pie snowflake mat from the kit inside the center of the card base. Position the freestanding strip at the bottom edge of the card base with the Pecan Pie cardstock strip at the top. Noting where the strips overlap the loose snowflake mat, add liquid glue within the one-inch border on the top, and press the card front flap on top to adhere. Add liquid glue to the bottom one inch border and align the freestanding strip, pressing to adhere.
decorating the spanner card
Add dimensionals to the back of the bauble and adhere to the center front flap. Position dimensionals strategically to the back of the greenery/bauble hanger from the kit and adhere at the top of the bauble. Trim the ‘stem’ so it sits flush with the card base.
Add dimensionals to the back of the greeting strip and adhere the greeting towards the bottom left of the bauble.
If you found this tutorial helpful, consider a contribution to my coffee fund ☕️ Coffee → Creativity → Content → More Coffee (help fuel the cycle!)
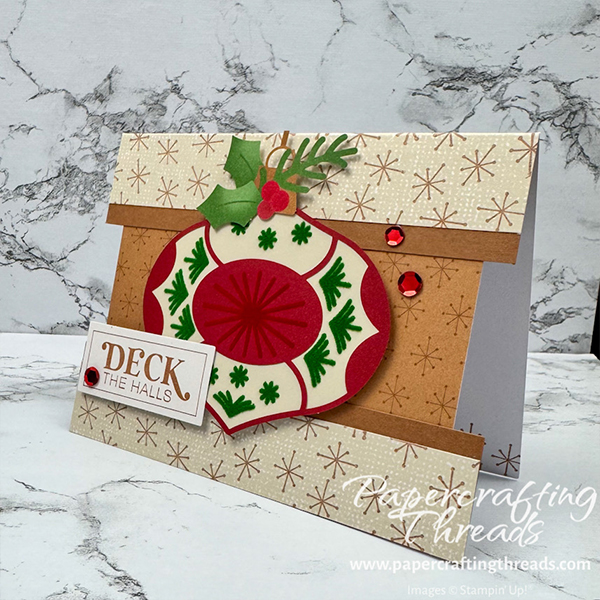
Scatter adhesive-backed red sequins from the kit to the front of the card. Open the front and randomly stamp an inch high ‘strip’ of snowflakes in Pecan Pie along the bottom.
step by step instructions for joy card
Cut and score a standard size card base from Basic White cardstock as noted in the table above. Open the card base and place in the trimmer. Cut 1″ from the top and bottom edges of the card front, perpendicular to the score line. Then cut along the score line to remove the freed section. Save for another project.
Cut a section measuring 3½” x 5½” from one of the green tree pattern card bases from the kit.
Stamp the word ‘JOY’ in Pecan Pie ink twice along the top flap and then the bottom flap as shown. Stamp ‘TO THE WORLD’ along the bottom of the die cut JOY from the kit. Fussy cut the red flocking away from the words.
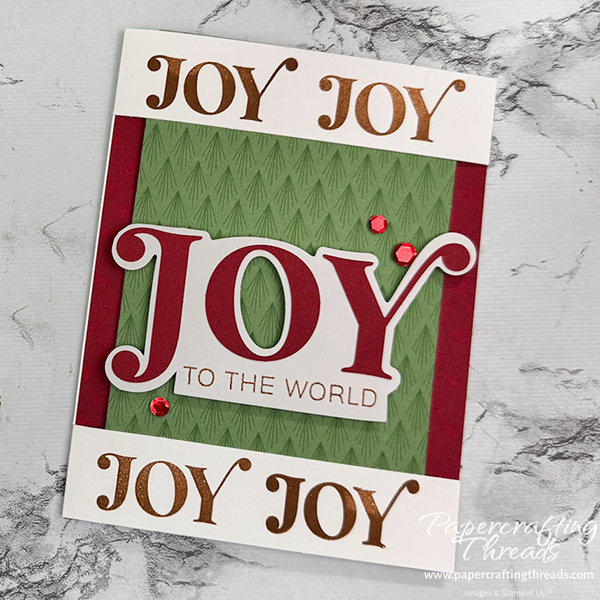
Apply liquid glue to the top one-inch section of the green tree patterned cardstock and adhere to the top front flap, Then apply liquid glue to the bottom one-inch section and adhere to the bottom flap.
Adhere the two red star patterned cardstock to opposite sides on the inside of the card. Pop the ‘JOY TO THE WORLD’ die cut up on dimensionals and adhere to card front. Scatter sequins across the front.
Ready to start your next paper crafting project? Browse my online store for Paper Pumpkin kits, cardstock, embellishments, and everything you need to bring your creative ideas to life!
Be sure to take a look at my YouTube video on how to create these stunning Spanner Cards.

Leave a Reply