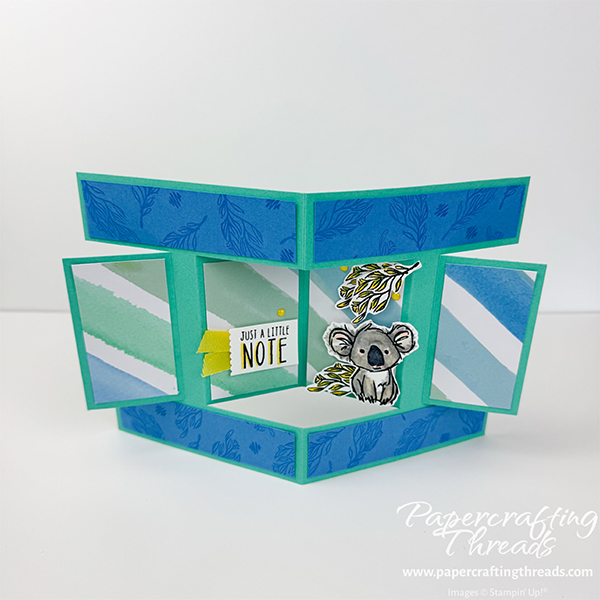
Create this wow Pop Out Burst Fun Fold card with just some cuts and scorelines following my easy tutorial. I’ve even made two templates breaking down the cutting and scoring as a reference to make it even simpler. Decorate the panels with fun patterned paper and add a cute koala. Who will you surprise with this adorable card? Let’s get started!
cutting & scoring guide
| Paper Dimensions | Score Short Side | Score Long Side | ||||
| 8½” x 5½” Summer Splash cardstock base | 4¼” | |||||
| 2″ x 8″ Azure Afternoon cardstock for stamping | ||||||
| 6½” x 2¾” Splash of Sparkles patterned paper | ||||||
| 3½” x 2¾” Basic White cardstock for liner | ||||||
| Scraps of Basic White cardstock for stamping koala, branches and greeting |
step by step instructions
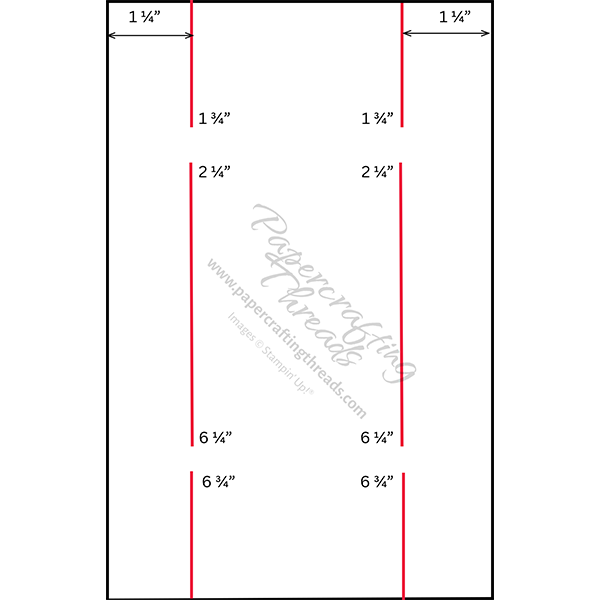
Place the Summer Splash cardstock with short side at the top of the Stampin’ trimmer with the long edge at 1¼” to the right side of the track. Move the cutting blade down to the 1¾” mark on the vertical ruler. Pick up the cutting blade, skip ½” and set it down at 2¼”, cutting down to 6¼”. Again pick up cutting blade, skip the next ½”, moving it down to 6¾” and cut to the bottom edge.
Rotate the cardstock 180° and repeat on the opposite edge.
Pop Out Burst Fun Fold Cutting Template
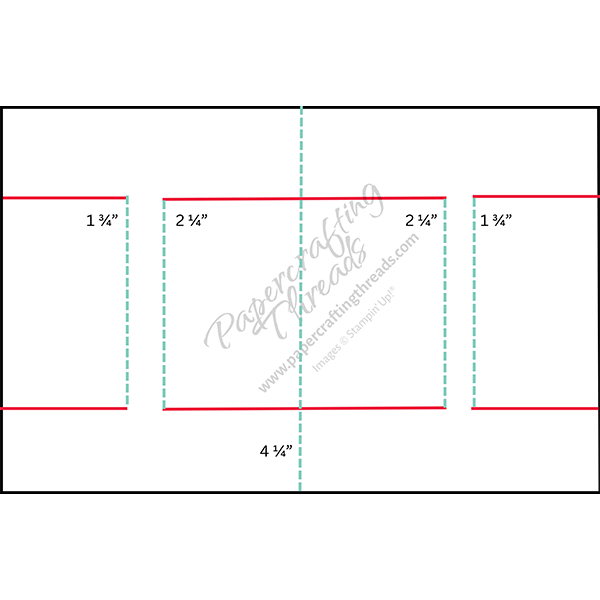
Pop Out Burst Scoring Guide
On the long edge of the base, score between the cut lines. Place the left edge of the cardstock at 1¾” and score between the two cut lines. Move the left edge of the cardstock over to 2¼” and score between the two cut lines. Rotate the cardstock 180 ° and repeat the scoring. (The 4¼” scoreline was already done when the cardstock was initially cut and prepped according to the guide at the top of this tutorial.)
If you are finding these templates helpful, consider a contribution to my coffee fund ☕️ Coffee → Creativity → Content → More Coffee (help fuel the cycle!)
Prepping the Patterned Paper
Slice the Splash of Sparkles patterned paper into sections – with the long edge at the top, cut off 1½”, then 1¾”, another 1¾” and a 1½” section remains. Keep in order and set aside.
Ink and stamp the leaf image from the Wild Bunch stamp set in Azure Afternoon ink randomly across the Azure Afternoon cardstock. Ink and stamp just one of the squiggle squares in Azure Afternoon ink repeatedly, filling in the open spaces.
Cut the stamped cardstock in half lengthwise and widthwise, creating four 1″ x 4″ pieces.
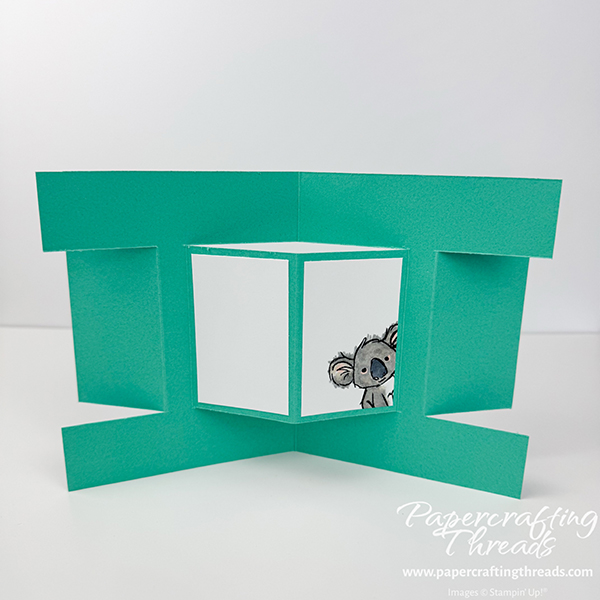
Folding the Pop Out Burst
Fold the narrow top and bottom panels as mountain folds. Just pinch the scorelines until the rest of the folds come not play. For the center section, starting from the left side, fold each scoreline as a valley, mountain, valley, mountain and valley. Once each scoreline has been started, then go back and use a bone folder to burnish the folds.
Decorating the Pop Out Burst Fun Fold
Adhere the four long stamped strips to the top and bottom panels. Adhere the DSP panels across the center sections, keeping the patterns in order.
Ink and stamp the leaf images with black ink three times on a scrap of Basic White and the koala once. Stamp the sentiment on a scrap strip of Basic White just under 1″ in diameter. Stamp the koala in the lower right corner of 3½” x 2¾” Basic White piece.
Color the leaves with the Light Shaded Spruce and Dark Lemon Lolly Stampin’ Blends. Fussy cut.
Color the koalas with the Dark Petal Pink, Color Lifter, Light Basic Black, Light & Dark Smoky Slate, and Light Crumb Cake blends. Slice the 3½” x 2¾” Basic White in half on the long side, creating two 1¾” x 2¾” pieces (one will be blank). Fussy cut the koala from the scrap piece of Basic White.
Add a Dark Lemon Lolly shadow to the large letters of the word ‘NOTE’ with the bullet tip of the Dark Lemon Lolly Stampin’ Blend.
Final Assembly
Returning to the front of the card base, adhere the first leaf flat at the lower right corner of the focal DSP panel. Adhere the second leaf at the top right corner. Pop up the remaining leaf on dimensionals and adhere at an angle over the top leaf. Add dimensionals to the koala and adhere over the lower leaves.
Place the sentiment strip in the Happy Labels Pick a Punch and squeeze to punch the decorative end. Fold a short strip of Daffodil Delight ribbon in half, apply glue dots and adhere behind the sentiment strip with the tails peeking out on the left, behind the decorative edge. Then press to adhere to left DSP focal panel.
For the back of the card, adhere the plain Basic White panel and the panel with the corner koala to the center back panels as a liner for space to write a personal message.
Scatter a few yellow self-adhesive dots across the front of the card.
Isn’t this Pop Out Burst Fun Fold a blast? And it even folds flat for mailing, though I would suggest putting it in a padded envelope, as it is a tiny bit bulky in the middle. Or better yet, hand deliver in person!

fabulous
thank you!