
Want to create an amazing Bendi Balcony Card that’ll impress? Picture exquisite florals cascading over the edge of a center pop-up, with delicate roses blooming in the background. The best part? You’ll be amazed at how simple flat cardstock transforms into sweeping curves—and you won’t need any special tools to make it happen. Bonus ways to add dimension AND Stampin’ Blends alcohol markers coloring tips. Let’s get started!
cutting & scoring guide
| Paper Dimensions | Score Short Side | Score Long Side | ||||
| 4⅛” x 5½” Cloud Cover cardstock base | 2¾” | |||||
| 2″ x 5″ Cloud Cover cardstock for center pop up | (2½” optional) plus ½” each end | |||||
| 1″ x 6½” Cloud Cover cardstock bendi | ½” each end | |||||
| 2⅝” x 3″ Gallery Blooms rose pattern (cut 2) | ||||||
| 1″ x 2⅝” Florals in Bloom hatch pattern (cut 2) | ||||||
| ⅞” x 5⅜” Florals in Bloom hatch pattern for bendi cover | ||||||
| 2⅝” x 4″ Basic White liner for back (cut 2) | ||||||
| Scraps of Basic White for die cutting |
step by step instructions
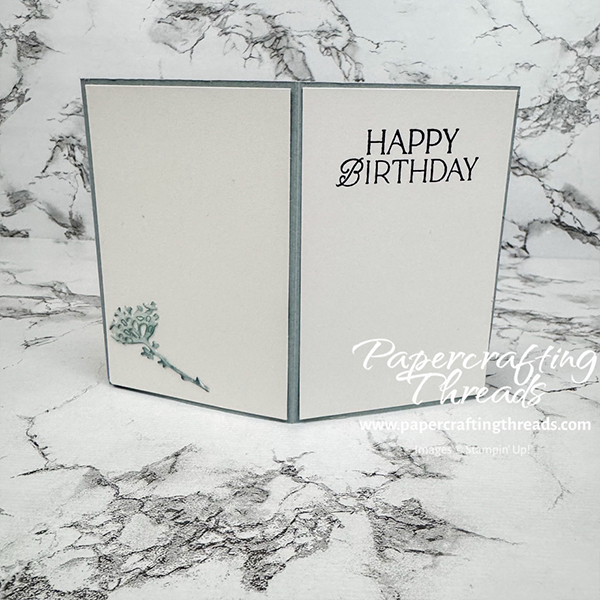
After cutting and scoring all pieces with the Stampin’ Up! paper trimmer, gently fold the card base both ways on the scoreline. Stamp the sentiment on one of the Basic White liner pieces in Secret Sea ink and adhere to the right half back of the card base. (I used the Happy Birthday sentiment from the Notes from the Heart December 2024 Paper Pumpkin Kit.) Adhere the plain Basic White liner to the other half.
Now for the front. Stamp floral images from Gallery Blooms stamp set in Tuxedo Black Memento ink on scraps of Basic White cardstock. Die cut with matching dies. Color with Stampin’ Blends — I used Light Old Olive, Light Lemon Lime Twist, Light Pool Party, Light Balmy Blue, Light Lost Lagoon and Light Smoky Slate. Die Cut foliage from Basic White cardstock scraps with the Gallery Blooms dies. Use a blending brush to add Lemon Lime Twist ink, varying the intensity by adding layers of ink. Blend Pool Party ink on the Queen Anne’s like small die cut.
creating the bendi balcony mechanisms
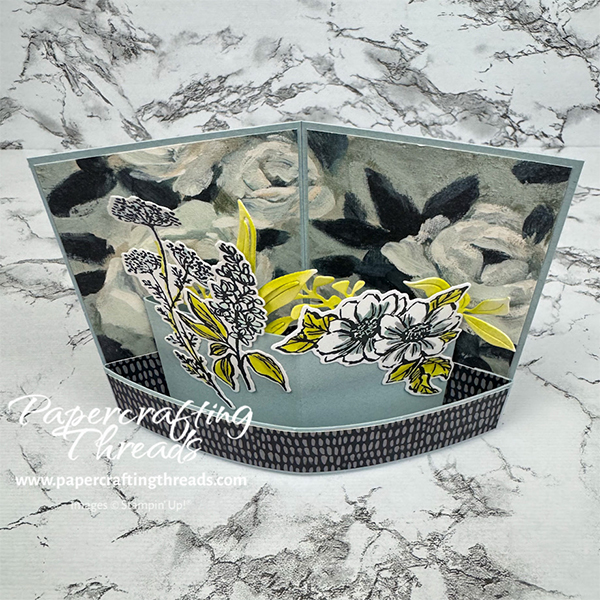
Adhere the two rose-patterned pieces (from the Beautiful Gallery 6″x6″ DSP) so the image flows continuously across the separation by the scoreline. Fold the tab ends of the Cloud Cover bendi strip under. Adhere the long strip of the hatch pattern on the front. With the bendi strip face up and the tabs folded back, adhere the short strips of the hatch patterned paper face up on each tab. Then add liquid glue to the backs of the tabs and the extension of patterned paper and adhere along bottom front of card base, leaving a small gap from the bottom edge.
Fold the tabs back on the remaining piece of Cloud Cover cardstock. Add liquid glue to the backs of the tabs. Insert your hand from the bottom of the card beneath the bendi strip and guide the Cloud Cover cardstock into position, lining up the center scoreline with the card base and the bottom edge with the hatch patterned paper. Press to adhere. ✨ALTERNATE VERSION: Omit the center scoreline on the center panel to create a second bendi!✨
If you find this tutorial helpful, consider a contribution to my coffee fund ☕️ Coffee → Creativity → Content → More Coffee (help fuel the cycle!)
Attach floral images with liquid glue to the front of the Cloud Cover pop out, being mindful of positioning when the card bends. The large floral corner piece cannot extend over the right edge. Use liquid glue sparingly to tuck the foliage in back of the floral images. Add extra floral image to the left half Basic White panel on the back of the card.
Leave a Reply