Papercrafting Threads

  • Tutorials
    • PDF Tutorials
    • 3D Projects
    • Cardmaking
    • Fun Fold
    • Product Tips & Tricks
    • Projects
    • Techniques
  • Catalogs
  • Shop & Specials
    • Shop My Stampin’ Up! Online Store
    • Special Offers
    • Buy Me A Coffee
    • My Favorite Things on Amazon
    • Gift Certificates
  • Contact Me
  • Join the Fun
    • Join the Fun
    • Special Join Offers
  • Calendar of Events
  • Paper Pumpkin
    • Paper Pumpkin Kits
    • Paper Pumpkin Stamp Case Inserts
  • Nav Social Menu

    • Email
    • Facebook
    • Instagram
    • Pinterest
    • YouTube

Cardmaking Hacks with Simply Sparkling

June 16, 2024 Leave a Comment

16 Jun
Cardmaking hacks with Simply Sparkling shows a purple greeting card with bubbles, and a soda can decorated with shiny cherries

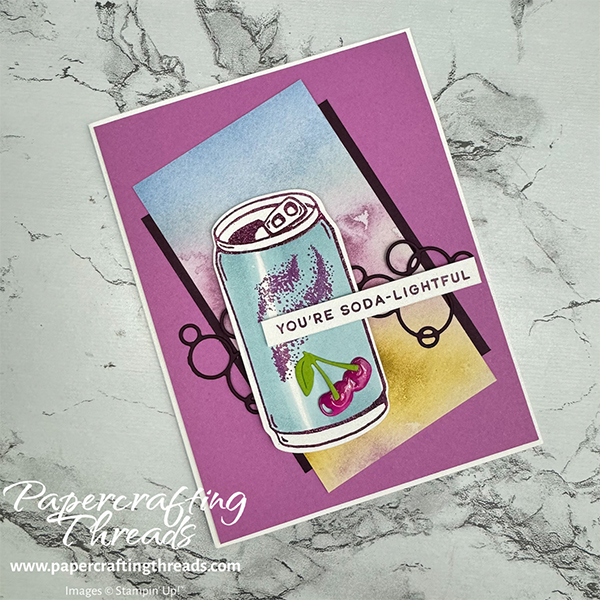
Loads of cardmaking hacks are featured with my Simply Sparkling cherry soda card. From heat embossing with colored ink, to a faux metallic look with Stampin’ Blends alcohol markers to shiny cherries, this card has it all. Let’s get started!

This card features the Online Exclusive bundle Simply Sparkling stamp and die sets. The card base measures 5-1/2″ x 8-1/2″ of Basic White, scored down the middle on the long side at 4-1/4″. The glorious Petunia Pop mat cut to 4-1/8″ x 5-3/8″ provides a jubilant backdrop.

hack #1 card stock saver

Diecut the open bubbles from a piece of Blackberry Bliss cardstock 2-3/4″ x 3-3/4″ before using it to frame the sides of a piece of patterned paper 2-1/2″ x 4-1/4″ from the gorgeous Thoughtful Journey Designer Series Paper.

Diecut another set of open bubbles from a scrap of Blackberry Bliss cardstock and lay the bubbles horizontally across the angled papers.

cardmaking hack #2 Heat emboss in any color ink

Stamp the can in Versamark Ink first, then in Blackberry Bliss Classic Ink. Heat set with clear embossing powder for a shiny outline.

hack #3 create faux shine with alcohol markers

Use Light and Dark Balmy Blue Stampin’ Blends to create a faux shine on the can body by leaving an open white ‘strip’ uncolored where the light might hit the can side.

Hack #4 get more than one color from ink pad

Ink and stamp off the swoosh image in Blackberry Bliss before stamping on the can front.

Pop the can up on Dimensionals and adhere to card front. Stamp the sentiment in Blackberry Bliss ink and adhere with Dimensionals.

hack #5 create a similar hue of cardstock

Swirl Blackberry Bliss ink with a Blending Brush onto a scrap of Basic White cardstock. Diecut the cherry image. Diecut the stem piece from a scrap of Granny Apple Green cardstock.

hack #6 make super shiny embellishments

Lay the cherries on a Silicone Craft Mat and cover with the clear glue from the Fine Tip Glue Pen; let dry. Adhere the stem on top of the cherries with liquid glue. Then adhere the assembled cherries to the front of the can.

Find all of the products I used for these cardmaking hacks here in my online store. And I made a 44 second short over on my YouTube channel if you need a visual of any of the steps.

Share:

Leave a Comment
see more related posts: Cardmaking· Product Tips & Tricks

Previous Post: « Tucked Gate Fold Card
Next Post: Floating Front Panel Card Tutorial »

Reader Interactions

Leave a Reply Cancel reply

Your email address will not be published. Required fields are marked *

Primary Sidebar

Peri Beal

Cheesehead. Avid reader. Antique hunter.

Shop Online

Shop with me and get a FREE PDF tutorial bundle delivered to your inbox AND a handmade card via snail mail

Search

Papercrafting Threads

Gift Certificates
  • Email
  • Facebook
  • Instagram
  • Pinterest
  • YouTube

Sign up for my Newsletter

Sign up for my newsletter and get a free PDF tutorial as my welcome thank you!

Almost there...

Please check your email to confirm your subscription

Retired Product
Privacy Policy

The Fine Print

Just so you know... This is a personal website and I am responsible for its content. Stampin' Up!® does not endorse the use of or contents of the classes, services, or non-Stampin' Up! products I offer.

Sign up for my Newsletter

Sign up for my newsletter and get a free PDF tutorial as my welcome thank you!

Almost there...

Please check your email to confirm your subscription

Footer

  • Calendar of Events
  • 3D Projects
  • Cardmaking
  • Fun Fold
  • Product Tips & Tricks
  • Projects
  • Techniques
  • Of Interest
  • Catalogs
  • Join the Fun
  • Contact Me
  • Email
  • Facebook
  • Instagram
  • Pinterest
  • YouTube

PAPERCRAFTING THREADS

Copyright © 2025 · Refined theme customized by Catherine Carroll

Privacy Policy · Affiliate Disclosure