
I’ll be honest—I almost let National Kindness Day slip by this year! But as soon as I remembered, I knew exactly what I wanted to create: a moody, autumn-inspired greeting card that captures the cozy essence of fall while spreading a message of kindness.
This design features a charming pumpkin patch scene with a rich color palette, brought to life with a variety of pumpkins. It’s the perfect seasonal card to send to someone who could use a little extra love and encouragement.
National Kindness Day reminds us that small gestures—like a handmade card—can make a big difference in someone’s day. So grab your supplies, and let’s create something beautiful together!
cutting & scoring guide
| Paper Dimensions | Score Short Side | Score Long Side | ||||
| 4¼” x 11″ Garden Green cardstock base | 1¼” & 6¾” | |||||
| 4″ x 4″ Perfectly Pears patterned paper for front | ||||||
| 1″ x 4″ Perfectly Pears patterned paper strips (cut 2) | ||||||
| 4″ x 5¼” Basic White cardstock liner | ||||||
| Scraps of Basic White & Mossy Meadow cardstock for stamping & die cutting |
step by step instructions
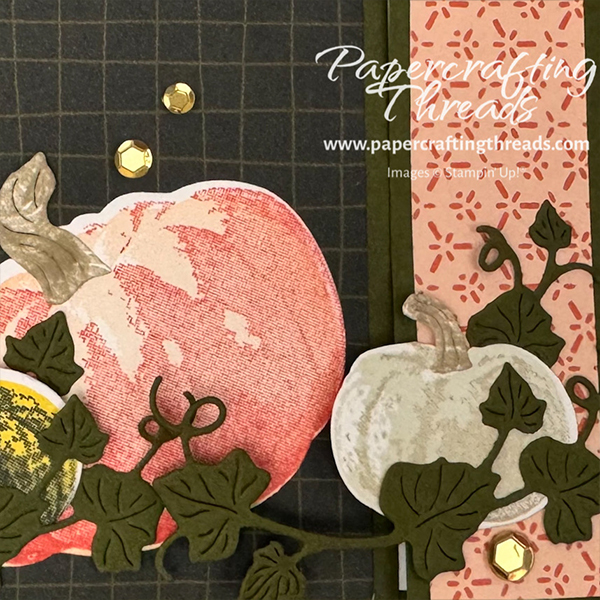
I used the Beautiful Pumpkins stamp set and matching die set for my pumpkins. And they really are beautiful. The color combinations are endless! But for this card, I inked the large detailed image in Calypso Coral and stamped it on Basic White cardstock. Then I inked the large fill image in Petal Pink, lined it up and stamped over the first image. And voila! A pumpkin practically leaps off the paper.
For my two small pumpkins, for my first combo, I used Crumb Cake for the detail and Basic Beige for the fill. The second combo is quite unusual — I used Secret Sea for the detail and Darling Duckling for the fill.
To create loads of texture in the stems, I stamped the large stem image in Basic Beige in a jumble on a piece of scrap Basic White cardstock. Diecut one large stem and two small stems with the embossed stem dies.
Diecut the pumpkins with their matching outline dies. And diecut multiples of the embossed leaf images from Mossy Meadow cardstock.
creating the fun fold
Place the Mossy Meadow cardstock base in landscape position. Adhere the Basic White liner in the middle. Adhere one of the patterned strips on the left side of the white liner. Fold in the small flap on the right side and burnish. Adhere the second patterned strip on the front of this side flap.
Fold in the large left flap and burnish. Adhere the large square patterned paper to the front.
If you are finding this tutorial helpful, consider a contribution to my coffee fund ☕️ Coffee → Creativity → Content → More Coffee (help fuel the cycle!)
Assemble the pumpkins by gluing the stems at slightly different angles. Adhere the small beige pumpkin on the lower portion of the right flap. Then adhere the long vine so it sweeps across the pumpkin. Tuck the vine spray under the top right edge of the pumpkin.
Next, adhere the large pumpkin on the big flap, so the vine sweeps across a portion of it. Add a dimensional behind the upper portion of the yellow pumpkin, and a dot of liquid glue to the base. Press to adhere towards the left side of the big pumpkin.
finish decorating
Adhere the last sweeping vine towards the bottom of the pumpkin pair, adjusting the leaves so the large one on the right is slightly under the yellow pumpkin. Tuck the remaining single leaves under the pumpkin edges. The goal is to make it look like the pumpkins are nested inside the swirling vines.
Stamp the sentiment ‘Hello’ from the Perfectly Pears stamp set in Versamark ink on a scrap of Basic White cardstock. Sprinkle with gold embossing powder and set with a heat tool. Diecut with the small strip die, pop up on dimensionals and add to card front.

Scatter loose gold sequins across the front.
Who will you give a card like this to?
Leave a Reply