Papercrafting Threads

  • Tutorials
    • PDF Tutorials
    • 3D Projects
    • Cardmaking
    • Fun Fold
    • Product Tips & Tricks
    • Projects
    • Techniques
  • Catalogs
  • Shop & Specials
    • Shop My Stampin’ Up! Online Store
    • Special Offers
    • Buy Me A Coffee
    • My Favorite Things on Amazon
    • Gift Certificates
  • Contact Me
  • Join the Fun
    • Join the Fun
    • Special Join Offers
  • Calendar of Events
  • Paper Pumpkin
    • Paper Pumpkin Kits
    • Paper Pumpkin Stamp Case Inserts
  • Nav Social Menu

    • Email
    • Facebook
    • Instagram
    • Pinterest
    • YouTube

Christmas Treat Popper

December 19, 2018 Leave a Comment

19 Dec

Bring back nostalgia for days gone by with the Christmas Treat Popper

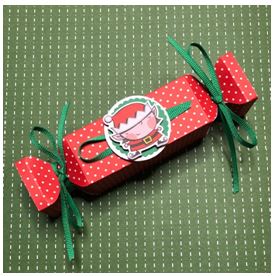
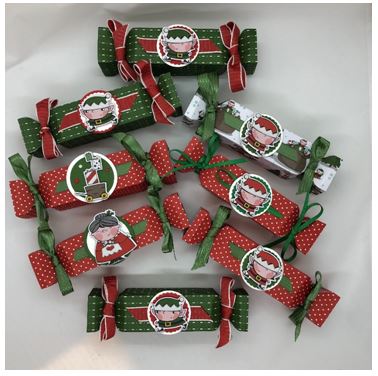
Today’s project uses the Santa’s Workshop Suite but you can decorate these fun “popper” treat boxes any way you like. I made these to give to the kids at a Christmas party. The Christmas treat popper reminds me of old-fashioned Christmas fun.

Supplies:

Designer Series Paper of choice

  • 6” x 5 ½”

Adhesives

  • Tear & Tape Adhesive
  • Tombow Liquid Glue (for decorations)
  • Stampin’ Dimensionals (for decorations)

Tools and Extras

  • Stampin’ Trimmer
  • Envelope Punch board
  • Simply Scored score board (not required if you have the Stampin’ Trimmer”

Instructions:

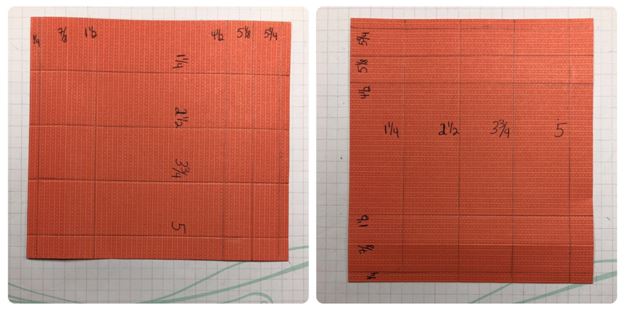
Start with the 6” by 5 ½” piece of designer series paper. I specifically designed this project so I could get 4 out of one sheet of 12 x 12 paper.

First, score the long (6”) side at ¼”, 7/8”, 1 ½”, 4 ½”, 5 1/8”, and 5¾”. Turn the paper 90 degrees, and then score the shorter (5 ½”) side at 1 ¼, 2 ½”, 3 ¾”, and 5.

Scoring Diagram for the Christmas Treat Popper

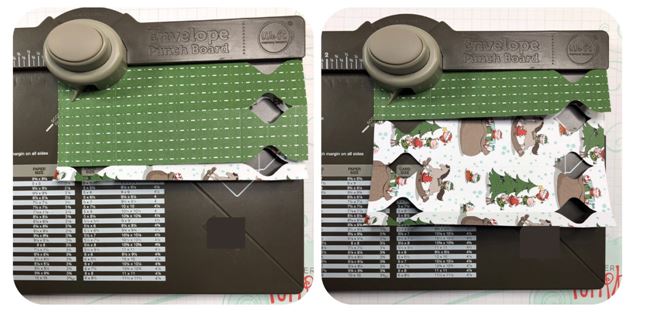
Next, fold and burnish the score lines on the shorter side. This prepares the paper for use the Envelope Punch Board.

The envelope punch board will be used on each of the burnished score lines plus the first end.

You will use the score lines going in the opposite direction as a guide for where to punch. Center the 2nd score line from each end in the punch opening.

Using the Envelope Punch Board for the Christmas Treat Popper

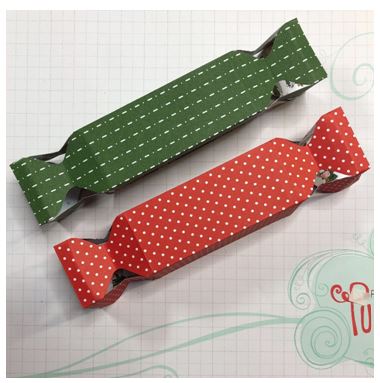
When you are done, your paper will look like this:

Christmas Treat Popper

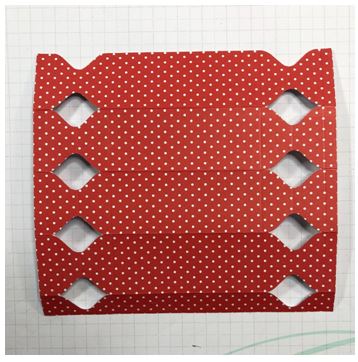
Now gently burnish the score lines on each end where you punched with the envelope punch.

Next trim the ends of the end flap then place the tear and tape.

Place Tear N Tape as shown on the Christmas Treat Popper

Then fold it over and assemble.

Assembled Christmas Treat Topper

Decorate your Christmas Treat Popper as desired:

Decorated Christmas Treat Popper

Share:

Leave a Comment
see more related posts: Uncategorized

Previous Post: « Quick and Simple Gift Card or Treat Holder
Next Post: New Goodies with the Occasions Catalog »

Reader Interactions

Leave a Reply Cancel reply

Your email address will not be published. Required fields are marked *

Primary Sidebar

Peri Beal

Cheesehead. Avid reader. Antique hunter.

Shop Online

Shop with me and get a FREE PDF tutorial bundle delivered to your inbox AND a handmade card via snail mail

Search

Papercrafting Threads

Gift Certificates
  • Email
  • Facebook
  • Instagram
  • Pinterest
  • YouTube

Sign up for my Newsletter

Sign up for my newsletter and get a free PDF tutorial as my welcome thank you!

Almost there...

Please check your email to confirm your subscription

Retired Product
Privacy Policy

The Fine Print

Just so you know... This is a personal website and I am responsible for its content. Stampin' Up!® does not endorse the use of or contents of the classes, services, or non-Stampin' Up! products I offer.

Sign up for my Newsletter

Sign up for my newsletter and get a free PDF tutorial as my welcome thank you!

Almost there...

Please check your email to confirm your subscription

Footer

  • Calendar of Events
  • 3D Projects
  • Cardmaking
  • Fun Fold
  • Product Tips & Tricks
  • Projects
  • Techniques
  • Of Interest
  • Catalogs
  • Join the Fun
  • Contact Me
  • Email
  • Facebook
  • Instagram
  • Pinterest
  • YouTube

PAPERCRAFTING THREADS

Copyright © 2025 · Refined theme customized by Catherine Carroll

Privacy Policy · Affiliate Disclosure