Papercrafting Threads

  • Tutorials
    • PDF Tutorials
    • 3D Projects
    • Cardmaking
    • Fun Fold
    • Product Tips & Tricks
    • Projects
    • Techniques
  • Catalogs
  • Shop & Specials
    • Shop My Stampin’ Up! Online Store
    • Special Offers
    • Buy Me A Coffee
    • My Favorite Things on Amazon
    • Gift Certificates
  • Contact Me
  • Join the Fun
    • Join the Fun
    • Special Join Offers
  • Calendar of Events
  • Paper Pumpkin
    • Paper Pumpkin Kits
    • Paper Pumpkin Stamp Case Inserts
  • Nav Social Menu

    • Email
    • Facebook
    • Instagram
    • Pinterest
    • YouTube

Corner Fold Card

September 11, 2021 Leave a Comment

11 Sep
Front of Corner Fold Card with Blackberry Beauty suite of products

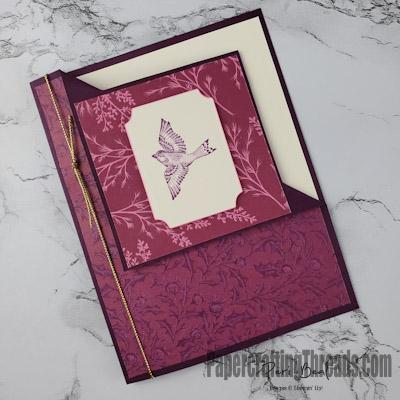
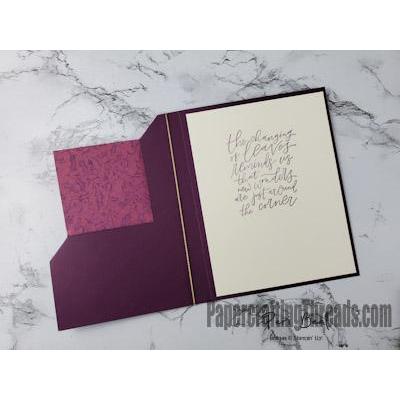
The Blackberry Beauty suite inspired me to try the Corner Fold Card. Looks pretty fancy but is quite easy to do once you know how. Blackberry Bliss Cardstock makes up the base of my card, with a mat of Very Vanilla for the message. I placed the patterned Designer Series Paper on the front of my card before I made any cuts, and voila!, look at the surprise inside!

Inside view of the Corner Fold Card

Corner Fold Card Measurements:

Blackberry Bliss cardstock base, 5-1/2″ x 8-1/2″ scored parallel to the short side at 4-1/4″

Very Vanilla cardstock, 5-1/4″ x 4″, plus scrap for front focal point

Blackberry Beauty Designer Series Paper Pattern 1, 5-1/4″ x 4″

Blackberry Beauty Designer Series Paper Pattern 2, 2-7/8″ x 2-7/8″

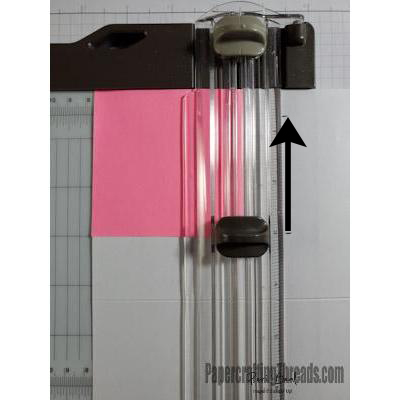
Adhere DSP Pattern 1 to front of card with adhesive of your choice. Open card base and place on trimmer, lining up top of card at the 3″ mark on the left and with the scoreline parallel to the top of trimmer. Place blade at 3″ mark on the guide arm and slice up until 5/8″ from the top edge.

Close up of Corner Fold Card first cut

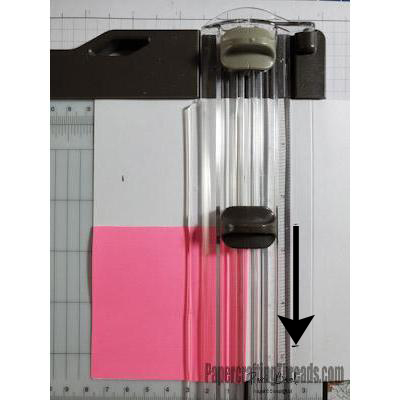
Turn card base upside down, line up left edge at 3″ mark. Place blade at 2-1/2″ mark on guide arm and slice down, stopping when 5/8″ from the bottom edge.

Close up of Corner Fold Card second cut

Remove the card from the trimmer and fold it in half. Gently pull the top right corner down towards the middle left side of the folded edge. Work the edges where the cardstock is still attached and crease. The edges of the square flipped portion should be parallel to the outside edges of the card base.

Stamp the bird image in Blackberry Bliss ink on a scrap of Very Vanilla, die cut with the Tasteful Labels die. Then run the brush end of the Light Polished Pink Stampin’ Blend along the edges of the die cut and pop up with dimensionals. Tie a length of gold Simply Elegant trim around the left edge of the card front. Stamp sentiment on Very Vanilla cardstock as shown so greeting is hidden by front flap and adhere inside of card.

Share:

Leave a Comment
see more related posts: Fun Fold

Previous Post: « Halloween Cauldron Card
Next Post: Cute Halloween Card »

Reader Interactions

Leave a Reply Cancel reply

Your email address will not be published. Required fields are marked *

Primary Sidebar

Peri Beal

Cheesehead. Avid reader. Antique hunter.

Shop Online

Shop with me and get a FREE PDF tutorial bundle delivered to your inbox AND a handmade card via snail mail

Search

Papercrafting Threads

Gift Certificates
  • Email
  • Facebook
  • Instagram
  • Pinterest
  • YouTube

Sign up for my Newsletter

Sign up for my newsletter and get a free PDF tutorial as my welcome thank you!

Almost there...

Please check your email to confirm your subscription

Retired Product
Privacy Policy

The Fine Print

Just so you know... This is a personal website and I am responsible for its content. Stampin' Up!® does not endorse the use of or contents of the classes, services, or non-Stampin' Up! products I offer.

Sign up for my Newsletter

Sign up for my newsletter and get a free PDF tutorial as my welcome thank you!

Almost there...

Please check your email to confirm your subscription

Footer

  • Calendar of Events
  • 3D Projects
  • Cardmaking
  • Fun Fold
  • Product Tips & Tricks
  • Projects
  • Techniques
  • Of Interest
  • Catalogs
  • Join the Fun
  • Contact Me
  • Email
  • Facebook
  • Instagram
  • Pinterest
  • YouTube

PAPERCRAFTING THREADS

Copyright © 2025 · Refined theme customized by Catherine Carroll

Privacy Policy · Affiliate Disclosure