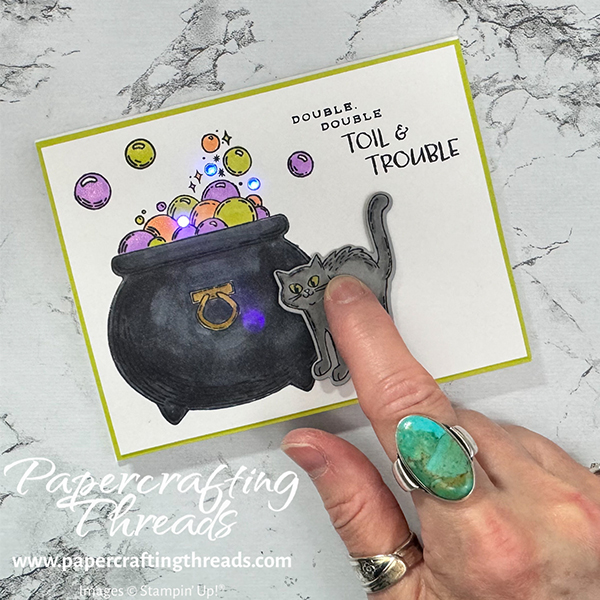
Brighten up the most wonderful spooky time of the year with my DIY Light Up Card Tutorial! Press the kitty’s belly and watch three bubbles light up with a ghostly purple glow. I’ve got tips and tricks galore as well as a STEM ‘lesson’ in how to make paper circuits. Let’s get started!
Laying out the design
Ink up the large cauldron from the Potions & Spells stamp set in Tuxedo Black Memento ink and stamp in the lower left corner of a piece of Basic White cardstock 4″ x 5 ¼”. Next stamp the overflowing bubbles image. Love that photopolymer for being able to see where to stamp!! The sentiment goes in the upper right corner. And a few errant bubbles float around. Stamp the cat on a scrap piece of Smoky Slate cardstock and die cut with the matching die.
Then color in the images with Stampin’ Blends. I used the following colors:
- Light and Dark Basic Black for the cauldron
- Dark Wild Wheat for the cauldron handle
- Light Lemon Lime Twist bubbles
- Light Peach Pie bubbles
- Light Highland Heather bubbles
- Dark Lemon Lolly cat eyes
- Light and Dark Smoky Slate cat
And finally adhere the focal image to a piece of Lemon Lime Twist cardstock 4 ⅛” x 5 ⅜”.
Using an 1/8″ hole punch, punch out three of the tiniest bubbles. Position over a standard card base of Thick Basic White cardstock (5 ½” x 8 ½”, scored and folded down the middle at 4 ¼”). Use a pencil and mark an ‘x’ in the center of each small hole. Mark a large ‘X’ under the cat’s tummy. Remove the top layer.
Make a housing
Now for the fun part! You’ll need 3mm light emitting diodes and double-sided conductive copper foil tape. And raid the junk drawer for a button battery (2032).
Here are the links to the products I bought from Amazon. Products listed contain affiliate links. I earn commissions if you click on those links to make a purchase. There is no extra cost to you.
Diodes: https://amzn.to/3X7PtXr
Copper Tape: https://amzn.to/4csHaK5
Cut a scrap of Basic White cardstock to enclose the battery. My cardstock measured ⅞” x 1 ¾”, and was scored down the middle at ⅞” and folded in half. Put Tear N Tape on the back flap and adhere to the large ‘X’ where the kitty will go. Mine is positioned like a book opens with the spine on the left. Pencil a ‘+’ sign inside the book. Pencil a ‘-‘ sign on the inside cover, cover and over to the left side of the card front as a reminder.

create the diy light up card paper circuit
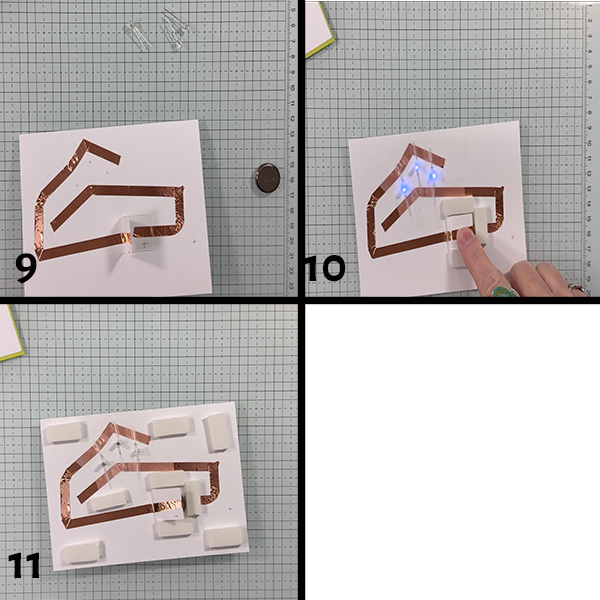
Create a circuit by adhering copper tape over the ‘+’ sign towards the right, up and under the three spots marked for the bubbles. Try to keep the copper tape in one single, continuous piece. If the tape does get broken apart, overlap the tape to make a good connection.
Then create the negative half the same way. I positioned the copper tape starting in a line above the three marked spots, over to the left, down and over to the right, with the tape going right over the cover of the book flap and inside the front cover.
Press all copper tape firmly to the cardstock. Place the battery inside the book with the positive side down touching the positive pencil mark. Close the front flap.

Choose the color diodes you’d like to use. The diodes have two ‘legs’: the anode, or negative short side and the cathode, or positive long side. Bend the legs apart, place the bulb over one of the marked spots and make sure the positive long side crosses the positive copper tape and the short long side crosses the negative copper tape. Hold in place, press on the closed flap and rejoice when the diode lights up💡. Position the remaining diodes in place in the same way. Add clear tape over the legs to hold in place. Test circuit by pressing on the front cover of the book. Adjust diodes and tape as necessary.
WARNING ABOUT MULTIPLE COLOR DIODES: If you decide to use more than one color diode, be aware of this variable. Different colors have different resistive properties and require different voltages to light up. When used in combination, circuits may not work or may work but in confusing ways. Some colors light up less or not at all when combined with other colors. I spent an hour testing all of the UV color diodes with orange and chartreuse diodes. There was nothing wrong with the diodes. Those three could not be mixed together. When I changed out the UV to yellow, all three worked fine together.
securing the battery
Build up ‘walls’ of foam adhesive sheet around the top, right and bottom of the battery ‘book’. Cut small pieces of foam adhesive sheet and double stack around the battery ‘book’. Test that top of the battery is below the ‘walls’. If using Stampin’ Up! foam adhesive sheets, two layers will work.
Next, position stamped and colored focal point over the card base, gently pushing the bulbs through the punched holes. Carefully lift lower right corner, remove last adhesive backing from walls and adhere. Make more double stacks of foam adhesive and insert around other corners of card front to evenly support the entire top layer.
I posted a video over on my YouTube channel of the process, so check it out! The possibilities are endless for making other DIY Light Up Card designs. These bring out the kid in everyone 🙂
This is so clever!