Papercrafting Threads

  • Tutorials
    • PDF Tutorials
    • 3D Projects
    • Cardmaking
    • Fun Fold
    • Product Tips & Tricks
    • Projects
    • Techniques
  • Catalogs
  • Shop & Specials
    • Shop My Stampin’ Up! Online Store
    • Special Offers
    • Buy Me A Coffee
    • My Favorite Things on Amazon
    • Gift Certificates
  • Contact Me
  • Join the Fun
    • Join the Fun
    • Special Join Offers
  • Calendar of Events
  • Paper Pumpkin
    • Paper Pumpkin Kits
    • Paper Pumpkin Stamp Case Inserts
  • Nav Social Menu

    • Email
    • Facebook
    • Instagram
    • Pinterest
    • YouTube

Double Z Fold Gift Card Holder

July 5, 2024 Leave a Comment

5 Jul
Double Z Fold Gift Card Holder in bright red with pink mat, red cherries, sparkly hello sentiment, linen thread bow and sweet friend sentiment in shamrock green

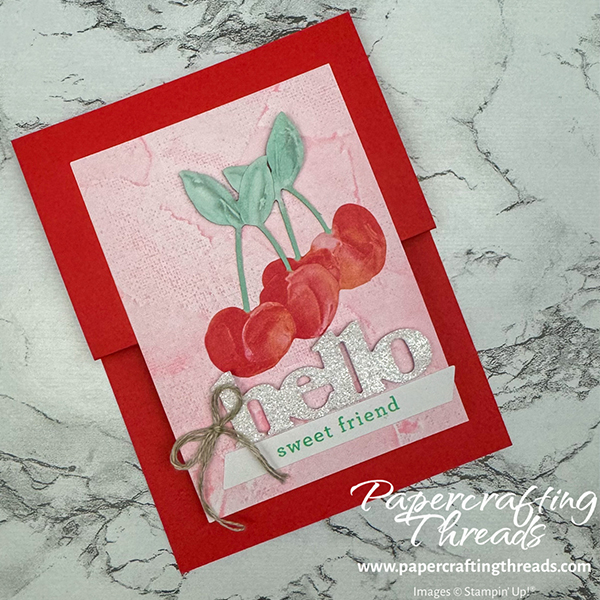
Juicy cherries and a sparkly ‘hello’ grace the front of this Double Z Fold Gift Card Holder. The card expands to reveal a gift card and a place for a handwritten message. I used pieces of Poppy Parade and Basic White cardstock for this project. All the rest of the elements are from the June 2024 Life Is Sweet Paper Pumpkin Kit. If you’re not a subscriber to this monthly kit, you should be! The kits just keep getting better and better. Get next month’s subscription here. So let’s get started crafting!

Cutting & Scoring Guide

Paper DimensionsScore Short SideScore Long Side
4-1/4″ x 11″ Poppy Parade card base2-3/4″ and 5-1/2″
3-1/4″ x 10″ Basic White panel for mechanism2-3/4″ and 5-1/2″s)
*3-1/4″ x 4-1/2″ patterned paper for front (for iTunes gift card)
*3-1/2″ x 4-1/2″ patterned paper for front if standard size gift card
Cutting & Scoring Guide for Double Z Fold Gift Card Holder

step by step instructions

I cut one of the Pretty in Pink patterned card bases from the kit down to 3-1/4″ x 4-1/2″. NOTE: I’m using an iTunes gift card, which is smaller than other gift cards. If your gift card is standard size, cut the patterned paper to 3-1/2″ x 4-1/2″.

Cut the other pieces of cardstock as noted in the guide above. Z fold both the Poppy Parade and the Basic White cardstock pieces.

Place the Poppy Parade card base on your work surface with the short panel end towards the top. Place the Basic White panel on your work surface with the longer panel end towards the top. The z-folds should match in direction. Slide the Basic White panel over the Poppy Parade base. Apply liquid glue to part of the Poppy Parade panel and adhere the Basic White in place, leaving the same border around both sides and top. Fold the Basic White Panel back and add liquid glue to the back of the short bottom panel. Adhere to the base.

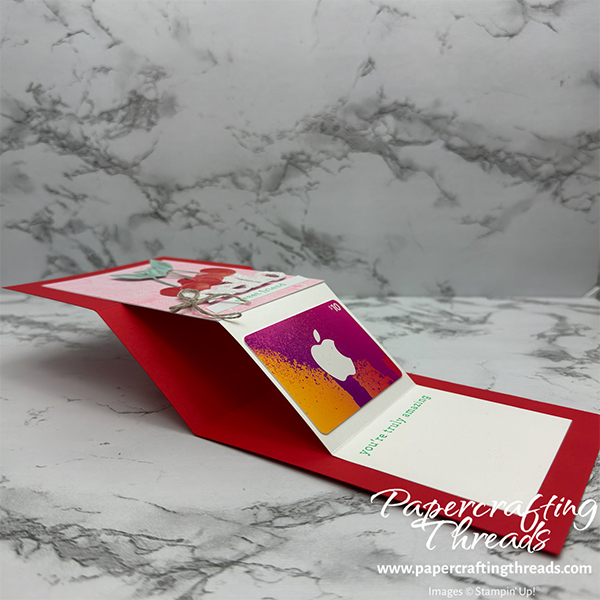
Adhere the Pretty in Pink layer to the top of the front Basic White panel. Add the cherries from the kit with Dimensionals behind the leaves and liquid adhesive behind the cherries. Cut up Dimensionals and pop up the glittery ‘hello’ sentiment from the kit. Tie a double bow with the linen thread (also in the kit) and adhere with a wadded up glue dot. Stamp ‘sweet friend’ in Shy Shamrock on the provided banner and adhere to card front. Stamp ‘you’re truly amazing’ in Shy Shamrock on the inner panel.

I made a quick video and posted it over on my YouTube channel. Check it out!

Share:

Leave a Comment
see more related posts: Fun Fold· Paper Pumpkin Alternative

Previous Post: « Floating Front Panel Card Tutorial
Next Post: Four Cards One Sheet Wonder »

Reader Interactions

Leave a Reply Cancel reply

Your email address will not be published. Required fields are marked *

Primary Sidebar

Peri Beal

Cheesehead. Avid reader. Antique hunter.

Shop Online

Shop with me and get a FREE PDF tutorial bundle delivered to your inbox AND a handmade card via snail mail

Search

Papercrafting Threads

Gift Certificates
  • Email
  • Facebook
  • Instagram
  • Pinterest
  • YouTube

Sign up for my Newsletter

Sign up for my newsletter and get a free PDF tutorial as my welcome thank you!

Almost there...

Please check your email to confirm your subscription

Retired Product
Privacy Policy

The Fine Print

Just so you know... This is a personal website and I am responsible for its content. Stampin' Up!® does not endorse the use of or contents of the classes, services, or non-Stampin' Up! products I offer.

Sign up for my Newsletter

Sign up for my newsletter and get a free PDF tutorial as my welcome thank you!

Almost there...

Please check your email to confirm your subscription

Footer

  • Calendar of Events
  • 3D Projects
  • Cardmaking
  • Fun Fold
  • Product Tips & Tricks
  • Projects
  • Techniques
  • Of Interest
  • Catalogs
  • Join the Fun
  • Contact Me
  • Email
  • Facebook
  • Instagram
  • Pinterest
  • YouTube

PAPERCRAFTING THREADS

Copyright © 2025 · Refined theme customized by Catherine Carroll

Privacy Policy · Affiliate Disclosure