Papercrafting Threads

  • Tutorials
    • PDF Tutorials
    • 3D Projects
    • Cardmaking
    • Fun Fold
    • Product Tips & Tricks
    • Projects
    • Techniques
  • Catalogs
  • Shop & Specials
    • Shop My Stampin’ Up! Online Store
    • Special Offers
    • Buy Me A Coffee
    • My Favorite Things on Amazon
    • Gift Certificates
  • Contact Me
  • Join the Fun
    • Join the Fun
    • Special Join Offers
  • Calendar of Events
  • Paper Pumpkin
    • Paper Pumpkin Kits
    • Paper Pumpkin Stamp Case Inserts
  • Nav Social Menu

    • Email
    • Facebook
    • Instagram
    • Pinterest
    • YouTube

Elfie Time

November 8, 2019 Leave a Comment

8 Nov

Elfie Time is perfect when you just want to say a holiday hello

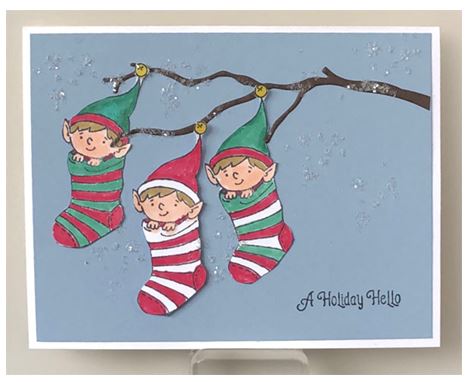
The cute faces of the Elfie stamp set, especially the one on the stamp that says “No Peeking” caught my eye the first time I thumbed through the Holiday catalog. The Elfie Time card is perfect for when you want to send a note to someone during the holiday season but don’t want to actually say “Merry Christmas”.

Supplies for Elfie Time:

Elfie (cling – 150509)
Tuxedo Black Memento Ink Pad (132708)
Stampin’ Blends:  Dark Mango Melody (147944), Light Soft Suede (146874), Dark Petal Pink (146871), Light Cherry Cobbler (144576), Shaded Spruce Combo (147938)
Whisper White Cardstock [CS] (100730) 8 ½” x 5 ½”, 4 ½” x 2 ¾”
Seaside Spray Cardstock [CS] (150883) 5 ¼” x 4”
Early Espresso Cardstock [CS] (119686) 5” x 2”
Seasonal Layers Dies (143751) branch die
Shimmery Crystal Effects (150892)
Ice Stampin’ Glitter (150445)
Multipurpose Liquid Glue (110755)
SNAIL Adhesive (104332)
Stampin’ Dimensionals (104430)
Silicone Craft Sheet (127853)
Paper Snips (103579)
Die-cutting Machine

Instructions:

  1. Fold the large piece of Whisper White CS in half to form the card base.
  2. Adhere the Seaside Spray to the cardfront with SNAIL adhesive.
  3. Stamp the elf in the stocking 3 times on the other piece of Whisper White CS with Memento Ink. Color them in with the blends.
  4. Apply a dot of Shimmery Crystal Effects to the jingle bell on the cap. Allow it to dry.
  5. When the crystal effects is dry, cut out the images with the Paper Snips.
  6. Use the branch die and the die-cutting machine to cut out a branch from the Early Espresso CS. Adhere it near the top of the card with small dots of Multipurpose Liquid Glue.
  7. Adhere one of the elves hanging down from the branch on the left with SNAIL. Tuck it behind the tip of the lower branch. Adhere the middle elf with Stampin’ Dimensionals and the third elf with SNAIL.
  8. Stamp the greeting in the lower right corner with Memento ink.
  9. Apply a thin string of Multipurpose Glue to various places on the branch and sprinkle Ice Stampin’ Glitter on them. Tap off the excess.
  10. Make a puddle of Multipurpose glue on the silicone craft sheet and stamp the ‘snow’ stamp in it. Then stamp on the card. Repeat in various places.
  11. Immediately sprinkle the glitter on the spots and tap off the excess.
  12. Wash off the glue from your stamp and silicone sheet immediately.
Share:

Leave a Comment
see more related posts: Cardmaking

Previous Post: « No Stamp Merry Christmas Card
Next Post: Christmastime is Coming Early this Year »

Reader Interactions

Leave a Reply Cancel reply

Your email address will not be published. Required fields are marked *

Primary Sidebar

Peri Beal

Cheesehead. Avid reader. Antique hunter.

Shop Online

Shop with me and get a FREE PDF tutorial bundle delivered to your inbox AND a handmade card via snail mail

Search

Papercrafting Threads

Gift Certificates
  • Email
  • Facebook
  • Instagram
  • Pinterest
  • YouTube

Sign up for my Newsletter

Sign up for my newsletter and get a free PDF tutorial as my welcome thank you!

Almost there...

Please check your email to confirm your subscription

Retired Product
Privacy Policy

The Fine Print

Just so you know... This is a personal website and I am responsible for its content. Stampin' Up!® does not endorse the use of or contents of the classes, services, or non-Stampin' Up! products I offer.

Sign up for my Newsletter

Sign up for my newsletter and get a free PDF tutorial as my welcome thank you!

Almost there...

Please check your email to confirm your subscription

Footer

  • Calendar of Events
  • 3D Projects
  • Cardmaking
  • Fun Fold
  • Product Tips & Tricks
  • Projects
  • Techniques
  • Of Interest
  • Catalogs
  • Join the Fun
  • Contact Me
  • Email
  • Facebook
  • Instagram
  • Pinterest
  • YouTube

PAPERCRAFTING THREADS

Copyright © 2025 · Refined theme customized by Catherine Carroll

Privacy Policy · Affiliate Disclosure