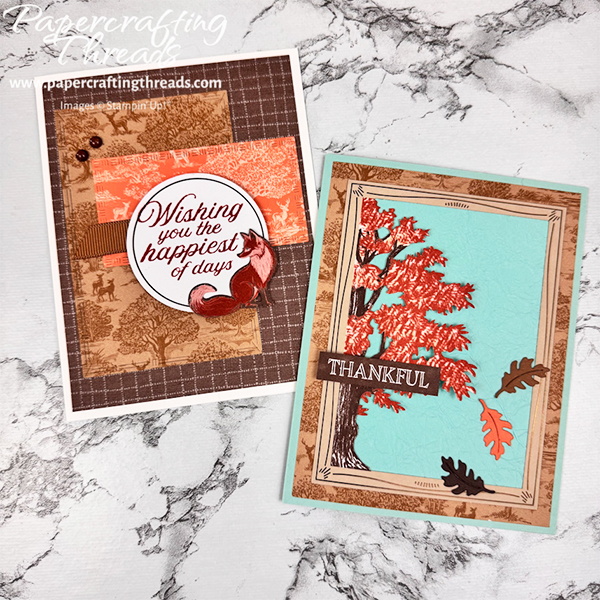
Use the Faux Linen Technique to create a showstopper of a card and make a bonus card with the secrets I share on how to stretch your supplies! While the Faux Linen Technique has been around for awhile, this tutorial changes it up with the type of adhesive and the use of pale aqua tissue paper. Then add some fall colors and loads of dimension for a fresh, modern take. Let’s get started!
cutting & scoring guide
| Paper Dimensions | Score Short Side | Score Long Side | ||||
| 4″ x 5¼” deer scene card base from kit | ||||||
| 3½” x 4¾” Pool Party cardstock for faux linen | ||||||
| 5½” x 8½” Pool Party cardstock for card base | 4¼” | |||||
| Scraps of Pecan Pie, Timid Tiger & Early Espresso cardstock | ||||||
| Envelope with orange flap from kit | ||||||
| Pool Party tissue paper from kit | ||||||
| Bonus Card | ||||||
| 5½” x 8½” Basic White cardstock for card base | 4¼” | |||||
| 4″ x 5¼” brown linen card base from kit | ||||||
| Leftover pieces from first card |
I’m using the Fall for Toile October 2025 Paper Pumpkin kit along with minimal other basic supplies for these two cards. Feel free to substitute other Paper Pumpkin kits or stamps and patterned papers from your stash of crafting supplies.
faux linen technique
Begin with the deer scene card base from the kit. Cut it down to 4″ x 5¼” and save the excess for other projects. Place the third largest die from the Textured Notes die set 165555 in the middle and die cut out the center of the scene. Set this aside for the bonus card.
Apply an adhesive sheet to one side of the 3½” x 4¾” piece of Pool Party cardstock. Cut a piece of the Pool Party tissue paper larger than the cardstock from the kit. Crumple the tissue paper up in a ball, then carefully straighten it out without removing all of the creases. Lay the tissue paper on the work surface with the SHINY side up. Remove the liner from the Pool Party cardstock with the adhesive sheet and lay adhesive-side down on the tissue paper. Press to adhere. Cut off any excess tissue paper.
assembling the card
Place the die cut frame with tree from the kit over the faux linen cardstock and check for any overhand. Trim any excess with a scissors. The goal is to have the faux linen cardstock just slightly smaller than the frame. Apply a thin line of glue around the outer edges of the faux linen cardstock. Then adhere the frame over the faux linen and press to adhere.
Adhere the deer scene with the cutout center to a Pool Party card base. Then adhere the faux linen layered cardstock centered over the card base. Apply dimensionals to the backs of three of the tree branches, creating dimension.
If you found this tutorial helpful, consider a contribution to my coffee fund ☕️ Coffee → Creativity → Content → More Coffee (help fuel the cycle!)
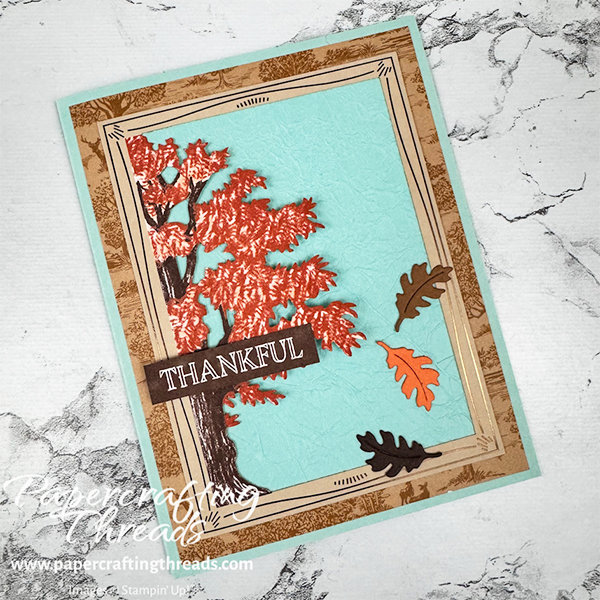
Die cut one leaf using the Circle of Seasons Add-on die set 167277 out of Pecan Pie, Timid Tiger and Early Espresso cardstock scraps. Apply a glue dot to the back of each leaf and arrange as shown. Note that the top leaf and the bottom leaf overhang the frame.
Add a dimensional to the back left half of the ‘Thankful’ sentiment strip from the kit. Add a glue dot to the back right half. Adhere the greeting to the front of the card, with the left side overhanging the frame and right side ending before one of the branches.
For the inside of the card, slice up one of the envelopes with an orange flap to create a liner. Then stamp falling leaves in Cajun Craze down the right side before adhering to the inside of the card.
WANT YOUR OWN PAPER PUMPKIN KITs? While this specific kit is no longer available, you can subscribe through me to receive future monthly kits featuring more amazing seasonal imagery and projects! Every kit is 100% guaranteed, and you can cancel anytime. Get crafting delivered right to your door! Choose from monthly OR prepaid subscriptions here.
bonus card instructions
For the Bonus card, select one of the brown linen card bases from the kit, and cut down one of the panels to 4″ x 5¼”. Adhere this panel to the front of a Basic White card base.
Adhere the saved brown deer scene from the first card towards the left hand side of the card base.
Die cut a rectangle from the left over orange flap of the chopped up envelope from the first card with the third smallest die of the Textured Notes die set 165555. Adhere this die cut rectangle horizontally over the deer scene.

Cut a piece of the sumptuous ribbon provided in the kit and adhere with a piece of Tear and Tape to the orange die cut. Stamp the greeting on one of the large circles from the kit with Cajun Craze ink. Apply dimensionals to the back of the circle and pop up on the card front.
Apply glue dots strategically to the back of the fox die cut from the kit and adhere to the circle. Finish off the card with several Streaked Dots 165902 as embellishments. Stamp leaf images on the inside of the card in Cajun Craze ink.
I love using leftovers from one card to make another card! And using the tissue paper that the contents of the kit are wrapped in when it’s normally thrown away is another way to get more bang for your buck.
I threw together a little how-to video for both cards over on my YouTube channel – check it out below. What do you think? I love using tinted tissue paper and adhesive sheets for a no mess version of the Faux Linen Technique.
Leave a Reply