Papercrafting Threads

  • Tutorials
    • PDF Tutorials
    • 3D Projects
    • Cardmaking
    • Fun Fold
    • Product Tips & Tricks
    • Projects
    • Techniques
  • Catalogs
  • Shop & Specials
    • Shop My Stampin’ Up! Online Store
    • Special Offers
    • Buy Me A Coffee
    • My Favorite Things on Amazon
    • Gift Certificates
  • Contact Me
  • Join the Fun
    • Join the Fun
    • Special Join Offers
  • Calendar of Events
  • Paper Pumpkin
    • Paper Pumpkin Kits
    • Paper Pumpkin Stamp Case Inserts
  • Nav Social Menu

    • Email
    • Facebook
    • Instagram
    • Pinterest
    • YouTube

Faux Step Card Tutorial

October 14, 2024 Leave a Comment

14 Oct
Faux Step Card with adorable basset hound in peaches, creams, rusts and white. Fun fold has panel at bottom with stamped bone images, middle panel with Here's to a true friend repeated in peach, turquoise and rust inks. Tall narrow panel rises up above the rest with stripes in ranging in peach to rust. Two hearts are near dog's head.

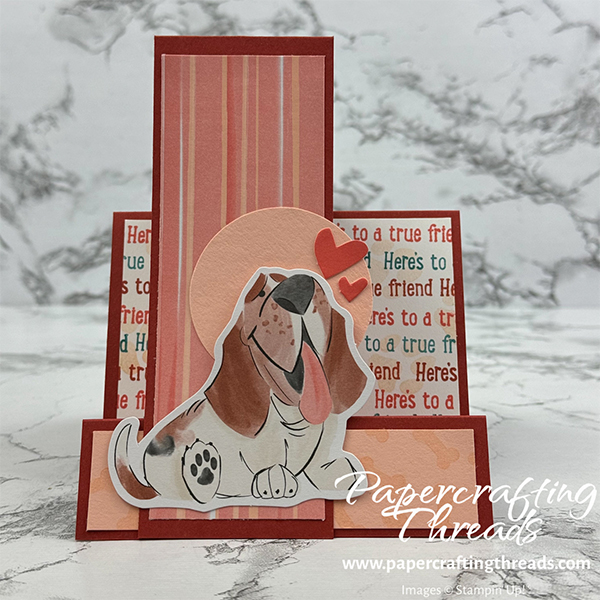
A Faux Step Card is an easy fun fold that looks complicated but suits man’s (or woman’s) best friend. You’ll be amazed at how quickly the card comes together. Use a kit like I did to make it even quicker. Or use your favorite stamp images and patterned paper to tailor the card to its recipient. Let’s get started!

cutting & scoring guide

Paper DimensionsScore Long Side
4¼” x 9″ Cajun Craze cardstock base1¼”, 2½” & 5¾
2″ x 8½” Cajun Craze cardstock for raised panel5½”
1″ x 4″ Petal Pink cardstock front strip
3″ x 4″ portion of envelope with colored stripe for inner back liner
3″ x 4″ Basic White cardstock inner back liner
1⅞”x 5⅛” stripes with circle from envelope flap (or DSP)
Scrap of Petal Pink for punching
Cutting & Scoring Guide for Faux Step Card

step by step instructions for the Faux Step CArd

Since I used the adorable By Your Side Kit, my first step was to cut up one of the patterned envelopes. I trimmed off the two sides, opened the envelope flat, and cut a piece measuring 3″ x 4″ so a narrow stripe was positioned at the bottom edge of the landscape oriented piece. Then I cut off and squared up the flap to use those stripes as a large vertical element.

I stamped the sentiment ‘Here’s to a true friend’ on the 3″ x 4″ Basic White cardstock, alternating lines in Calypso Coral, Pretty Peacock and Cajun Craze inks. Just remember to clean the stamp between colors. I then randomly stamped paw print images in second generation Petal Pink ink over the top of the words. It’s subtle but adds more dimension and interest. Then I stamped the bone image in Petal Pink ink randomly on the 1″ x 4″ Petal Pink strip. And I stamped one last paw print in Calypso Coral ink on the 3″ x 4″ strip-at-the-bottom piece.

assembly

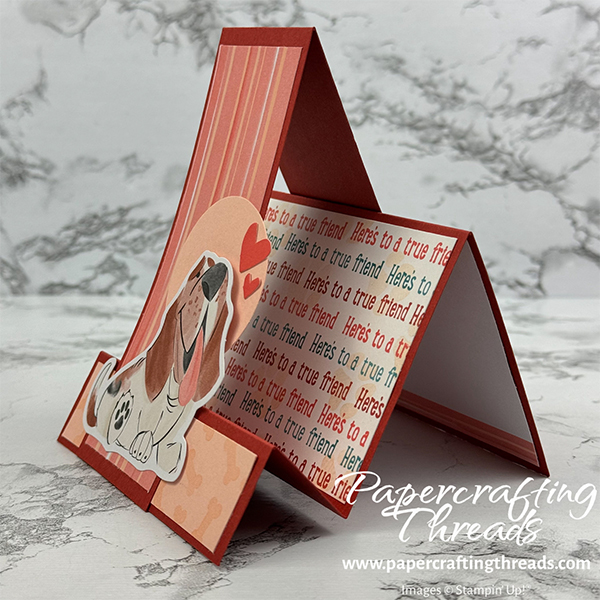
Fold the two pieces of Cajun Craze cardstock on the score lines. Adhere the patterned papers as shown. Once the base is complete, adhere the long narrow strip on top of the bone pattern, aligning the bottom edges. Fold the back half over the back fold of the base and adhere.

Side View showing all layers of Faux Step Card. Card has rust colored base, with three tiers of mountain folds with patterned paper in peach, turquoise and rust shades. Basset Hound lolls on the front with hearts and a peach circle behind him.

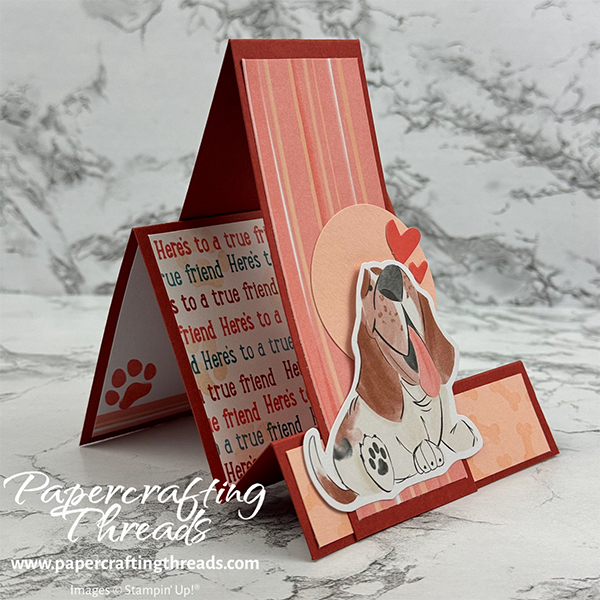
Punch a 2″ circle out of a scrap of Petal Pink cardstock and adhere it over the partial white circle from the envelope flap. Pop the pup up with Dimensionals behind his head and add glue near his feet. And pop out a few hearts from the accent piece in the kit. Use a few glue dots to adhere to the circle.

Extreme side view of the Faux Step Card with a basset hound, hearts and a circle enhancing the front and a good view of the three layers forming the steps. Color scheme is peach, rust and a few hints of turquoise.

The By Your Side Kit is perfect for those dog and cat lovers. And it’s on sale this month. Click on over to my online store to get your kit and the cardstock I used for this alternative. I’ve also included a link below to my YouTube channel if you need a visual tutorial.

Share:

Leave a Comment
see more related posts: Cardmaking· Fun Fold· Product Tips & Tricks

Previous Post: « Card Within a Card Fun Fold
Next Post: Peekaboo Card Tutorial »

Reader Interactions

Leave a Reply Cancel reply

Your email address will not be published. Required fields are marked *

Primary Sidebar

Peri Beal

Cheesehead. Avid reader. Antique hunter.

Shop Online

Shop with me and get a FREE PDF tutorial bundle delivered to your inbox AND a handmade card via snail mail

Search

Papercrafting Threads

Gift Certificates
  • Email
  • Facebook
  • Instagram
  • Pinterest
  • YouTube

Sign up for my Newsletter

Sign up for my newsletter and get a free PDF tutorial as my welcome thank you!

Almost there...

Please check your email to confirm your subscription

Retired Product
Privacy Policy

The Fine Print

Just so you know... This is a personal website and I am responsible for its content. Stampin' Up!® does not endorse the use of or contents of the classes, services, or non-Stampin' Up! products I offer.

Sign up for my Newsletter

Sign up for my newsletter and get a free PDF tutorial as my welcome thank you!

Almost there...

Please check your email to confirm your subscription

Footer

  • Calendar of Events
  • 3D Projects
  • Cardmaking
  • Fun Fold
  • Product Tips & Tricks
  • Projects
  • Techniques
  • Of Interest
  • Catalogs
  • Join the Fun
  • Contact Me
  • Email
  • Facebook
  • Instagram
  • Pinterest
  • YouTube

PAPERCRAFTING THREADS

Copyright © 2025 · Refined theme customized by Catherine Carroll

Privacy Policy · Affiliate Disclosure