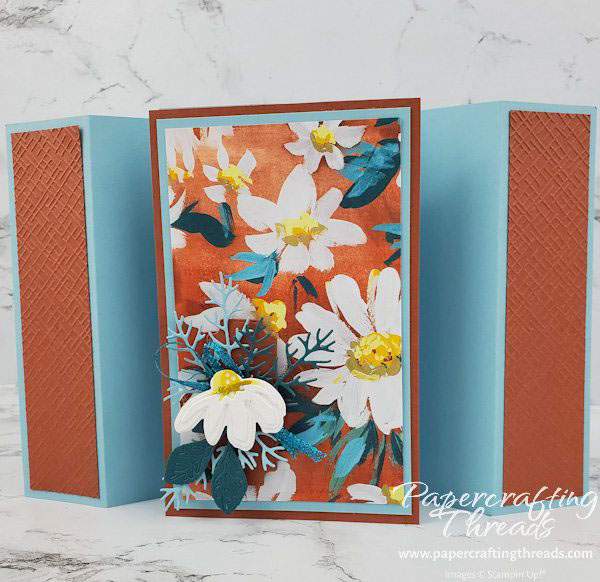
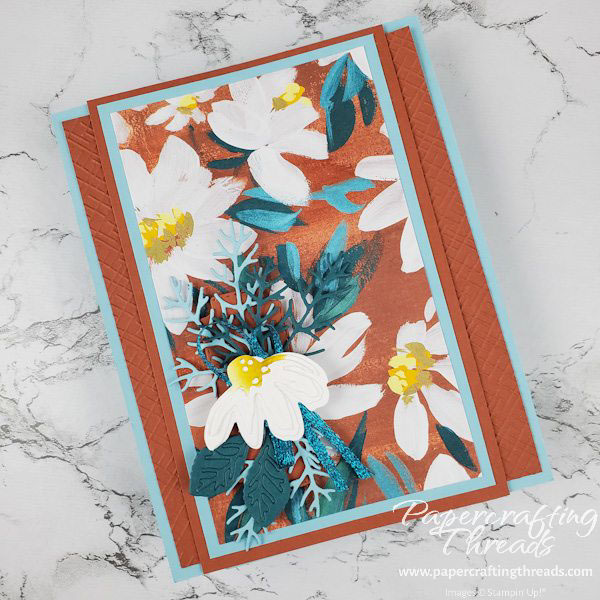
The Flying Finch Card has landed! And it’s a beauty, from the moment you pull it from the envelope all tucked in to its glory with wings extended for display. Quick and easy to make, let’s get started.
Cutting & scoring guide
| Paper Dimensions | Score Short Side | |||
| 6-1/4″ x 11″ Balmy Blue cardstock base | 1-1/2″, 2-3/4″ & 4-5/8″ | |||
| 3-1/2″ x 5-1/2″ Copper Clay cardstock base | ||||
| 3-1/4″ x 5-1/4″ Balmy Blue cardstock mat | ||||
| 3″ x 5″ Fresh As A Daisy DSP | ||||
| 1-1/4″ x 5-1/4″ Copper Clay cardstock (x2) for outer panels | ||||
| 3-1/4″ x 4-1/2″ Balmy Blue cardstock for message | ||||
| Scraps of Basic White, Balmy Blue, Pretty Peacock & Copper Clay |
step by step instructions for flying finch card
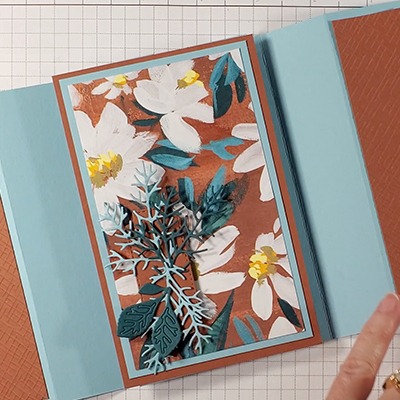
Once the Balmy Blue base cardstock has been cut and scored as noted in the guide above, cut the piece in half to get two 5-1/2″ x 6-1/4″ pieces. Then fold the 1-1/2″ score line as a mountain fold and the remaining two folds as valley folds. Repeat with the other piece.
Butt the two outer mountain folds up back to back and adhere with two strips of Tear N’ Tape spanning the seam or gap.

Add more adhesive on the newly created platform and center and adhere the Copper Clay cardstock base. Layer the Fresh as a Daisy piece on top of the Balmy Blue mat. Then adhere this new piece onto the Coppery Clay platform.
Run the two Copper Clay cardstock panels through an embossing machine with the crosshatch pattern from the Basics Embossing folder set. Then add liquid adhesive to the backs and adhere to the outside panels on the card front.
Stamp the large daisy image from the Fresh As A Daisy set onto the lower right corner of the remaining Balmy Blue cardstock. Then adhere the piece in the center back of the card. Slightly bend the card, just enough so there’s some give and the wings extend without interference.

decorate
Diecut the label from the Fresh As A Daisy diecut set with Coppery Clay cardstock. Pop it up on dimensionals towards the bottom left corner of the patterned daisy paper platform.
Diecut the fern-like foliage twice from Balmy Blue and once from Pretty Peacock. Diecut the daisy petal detail and raised center from a scrap of Basic White cardstock. Place a scrap of Pretty Peacock behind the leaf portion of the large grouped die and a scrap of Basic White behind the half daisy, then diecut.

Trim any excess cardstock from the daisy petals. If the leaf centers separated when removing from the cutting machine, put them back in place and add a small piece of Tear N’ Tape to the back. Use a sponge dauber to add Lemon Lolly, Crushed Curry and Wild Wheat accents to the center of the daisy diecut. Then layer the three pieces of daisy together.
Add the ferny-like foliage with glue dots to the top of the label, with fronds handing over the edges. Then add the diecut inset leaves with a glue dot.
Add adhesive to the back of the assembled daisy and zig zag Tahitian Tide Metallic Woven Ribbon across the back. Pop up on dimensionals and center on top of the foliage-draped label.
See the Flying Finch card in action as well as step by step assembly over on my YouTube channel.
Leave a Reply