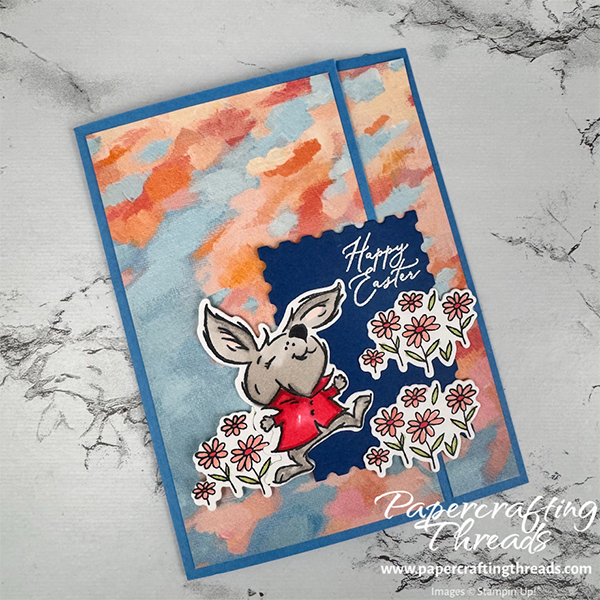
Learn how to create a showstopping Fold Back Fun Fold Card with a playful Easter bunny skipping through a flower-filled meadow. What makes this card extra special is the interactive element—the focal point swings out and back when the card is opened, creating a magical reveal moment. Perfect for Easter greetings or springtime celebrations, this card combines eye-catching design with interactive fun! Let’s get started!
cutting & scoring guide
| Paper Dimensions | Score Short Side | Score Long Side | ||||
| 5½” x 7½” Azure Afternoon cardstock base | 3¼” and 6½” | |||||
| 3″ x 5¼” Basic White cardstock for inside liners (cut two) | ||||||
| 3″ x 5¼” Everyday Skies patterned paper | ||||||
| ⅞” x 5¼” Everyday Skies patterned paper | ||||||
| Scraps of Basic White cardstock for bunny and flowers | ||||||
| Scrap of Blueberry Bushel cardstock for die cutting postage stamp edge |
step by step instructions
After prepping all of the cardstock and patterned paper, fold the card base on the 3¼” scoreline. Fold the 6½” scoreline backwards.
Using the Playing in the Rain stamp set, stamp the bunny image once and the flower patch image three times in Tuxedo Black Memento ink on scraps of Basic White cardstock and set aside. The Playing in the Rain stamp set is currently on sale and in stock! Visit my online store today as supplies are limited.
Line up the two Basic White panels, edge to edge on the work surface. Then stamp the flower patch image repeatedly across the bottom of the panels, spanning the gap.
Color the bunny and the flower patch images with Stampin’ Blends. I used the following:
| Description | Color of Stampin’ Blends | |||||
| Bunny nose | Light Basic Black | |||||
| Inside of bunny ears | Light Petal Pink | |||||
| Bunny ‘outline’ | Dark Gray Granite | |||||
| Bunny | Light Gray Granite | |||||
| Raincoat ‘outline’ | Dark Poppy Parade | |||||
| Raincoat | Light Poppy Parade | |||||
| Leaves | Light Granny Apple Green | |||||
| Petals | Light Calypso Coral | |||||
| Flower centers | Light Poppy Parade |
Die cut the colored bunny image and the three flower patch images. Also die cut an unstamped bunny image and flower patch image to use as a backing later. Using the Perennial Postage die set, die cut the 2″ x 2¾” sized postage ‘stamp’ from a scrap of Blueberry Bushel.
Ink ‘Happy Easter’ (from the Hello Spring February 2025 Paper Pumpkin Kit) in Versamark ink and stamp in the upper right corner of the Blueberry Bushel die cut. Add white embossing powder and heat set.
assembly of the fold back fun fold card
Line the left edge of the slender strip of Everyday Skies patterned paper up to the scoreline of the fold back section of the card base, leaving an equal margin from the other three sides. Adhere.
Then adhere the large piece of patterned paper to the front flap of the card base, leaving an equal margin around all four sides.
Open the card and adhere the two Basic White panels inside, creating a scene where the flower patches flow across the scoreline.
Apply a thin stripe of liquid glue to the back right edge of the Blueberry Bushel diecut and, with the card folded flat, adhere to the right slender flap. The Blueberry Bushel cardstock should open freely on the left.
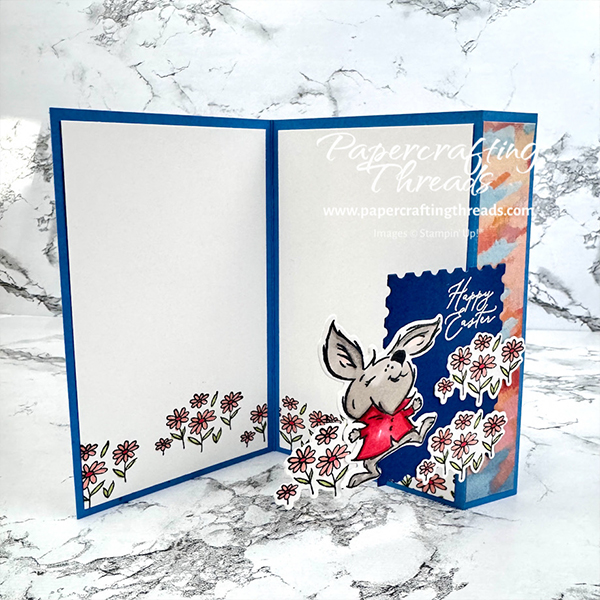
Adhere the colored and die cut bunny image and flower patch images as shown, being mindful of adhesive placement so the Blueberry Bushel piece swings freely.
And there you have it! A super easy interactive card that’s sure to delight. If you’re a visual learner, then hop on over to my YouTube channel where I posted a short video. If you find my tutorials helpful, consider a contribution to my coffee fund ☕️ Coffee → Creativity → Content → More Coffee (help fuel the cycle!)
Leave a Reply