Papercrafting Threads

  • Tutorials
    • PDF Tutorials
    • 3D Projects
    • Cardmaking
    • Fun Fold
    • Product Tips & Tricks
    • Projects
    • Techniques
  • Catalogs
  • Shop & Specials
    • Shop My Stampin’ Up! Online Store
    • Special Offers
    • Buy Me A Coffee
    • My Favorite Things on Amazon
    • Gift Certificates
  • Contact Me
  • Join the Fun
    • Join the Fun
    • Special Join Offers
  • Calendar of Events
  • Paper Pumpkin
    • Paper Pumpkin Kits
    • Paper Pumpkin Stamp Case Inserts
  • Nav Social Menu

    • Email
    • Facebook
    • Instagram
    • Pinterest
    • YouTube

Halloween Stair Step Card

October 31, 2021 Leave a Comment

31 Oct
Halloween Stair Step Card with Clever Cats in Blackberry Bliss and Mango Melody.

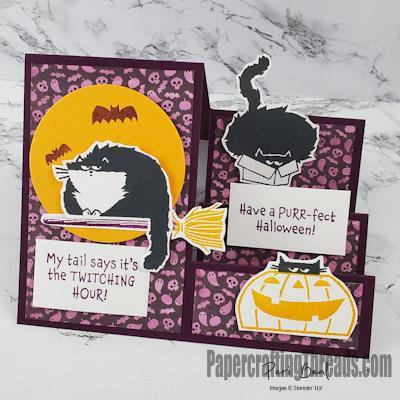
Boo! It’s my favorite holiday and I made two versions of the Halloween Stair Step Card. Clever Cats are featured in Basic Black, Blackberry Bliss, Mango Melody and Basic White. Wondering where that DSP came from, as you don’t see it in any of the catalogs? Look again, because I colored one of the black and white designs from the Cute Halloween designer series paper with a Light Blackberry Bliss Blend. Super fast and easy to change the color. I fussy cut the cats, broom and pumpkin and popped them up on strategically placed dimensionals.

Halloween Stair Step Card with cut skeletons, gravestones, spider and sparkly tree.

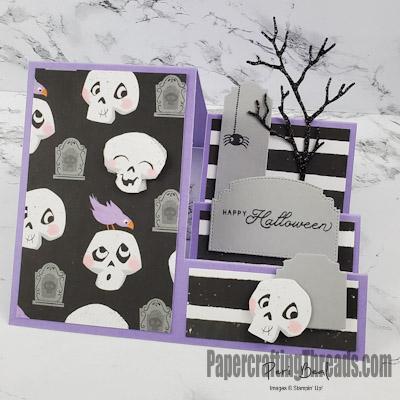
My second Halloween Stair Step Card showcases a graveyard with skeletons, tombstones, a resident spider and a sparkly bare-branched tree. The gravestones came from the Ornate Frames Dies. The middle one I used as is. I cut off the bottoms of the other two labels with my paper snips to get that tombstone look. It’s hard to see in the photo, but I fussy cut one of the skeleton faces on the far left panel and popped him up with dimensionals over the top of the printed skeleton face.

While both versions folded flat for mailing, the envelopes were quite thick and uneven. So I ran a piece of Basic White cardstock through the Subtles embossing folder and wrote the addressee information on one side. I used that piece as a backing for the folded stair step card and inserted both into a clear envelope with the address visible on the opposite side. Then a trip to the post office to purchase an extra 20 cents of postage for hand canceling. The wow factor of a clear envelope and seeing the card front made the extra cost totally worth it!

Share:

Leave a Comment
see more related posts: 3D Projects· Cardmaking

Previous Post: « Angled Gatefold Card
Next Post: Christmas Tags & Ornaments »

Reader Interactions

Leave a Reply Cancel reply

Your email address will not be published. Required fields are marked *

Primary Sidebar

Peri Beal

Cheesehead. Avid reader. Antique hunter.

Shop Online

Shop with me and get a FREE PDF tutorial bundle delivered to your inbox AND a handmade card via snail mail

Search

Papercrafting Threads

Gift Certificates
  • Email
  • Facebook
  • Instagram
  • Pinterest
  • YouTube

Sign up for my Newsletter

Sign up for my newsletter and get a free PDF tutorial as my welcome thank you!

Almost there...

Please check your email to confirm your subscription

Retired Product
Privacy Policy

The Fine Print

Just so you know... This is a personal website and I am responsible for its content. Stampin' Up!® does not endorse the use of or contents of the classes, services, or non-Stampin' Up! products I offer.

Sign up for my Newsletter

Sign up for my newsletter and get a free PDF tutorial as my welcome thank you!

Almost there...

Please check your email to confirm your subscription

Footer

  • Calendar of Events
  • 3D Projects
  • Cardmaking
  • Fun Fold
  • Product Tips & Tricks
  • Projects
  • Techniques
  • Of Interest
  • Catalogs
  • Join the Fun
  • Contact Me
  • Email
  • Facebook
  • Instagram
  • Pinterest
  • YouTube

PAPERCRAFTING THREADS

Copyright © 2025 · Refined theme customized by Catherine Carroll

Privacy Policy · Affiliate Disclosure