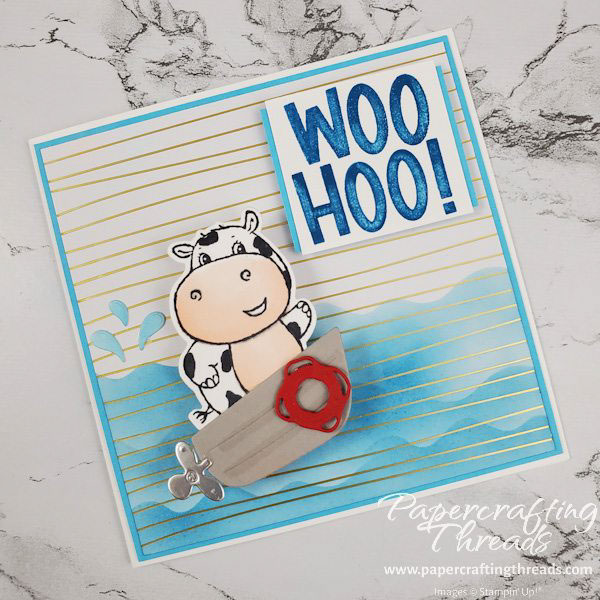
Create a fun interactive wobble card with a hip hippo turned cow and a boat that floats over the water! This card tutorial is full of tips and tricks to help you get the most out of your supplies.
Scoring & cutting guide
| Paper Dimensions | Score Short Side | Score Long Side | ||
| 4-1/4″ x 8-1/2″ Basic White cardstock base | 4-1/4″ | |||
| 4-1/8″ x 4-1/8″ Tahitian Tide cardstock | ||||
| 4″ x 4″ Gold Designer Series Paper (Sale-a-Bration) | ||||
| 1-1/2” x 1-5/8” Basic White cardstock | ||||
| Scraps of Gray Granite, Real Red, Tahitian Tide, Basic White, Silver foil |
step by step instructions
Tape the wave die from the free Hippos die set onto a scrap piece of Basic White cardstock that is 3” wide and run it through a Cut & Emboss machine. Use just the wavy edge as a mask. The embossed wave part can be saved and used for another project.
I placed the wavy edge upside down on my gold foil paper and used a blending brush to apply layers of Pacific Point ink. Then I moved the mask to another part and repeated. Smooth out any hard edges by going over the area again with just the blending brush and ink. And while you have the ink and blending brush out, add some ink to a scrap piece of Basic White paper as well. Diecut the water droplets from the inked scrap, the life preserver from the Real Red cardstock and the propeller from the silver foil.
Next, stamp the hippo image from Hippest Hippos with black Memento ink onto a scrap piece of Basic White cardstock and diecut. Diecut the boat from the scrap of Gray Granite cardstock.
Add even more dimension to the boat with a few swipes of alcohol ink using a Light Gray Granite Stampin’ blend. Color in the hippo’s muzzle and belly with a Light Petal Pink Stampin’ Blend. Add shadows with a Dark Petal Pink Blend. Go back over the darker color with the Light Petal Pink and blend them together.
Turn this hippo into a Hohlstein cow by coloring in random spots with a Dark Basic Black Blend. Voila!
Assemble the wobble card
Roll up a glue dot by pressing the tip of your finger on one edge and rolling it away from you. Place the glue dot on the back of the life preserver. And add another. Attach the life preserver to the prow of the boat. Add a drop of liquid glue to the stern of the boat and attach the propeller. Spread liquid glue on the bottom edge of the cow and place the boat on top.
The Woo-Hoo sentiment from Amazing Phrasing is too long for this card, but here’s how to make it fit! Ink just the first half (the ‘Woo’) in Pacific Point ink and stamp it on a 1-1/2” x 1-5/8” piece of Basic White cardstock. Ink the rest of the sentiment (the ‘Hoo!’) and stamp it underneath the first part.
PRO TIP: Use a blender brush to smooth out the inked image for when your ink pad is a little dry and the image is not solidly inked. Add a layer of Tahitian Tide cardstock behind the sentiment.
Fold the Basic White cardstock base in half. Center the mat layer of Tahitian Tide cardstock on top and then add the gold foil waves.
I stuck an action wobble to the back of my cow in the boat. Then I added 3 drops of liquid glue just above the waves and adhered the splashes.
I centered the sentiment between the cow and edge of the card. Then I stamped the starfish from July’s Paper Pumpkin kit on the inside flap in Tahitian Tide ink.
If you don’t already have a Stampin’ Up! demonstrator, I’d love to be your demo! Visit my online store here to order today!
Leave a Reply