Papercrafting Threads

  • Tutorials
    • PDF Tutorials
    • 3D Projects
    • Cardmaking
    • Fun Fold
    • Product Tips & Tricks
    • Projects
    • Techniques
  • Catalogs
  • Shop & Specials
    • Shop My Stampin’ Up! Online Store
    • Special Offers
    • Buy Me A Coffee
    • My Favorite Things on Amazon
    • Gift Certificates
  • Contact Me
  • Join the Fun
    • Join the Fun
    • Special Join Offers
  • Calendar of Events
  • Paper Pumpkin
    • Paper Pumpkin Kits
    • Paper Pumpkin Stamp Case Inserts
  • Nav Social Menu

    • Email
    • Facebook
    • Instagram
    • Pinterest
    • YouTube

How to Make a Shaker Card

March 12, 2022 Leave a Comment

12 Mar
Card example of how to make a shaker card with a wave, seagulls and puffy clouds.

Ever wondered how to make a shaker card? It’s quite simple and the end result is a lot of fun. I used the gorgeous Waves of the Ocean stamp set and matching dies for my ocean view card pictured above. Read on for the basic directions and soon you’ll be making your own shaker cards.

make the shaker card frame

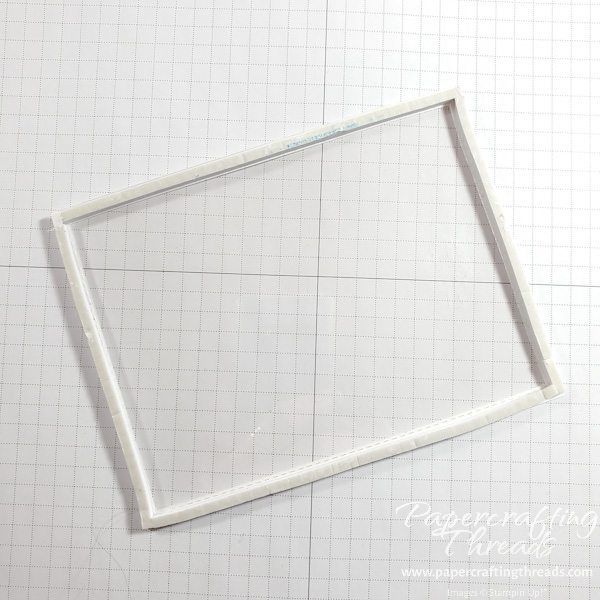
I chose the largest rectangle from the Rectangle Stitched Frame Dies. Once I diecut the frame from a piece of cardstock the same size as my card front, 4-1/4″ x 5-1/2″, I glued a piece of window sheet on the back of it and added foam adhesive strips. Be sure to outline all of the edges with no gaps so the sequins don’t leak out. PRO TIP: Dust the inside of the foam tape edges with an embossing buddy to keep sequins from sticking to any of the exposed sticky side.

Assembly of the Shaker

Stamp images on card front. I stamped the wave image in Pacific Point ink. I also diecut two seagulls from patterned paper and glued them to the card front. Once the card front is completely dry, pour sequins on top, keeping the sequins in the center. Remove the tape from the prepared frame and adhere, pressing firmly so there are no gaps.

Decorate the Shaker front

Next, to decorate the front of my shaker card, I diecut the wave from some leftover Be Dazzling Specialty Paper. I then glued the diecut to a piece of the stunning Waves of the Ocean patterned paper and trimmed around the outlined edge of the wave. Finally I glued the wave piece to the front of the window sheet frame. And my finishing touch was adding some puffy clouds, diecut from Basic White cardstock and adhered to the window sheet.

Final Notes

The finished card looks almost like a diorama, with the different elements of stamping and diets on different surfaces/planes. And if you’d like to see a live action version of how to create a shaker card, click here.

Share:

Leave a Comment
see more related posts: 3D Projects

Previous Post: « Create Layered Circle Cards
Next Post: How to Make a Fun Abstract Card »

Reader Interactions

Leave a Reply Cancel reply

Your email address will not be published. Required fields are marked *

Primary Sidebar

Peri Beal

Cheesehead. Avid reader. Antique hunter.

Shop Online

Shop with me and get a FREE PDF tutorial bundle delivered to your inbox AND a handmade card via snail mail

Search

Papercrafting Threads

Gift Certificates
  • Email
  • Facebook
  • Instagram
  • Pinterest
  • YouTube

Sign up for my Newsletter

Sign up for my newsletter and get a free PDF tutorial as my welcome thank you!

Almost there...

Please check your email to confirm your subscription

Retired Product
Privacy Policy

The Fine Print

Just so you know... This is a personal website and I am responsible for its content. Stampin' Up!® does not endorse the use of or contents of the classes, services, or non-Stampin' Up! products I offer.

Sign up for my Newsletter

Sign up for my newsletter and get a free PDF tutorial as my welcome thank you!

Almost there...

Please check your email to confirm your subscription

Footer

  • Calendar of Events
  • 3D Projects
  • Cardmaking
  • Fun Fold
  • Product Tips & Tricks
  • Projects
  • Techniques
  • Of Interest
  • Catalogs
  • Join the Fun
  • Contact Me
  • Email
  • Facebook
  • Instagram
  • Pinterest
  • YouTube

PAPERCRAFTING THREADS

Copyright © 2025 · Refined theme customized by Catherine Carroll

Privacy Policy · Affiliate Disclosure