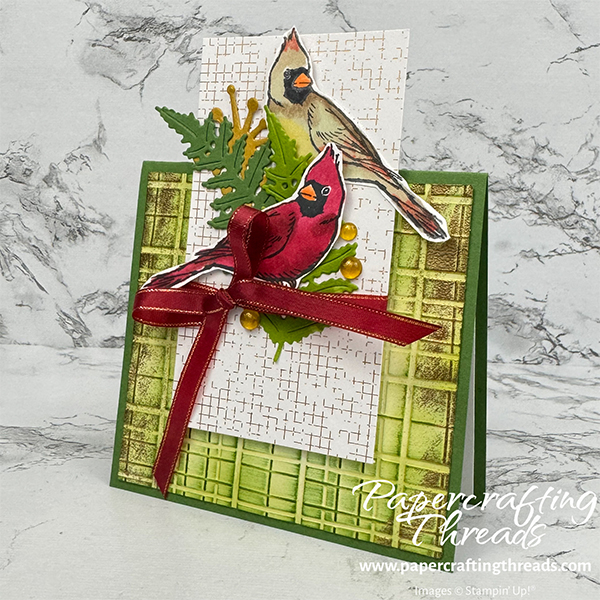
Create a Mirror Image Fun Fold Card with this stunning pair of cardinals nestled together using only one cardinal stamp for both birds. The combination of festive green plaid, touches of cherry cobbler ribbon, and elegant gold accents creates a card that’s perfect for the holidays or any special winter occasion. I used the cardinal image stamp from the October 2024 Nests of Christmas Paper Pumpkin kit. And bonus, it fits in a standard envelope for mailing. Let’s get started!
Cutting & Scoring Guide
| Paper Dimensions | Score Long Side | ||||
| 4¼” x 8″ Garden Green cardstock base | 4″ | ||||
| 3¾” x 4″ Basic White cardstock for embossing plus second cut for liner | |||||
| 2½” x 4½” Nature’s Sweetness patterned paper | |||||
| 2½” x 4½” Basic White cardstock | |||||
| Scraps of Basic White cardstock for stamping cardinals | |||||
| Scrap of Garden Green cardstock for die cutting fern | |||||
| Scrap of Granny Apple Green cardstock for die cutting fern | |||||
| Scrap of Wild Wheat cardstock for die cutting bauble |
Emboss one piece of the almost square Basic White cardstock in landscape position with the Forever Plaid 3D embossing folder. Mark the embossed side with an E (the side that was facing the back of the Stampin’ Up! logo).
Turn the embossed piece over to the debossed side. Add Granny Apple Green ink with a Blending Brush around all four sides. With the piece in landscape orientation, swipe Garden Green ink from edge to edge. Repeat to cover entire surface.
Dab Versamark ink on the right edge and sprinkle with Gold Embossing Powder. Remove any hard lines with a dry paint brush, then heat set. Repeat on the left edge. Set aside.
mirror image technique
Stamp the cardinal image in Tuxedo Black Memento ink on a Silicone Craft Sheet. TIP: stamp quickly straight down and up; the mat is squishy and ink will smear if you press too hard. Press one side of a scrap of Basic White cardstock over image and rub with your fingers to transfer ink to cardstock. Lift straight up. Ink and stamp image again directly on another scrap of Basic White cardstock.
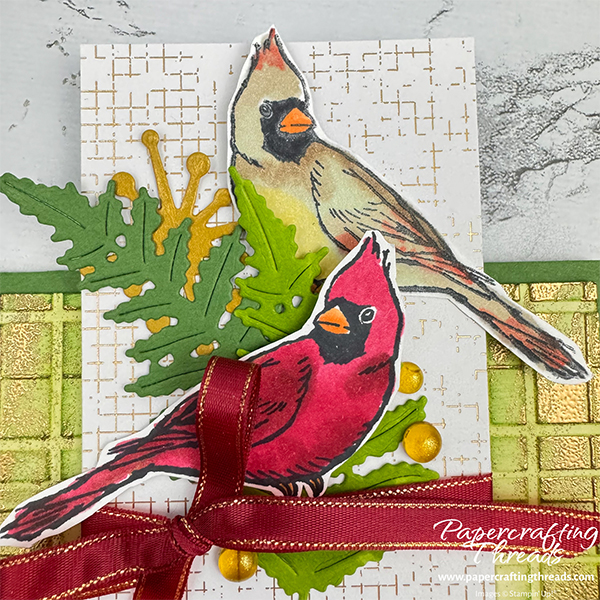
Color in cardinals with Stampin’ Blends using the chart below. Then fussy cut both images.
| Male | |||||
| Beak | Light & Dark Peach Pie | ||||
| Body | Light & Dark Cherry Cobbler Light & Dark Pecan Pie | ||||
| Feet | Light & Dark Peach Pie Light Pecan Pie | ||||
| Female | |||||
| Beak | Light & Dark Peach Pie | ||||
| Body | Light Soft Sea Foam Light & Dark Crumb Cake Light Daffodil Delight Dark Calypso Coral | ||||
| Neck | Dark Basic Black | ||||
| Feet | Light & Dark Peach Pie Light Pecan Pie |
Diecut two ferns from the Merry Tags & More Add-on 165639, one from a scrap of Garden Green cardstock and the other from Granny Apple Green. Color the Granny Apple Green fern with a Dark Granny Apple Green Stampin’ Blend.
Next, diecut two of the bauble or ‘sploot’ from the Tune In die set from a scrap of Wild Wheat cardstock. Cover with Metallic Enamel Effects in gold and set aside to dry.
assembly of mirror image fun fold card
Fold the Garden Green card base in half with the fold positioned at the top. Adhere the embossed plaid piece so the gold embossing is on the sides. Then adhere the plain Basic White piece rectangle to the back of the Nature’s Sweetness panel. Next, adhere the Garden Green fern with the tip hanging off the patterned paper towards the left. Adhere the Lemon Lime Twist fern in the center. Then tuck and adhere the bauble behind the ferns.
Next, add a dimensional behind the head of the female cardinal, add adhesive to her belly and tuck in behind the Lemon Lime Twist fern. Add the same adhesives to the male cardinal and add on top of the ferns but below the female.
Tie a length of Cherry Cobble and Gold ribbon in a bow around the bottom of the focal point. Add dimensionals to the bottom third of the panel and add to card front, making sure card height does not extend beyond 5½”. Scatter Gold-Textured Adhesive-Backed dots around ferns.
Finally, adhere plain piece of Basic White cardstock liner inside the card. Attach remaining bauble in lower right corner.
I’ve filmed a video with all of the techniques and the fun fold – check it out on my YouTube channel.
I hope you like my Mirror Image with a Fun Fold Card. Just think of all the different stamp images you have in your stash that you could use this technique on.
If you found this tutorial helpful, consider a contribution to my coffee fund ☕️ Coffee → Creativity → Content → More Coffee (help fuel the cycle!)
Leave a Reply