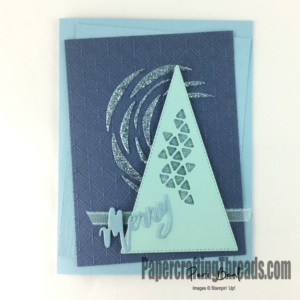
This card is non-traditional in every way possible…shades of blue instead of red and green, no stamping on the front, using a triangle to stand in for a tree, and even using the negative space from a die!!! But it shimmers and sparkles and definitely gives off holiday vibes in spite of all that.
Supplies
A Wish for Everything Stamp Set 149320
Word Wishes Dies 149629
Stitched Triangles Dies 152710
Painted Labels Dies 151605
Stampin’ Cut & Emboss Machine 149653
Dainty Diamonds Embossing Folder 152702
Subtle 3D Embossing Folder 151775
Balmy Blue cardstock 146982
Misty Moonlight cardstock 153081
Pool Party cardstock 122924
Misty Moonlight Classic Ink 153118
Wink of Stella 141897
Snowflake Splendor ¼’ Ribbon 153548
Snowflake Adhesive Backed Embellishments 153545
Glue Dots 103683
Dimensionals 104430
Mini Dimensionals 144108
Instructions for Non Traditional Triangle Tree
- Cut Balmy Blue cardstock base 5 ½” x 8 ½” and score at 4 ¼”.
- Cut another Balmy Blue cardstock mat to 3 ¾” x 5”, and emboss with the Subtles EF. Adhere to the card front at a slight angle to the right.
- Cut a Misty Moonlight cardstock mat to 3 ” x 4 ” and emboss with the Dainty Diamonds EF. Adhere to the card front at a slight angle to the left.
- Using the largest isosceles triangle and the ‘honeycomb’ triangles from the Stitched Triangles, diecut the large triangle with the honeycomb triangles as shown in the sample from Pool Party cardstock.
- Cut 3 pieces of Snowflake Splendor ribbon, and layer the pieces side by side running the length of the honeycomb triangles on the back of the isosceles triangle, adhering the ends of the ribbon with glue dots.
- Cut another strip of Snowflake Splendor ribbon and layer it horizontally as shown on the back of the isosceles triangle ‘tree’.
- Diecut the large circle with swirls from the Panted Labels dieset from a scrap of Balmy Blue Glimmer Paper. Adhere the negative pieces in a swirl pattern on the Misty Moonlight mat as shown on the sample.
- Pop up the tree using dimensionals as shown.
- Diecut the word “Merry” from the Word Wishes dieset from Balmy Blue cardstock. Swirl Wink of Stella over entire surface and let dry. Adhere with multipurpose glue and one mini dimensional below the letter M across the ribbon and tree as in the sample.
- Stamp “A Merry Little Wish for Lots of Joy This Season” sentiment from A Wish for Everything Stamp Set on the inside of the card in Misty Moonlight ink.
- Scatter Snowflake Adhesive Backed Embellishments around the sentiment on the inside of the card.

Leave a Reply