
Pull the arrows to reveal the Peekaboo Card surprise when two little chickadees appear on either side of this handsome cardinal! No special dies needed, just some cardstock, scissors, and a plastic bag. Let’s get started!
cutting & scoring guide
| Paper Dimensions | Score Long Side | ||||
| 5½” x 8½” Coastal Cabana cardstock base | 4¼” | ||||
| 3¾” x 4⅝” patterned paper for snow mat | |||||
| 4⅛” x 5⅜” Garden Green mat | |||||
| 1½” x1¾” Basic White cardstock for mechanism | |||||
| 1½” x 2″ Basic White cardstock for platform | |||||
| ⅞”x 2″ Basic White cardstock strips for tabs (cut 2) | |||||
| Scrap of Basic White cardstock for arrows |
step by step instructions for peekaboo card
I used the Nests of Christmas October 2024 Paper Pumpkin Kit for my card elements, but feel free to substitute any stamps and diecuts that you have.
Place the Basic White cardstock mechanism in landscape position on work surface. With a pencil, mark in ¼” from all sides and make a grid. Cut out the inner side edges.
Remove the extra wide Tear N Tape from its plastic bag. Cut the bag into a strip 7/8″ wide by 4″. Add a piece of 1/8″ wide double-sided adhesive to one end. Lay the strip of plastic with adhesive strip facing up over the middle of the mechanism with the tape lined up with the right edge. Wrap the plastic around the back side of the mechanism, and overlap the adhesive strip on the front. Remove the liner and press to adhere.
Add another piece of adhesive tape on the outside over the first one. Remove the liner from the adhesive strip and line up the right edge of one of the tabs. The rest of the tab should hang over the left edge of the mechanism. Press to adhere.
Flip the mechanism face down, add a piece of adhesive tape to the left side of the plastic. Remove the liner. Line up the remaining tab with the left edge. The excess of the tab should hang over the right side of the mechanism. Press to adhere.
Add a strip of adhesive foam to the top and bottom channels of the mechanism. Center the platform in landscape position on top and adhere. Pull the tabs to make sure the mechanism works. Push the tabs back in before decorating.
decorating
Using pieces from the kit, adhere the chickadee on a branch to the left tab. Adhere the large greenery to the platform with glue dots. Brighten up the cardinal with flicks of color using a Light Real Red Stampin’ Blend. Adhere with a dimensional behind his neck and a glue dot behind the base of the tail. Cut up the chickadee with two branches die cut into three pieces. Place greenery on right tab with chickadee adhered on top.
Flip whole thing over and add foam adhesive tape to top and bottom channels just like as on front.
Add layers to card base as shown. Adhere Peekaboo mechanism to front of card. Stamp greeting on label from kit and pop up on dimensionals.
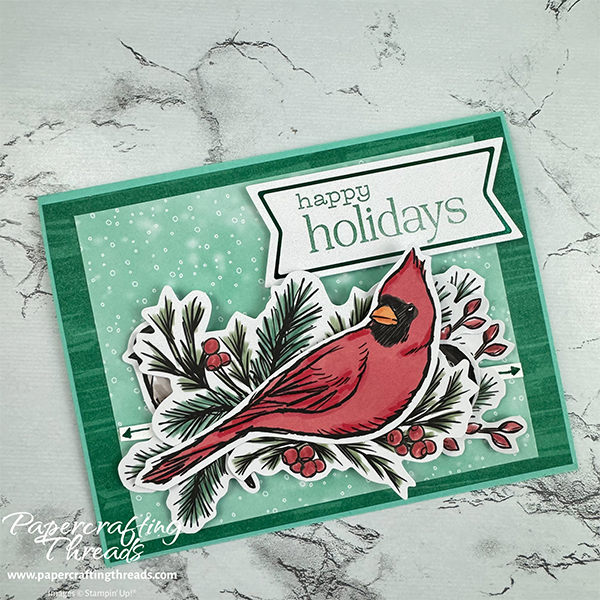
Cut a Basic White liner for inside of card, adhere extra greenery to bottom right corner and add to inside of card. Draw two arrows on a scrap of Basic White cardstock with a Shaded Spruce Stampin’ Write marker. Trim closely around each arrow and use multipurpose liquid glue to adhere behind die cut birds on each side.
I posted a video over on my YouTube channel if you’d like a visual. Don’t you love how those chickadees pop out from hiding behind the cardinal? To get other Paper Pumpkin Kits, fly on over to my online store and pick up a prepaid subscription today!
Leave a Reply