Isn’t this Pinwheel Tower Fun Fold Card cute? It folds flat for mailing, and opens up to stand on its own. This fun fold would be great for table decor, so make a bunch for your boo bash!
I used Gorgeous Grape for my base cardstock, and I cut four at 2-3/4″ x 4-1/4″. The larger panels measure 2-1/2″ x 4″. The skinny panels measure 1-1/2″ x 4″. And I used Pattern Party Designer Series Paper for the “tower” that makes it all work. The tower measures 4/14″ x 4-1/4″. I used Designer Series Paper for my tower to cut down on the bulk. Plus I like that the pattern adds even more to the Halloween feel.
Start by scoring the Pattern Party tower at 1″, 2″, 3″ and 4″. Fold the tower with the pattern you want showing on the inside. Place liquid glue on the tab and adhere. The side that faces out will be completely covered up. Set the tower aside to dry.
Pinwheel Tower Panel 1
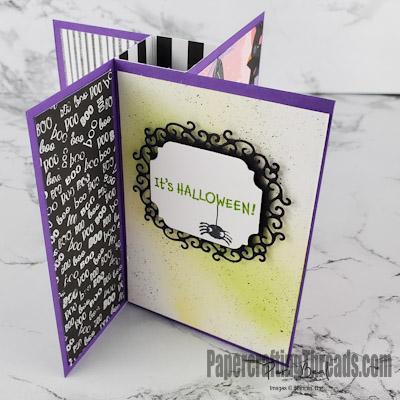
For my first panel, I cut my panel from Basic White cardstock. I sponged Daffodil Delight ink diagonally across the panel using a Blender Brush. Then I added Granny Apple Green ink in the middle of the Daffodil Delight. Next I splattered black ink using the brush tip of my marker pressed against the cap of the marker. I then cut a spooky looking frame in Basic Black with one of the Ornate Frame Dies. The sentiment and little spider came from the Clever Cats stamp set.
Once I had my panel done, I flattened my tower and applied liquid glue to one side. Then I lined up the long edge of the Gorgeous Grape Panel with the long edge of the tower and held it for a few seconds.
Panel 2
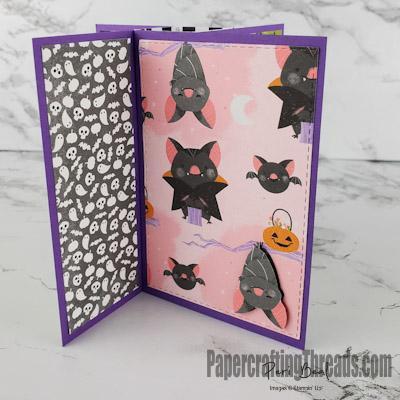
For my next large panel, I used the bat design from the Cute Halloween Designer Series Paper. And I cut it out of the paper with the Stitched Rectangles Die. I also fussy cut one of the upside down bats from a scrap of DSP and popped it up on a dimensional. After glueing the designer paper to a panel of Gorgeous Grape, I applied glue to the next column of my center tower and butted this panel up against the first panel.
Panel 3
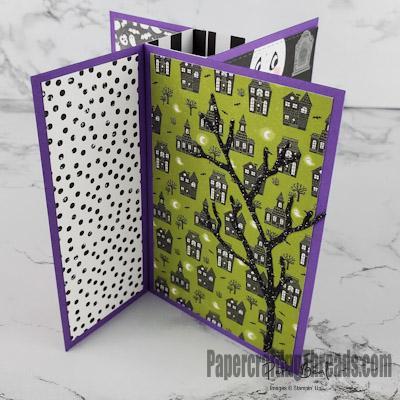
For the third panel, I chose the haunted mansion pattern. And I die cut the branch from the Harvest Dies with Black Glitter Paper. I applied this panel in the same manner as the previous panel.
Pinwheel Tower Panel 4
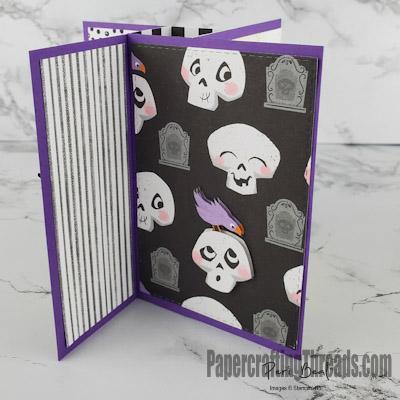
The last panel of my Pinwheel Tower Fun Fold Card features the skeleton pattern from the Cute Halloween paper. I fussy cut one of the skeletons with the goofy crow on it’s head from a scrap and popped it up on one from my panel.
For the smaller side panels, I cut four different patterns, all from the Cute Halloween Designer Series Paper. The panels were adhered with liquid glue. And that’s it!
Leave a Reply