Papercrafting Threads

  • Tutorials
    • PDF Tutorials
    • 3D Projects
    • Cardmaking
    • Fun Fold
    • Product Tips & Tricks
    • Projects
    • Techniques
  • Catalogs
  • Shop & Specials
    • Shop My Stampin’ Up! Online Store
    • Special Offers
    • Buy Me A Coffee
    • My Favorite Things on Amazon
    • Gift Certificates
  • Contact Me
  • Join the Fun
    • Join the Fun
    • Special Join Offers
  • Calendar of Events
  • Paper Pumpkin
    • Paper Pumpkin Kits
    • Paper Pumpkin Stamp Case Inserts
  • Nav Social Menu

    • Email
    • Facebook
    • Instagram
    • Pinterest
    • YouTube

Stamp It Up!

November 19, 2017 Leave a Comment

19 Nov

red rubber stamp

Every project – and every stamper – is just a bit different which is why Stampin’ Up! offers unique styles of stamps. All stamps are made in the United States and are packaged in uniformly sized cases with images on the side for easy storage and quick reference. The stamp medium is listed in each stamp set description. Here are the three types of stamps produced by Stampin’ Up!

Classic Rubber Clear Mount – Made using high-quality rubber that allows for detailed images. Come with a compact set of stamps ready to mount on reusable clear blocks (sold separately). Work your stamping magic, then remove the stamp from the block and store everything away for your next project.

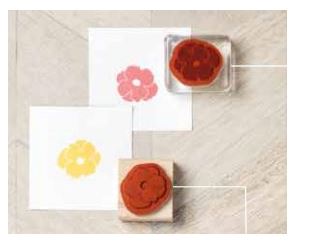
Classic Rubber Wood Mount – Made using high-quality rubber that allows for detailed images. Come in larger plastic storage cases and include both stamps and one maple wood block per stamp (in coordinating sizes). Once you’ve mounted the red rubber stamp on the block, it will always be ready for you to used right out of the box.

Photopolymer – The transparent nature of photopolymer stamps makes it easy to line up images for precision placement. Mount the stamps on reusable clear blocks and see where creativity takes you! Some advantages to using photopolymer stamps are – 1) mix & match – combine multiple stamps on a single block; 2) repeating patterns – create backgrounds by repeating images to fill the page; 3) clear alignment – perfect for alphabet sets or builder stamps; 4) two-step – layering two or more stamped images is called Two-Step Stampin. Look for sets throughout the current catalog marked as Two-Step.


Share:

Leave a Comment
see more related posts: Of Interest· Uncategorized

Previous Post: « Six Alternate Ways to Washi
Next Post: Online Extravaganza! »

Reader Interactions

Leave a Reply Cancel reply

Your email address will not be published. Required fields are marked *

Primary Sidebar

Peri Beal

Cheesehead. Avid reader. Antique hunter.

Shop Online

Shop with me and get a FREE PDF tutorial bundle delivered to your inbox AND a handmade card via snail mail

Search

Papercrafting Threads

Gift Certificates
  • Email
  • Facebook
  • Instagram
  • Pinterest
  • YouTube

Sign up for my Newsletter

Sign up for my newsletter and get a free PDF tutorial as my welcome thank you!

Almost there...

Please check your email to confirm your subscription

Retired Product
Privacy Policy

The Fine Print

Just so you know... This is a personal website and I am responsible for its content. Stampin' Up!® does not endorse the use of or contents of the classes, services, or non-Stampin' Up! products I offer.

Sign up for my Newsletter

Sign up for my newsletter and get a free PDF tutorial as my welcome thank you!

Almost there...

Please check your email to confirm your subscription

Footer

  • Calendar of Events
  • 3D Projects
  • Cardmaking
  • Fun Fold
  • Product Tips & Tricks
  • Projects
  • Techniques
  • Of Interest
  • Catalogs
  • Join the Fun
  • Contact Me
  • Email
  • Facebook
  • Instagram
  • Pinterest
  • YouTube

PAPERCRAFTING THREADS

Copyright © 2025 · Refined theme customized by Catherine Carroll

Privacy Policy · Affiliate Disclosure