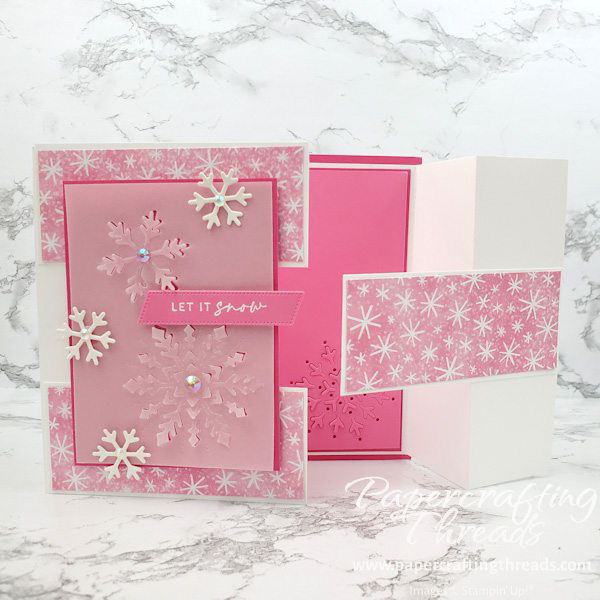
Today I’m sharing a Triple Panel Interlocking Card with lots of snowflakes. It’s December, and we have no snow on the ground, so I’m making up for it with my paper crafting.
scoring & cutting guide
| Paper Dimensions | Score Long Side | |||
| 5-1/4″ x 11″ Basic White cardstock | Score both ends at 1-3/4″ x 3-1/2″ | |||
| 1-3/4″ x 4″ Basic White cardstock (x3) | ||||
| 1-5/8″ x 3-7/8″ Celebrate Everything patterned paper (x3) | ||||
| 3-7/8″ x 5-1/8″ Melon Mambo cardstock for inside of card | ||||
| 4-1/4″ x 5-1/2″ Melon Mambo cardstock for base of card | ||||
| 3-3/4″ x 5″ Polished Pink cardstock mat for inside of card | ||||
| 3″ x 4-1/8″ Vellum cardstock for front | ||||
| 3-1/8″ x 4-1/4″ Melon Mambo cardstock for front mat | ||||
| Scraps of Shimmer cardstock and Polished Pink for sentiment |
step by step instructions
Start with the large Basic White cardstock piece and score both ends at 1-3/4” and 3-1/2”. Fold and burnish on the score lines with a mountain fold/valley fold (or mirrored “Z”) pattern on each side. The folded ends will not meet in the middle and that’s okay.
Then run a piece of Polished Pink cardstock cut to 3-3/4” x 5” through a Cut & Emboss machine with one of the snowflakes dies from the Frosted Flurry die set. The one I used cuts out only partial images so you can pop up the cutout pieces for a unique dimensional look. I adhered this to a piece of Melon Mambo cut to 3-7/8” x 5-1/8”. And then I glued the matted piece to the inside of my card base.
I layered three strips of patterned paper from the Celebrate Everything pack measuring 1-5/8” x 3-7/8” to three strips of Basic White card 1-3/4” x 4”. Then I placed the strips horizontally on the card front, first with no adhesive just for a visual placement guide. My strips butted up to each other with no space so that’s how I adhere them. I worked from bottom to top and applied adhesive to the left side only for the bottom strip, to the right side only for the middle strip, and to the left side only for the top strip.
Once that was done, I adhered my folded card to a Melon Mambo base 4-1/4” x 5-1/2”. You could skip this piece if you’re short on cardstock but I liked how it added more stability to the working mechanism of the front.
Decorating the Triple Panel Interlocking card
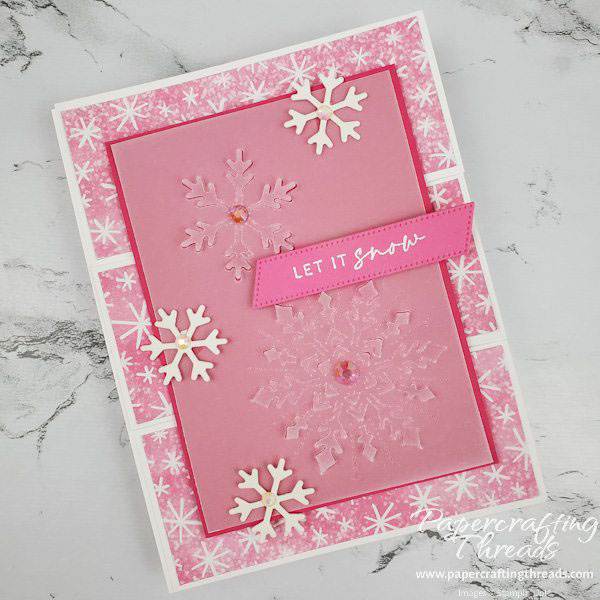
To decorate the front, I diecut two more of the partial snowflakes on a piece of vellum 3” x 4-1/8”. I strategically placed a glue dot behind the center of each snowflake to adhere it to a piece of Melon Mambo 3-1/8” x 4-1/4”. (I’ll be adding more adhesive once I know where I can hide it so it doesn’t show through the vellum.) Then I put dimensionals across the back, being sure to place them only at the top and the bottom of this piece. With it adhered to the front, the piece spans the middle triple panel and doesn’t hinder the movement.
Rolled up glue dots on the back of Shimmer White snowflakes are scattered around the edges. Iridescent rhinestones finish off the centers of each snowflake. My sentiment was stamped in Versarmark ink and heat embossed with White Embossing Powder on a strip of Polished Pink. Dimensionals placed on only the left side allow the sentiment strip to hang off the edge.
Then I hid more glue dots behind the centers of the snowflakes and behind the sentiment strip to securely hold the vellum piece.
And there you have it, a Triple Panel Interlocking card with plenty of room to write on either the inside and/or the back of the card. Check out the video I made below!
Leave a Reply