Papercrafting Threads

  • Tutorials
    • PDF Tutorials
    • 3D Projects
    • Cardmaking
    • Fun Fold
    • Product Tips & Tricks
    • Projects
    • Techniques
  • Catalogs
  • Shop & Specials
    • Shop My Stampin’ Up! Online Store
    • Special Offers
    • Buy Me A Coffee
    • My Favorite Things on Amazon
    • Gift Certificates
  • Contact Me
  • Join the Fun
    • Join the Fun
    • Special Join Offers
  • Calendar of Events
  • Paper Pumpkin
    • Paper Pumpkin Kits
    • Paper Pumpkin Stamp Case Inserts
  • Nav Social Menu

    • Email
    • Facebook
    • Instagram
    • Pinterest
    • YouTube

How to Use Laser-Cut Specialty Paper

June 20, 2020 Leave a Comment

20 Jun

Laser-Cut Specialty Paper in gold foil adds an extra bit of sunshine and glitz to this quick and easy card

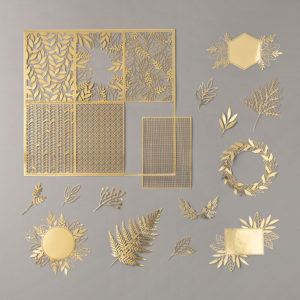
Need a quick card but want it to be extra special? Then Stampin’Up!’s new Forever Gold Laser-Cut Specialty Paper is for you!

You get three sheets each of two single-sided designs. One side is gold foil and the other side is white. Designs range from full card front panels (18 total!) to greenery accents (more than 40 pieces). A few dots here and there of our Fine Tip glue or the multipurpose glue is all that’s needed to hold this specialty paper in place.

Adhere a card front over a plain cardstock base for a quick card. Paint a watercolor background, use strips of coordinating cardstock arranged in stripes, or add a layer of designer series paper behind the panel when you have more time. Or use the card front piece as a stencil to add a pattern to plain cardstock with no extra layers!

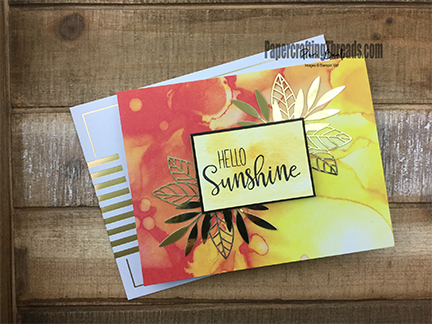
The greenery accents range in size from small pieces to large focal points. Tuck a piece of greenery behind a sentiment strip or under a ribbon.  To get even more mileage from the larger pieces, snip off bits – there’s no rule that says you have to use a whole piece. Or use a focal point piece to frame a diecut sentiment, like I did here in the Yellow Sunshine card at the top of this post. The base of my card is from June’s Paper Pumpkin Box of Sunshine kit as is the sentiment. I added a Basic Black rectangle over the gold center base and watercolored a Bumble Bee wash on a scrap of watercolor paper. Once dry I stamped my sentiment in Memento Ink and the card was done. The envelope shown with the gold accents was also part of the Paper Pumpkin kit.

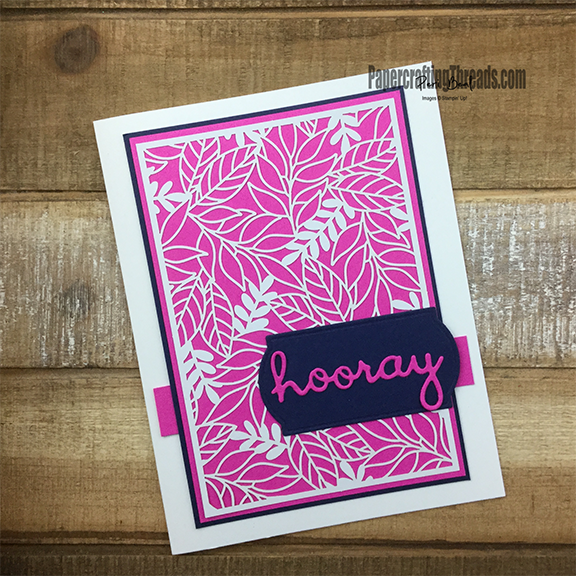
And if the gold side doesn’t coordinate with your desired project colors, flip the piece over and use the white side as I did below. I paired Night of Navy with Magenta Madness and white for the card below. Still doesn’t coordinate? Then sponge  the color of your choice on top of the white.

Use the white side of the Laser-Cut Specialty Paper for more options.

Once you’re done with the laser-cut images, don’t forget the leftover paper. The narrow strips of gold foil left from the full card front panels can be glued onto the inside of your card or on an envelope to finish off a project.

Just a few of the wide variety of Laser Cut Paper designs included in the pack.

Can you tell I love this stuff? No need to get out the diecut machine or a punch, just pop a piece out of the Laser-Cut Specialty Paper and it’s done. Order yours today.

Share:

Leave a Comment
see more related posts: Cardmaking

Previous Post: « Stepped Up Rock N Roll Technique
Next Post: How to Use a Background Stamp »

Reader Interactions

Leave a Reply Cancel reply

Your email address will not be published. Required fields are marked *

Primary Sidebar

Peri Beal

Cheesehead. Avid reader. Antique hunter.

Shop Online

Shop with me and get a FREE PDF tutorial bundle delivered to your inbox AND a handmade card via snail mail

Search

Papercrafting Threads

Gift Certificates
  • Email
  • Facebook
  • Instagram
  • Pinterest
  • YouTube

Sign up for my Newsletter

Sign up for my newsletter and get a free PDF tutorial as my welcome thank you!

Almost there...

Please check your email to confirm your subscription

Retired Product
Privacy Policy

The Fine Print

Just so you know... This is a personal website and I am responsible for its content. Stampin' Up!® does not endorse the use of or contents of the classes, services, or non-Stampin' Up! products I offer.

Sign up for my Newsletter

Sign up for my newsletter and get a free PDF tutorial as my welcome thank you!

Almost there...

Please check your email to confirm your subscription

Footer

  • Calendar of Events
  • 3D Projects
  • Cardmaking
  • Fun Fold
  • Product Tips & Tricks
  • Projects
  • Techniques
  • Of Interest
  • Catalogs
  • Join the Fun
  • Contact Me
  • Email
  • Facebook
  • Instagram
  • Pinterest
  • YouTube

PAPERCRAFTING THREADS

Copyright © 2025 · Refined theme customized by Catherine Carroll

Privacy Policy · Affiliate Disclosure