Learn how to make a Z Fold Spinner Card with pieces from the June 2022 Paper Pumpkin Kit with this tutorial! Don’t have this kit? Don’t worry, the directions/measurements work with whatever you have in your stash.
scoring & cutting guide
| Paper Dimensions | Score Short Side | Score Long Side | ||
| 4-1/4″ x 8-1/2″ Bermuda Bay cardstock base | 2-1/8″ and 4-1/4″ | |||
| 4″ x 4″ Pacific Point embossed water/cloud piece |
I’ll be using some of the diecut pieces from the Sending Good Thoughts Paper Pumpkin kit — the embossed water/clouds piece and the Bermuda Bay cardstock base. I’ve put the measurements of these pieces in the Scoring & Cutting Guide above.
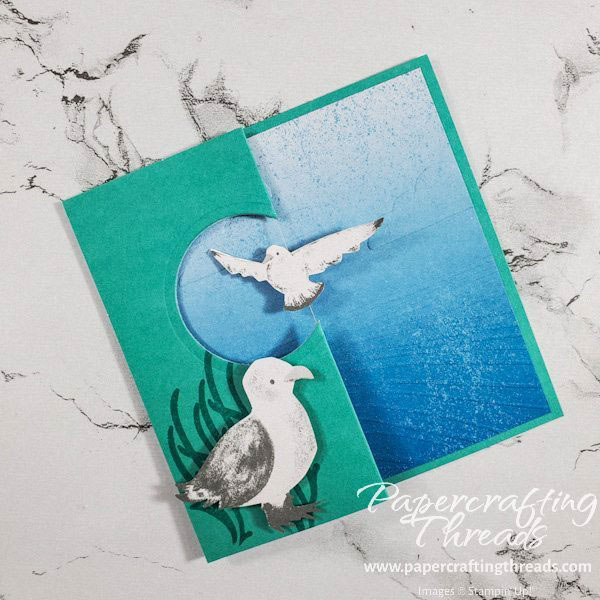
I made a square card, so I cut the card base down to 4-1/4” tall. Save that strip as it can be used in another project. Fold the base in half and score the front section at 2-1/8”. Now fold on this scoreline to create a Z fold, and burnish the fold with a bone folder.
Take the 1-5/8” diameter circle die from the Layering Circles die set and tape it about ½” inch from the left side of the card front with removable tape. Then run the piece through a Cut & Emboss machine to cut out the circle. Burnish the folds again with a bone folder.
Flip the card base over to the white side and add Pacific Point ink with a Blending Brush using a circular motion. I’m doing this just to the back portion of the front panel. Then use the punched out coral sheet as a stencil to add some interest to the piece. I’m still using Pacific Point ink, just pressing a bit more with a Blending Brush for a darker image.
z fold spinner card mechanism
Grab some thread – it can be any color (I used white) and cut off a length just a bit longer than your card. Place the thread in the groove of the scored Z-fold. Then hold the thread in place temporarily with pieces of washi tape.
PRO TIP: Use a silicone mat underneath the project as any excess glue is easily wiped off. It’s also handy to check that the glue bottle is not going to splat all over your project!
Add a thin line of glue over the length of thread and set this aside to dry.
In the meantime, take a piece of scrap Basic White cardstock and use the punched out ‘bird in flight’ shape as a stencil to create a mirror image bird. I’m using Smoky Slate ink with a Blending Brush to ink the stencil. The image only needs enough ink so you can cut out the image. Fussy cut the bird shape with paper snips. Remember to move the paper not the snips!
Cut the embossed water and clouds cardstock piece down to 4” square. Then rub Versamark ink over the rippled water portion and add clear embossing powder and heat set.
final assembly of z-fold spinner card
The liquid glue should be dry by now on the base piece, so cut off the thread as you don’t want it to extend beyond the edges of the card.
Ink up the sentiment stamp with Bermuda Bay ink and stamp on the inside of the z-fold. Add Bermuda Bay ink to the seagrass image stamp and stamp repeatedly on the front of the card as shown in the photos.
Then add adhesive to the back of the water/sky piece and adhere to the inside of the card, leaving an equal border on all sides.
fly little bird fly assembly
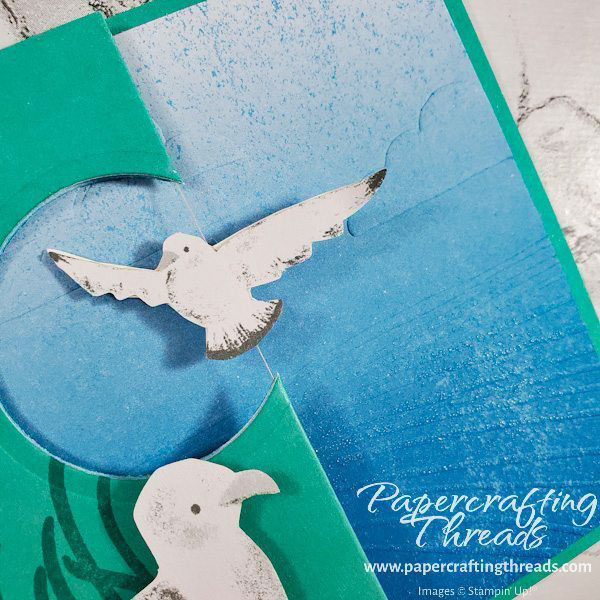
Stick a tiny piece of Tear N’ Tape in the middle of the back of the fussy cut stenciled bird and add some tiny dots of liquid glue. Place the bird under the string on the folded card. Press on the string to adhere it to the Tear N’ Tape. Then add the diecut bird on top, lining up the edges.
Give the bird a couple of turns with your finger and then watch it unwind and spin!
Last but not least, add the large standing bird. I positioned him over the seagrass and with his head just poking up above the cut out circle shape. And I used dimensionals to pop him up.
Set up the card by winding up the bird before placing it in the envelope. And tada — the little bird takes flight when the card is removed from the envelope!
I also added a stamped off Bermuda Bay seagrass image to the left front of the envelope and to the back of the card, as they looked a little plain. Write your message to the recipient on the white space. Who wouldn’t love to get this little card? I know I would!

Get a subscription to Paper Pumpkin Kits by clicking here. The kits have been outstanding lately and next month’s Sunflower theme is no exception.
Leave a Reply