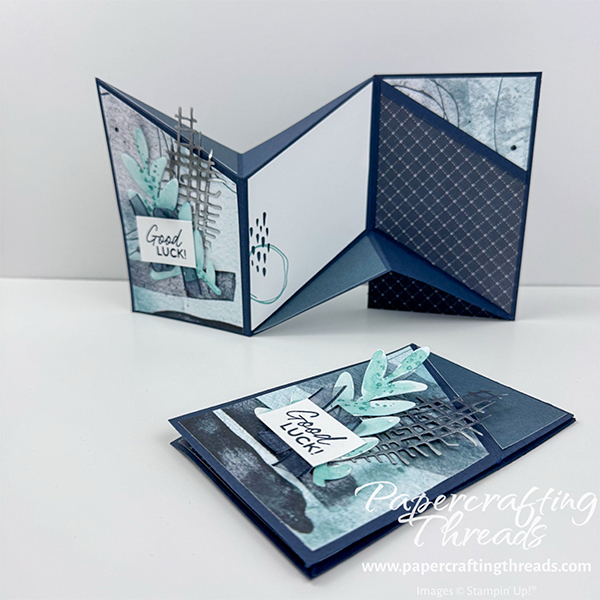
The Miura Fun Fold Card is inspired by an origami fold created by a Japanese astrophysicist Kōryō Miura in the 1970s. And I think the Painted Collage patterned paper with its mid century modern vibe pairs together with the Miura perfectly. My tutorial breaks it down step by step. Let’s get started!
cutting & scoring guide
| Paper Dimensions | Score Short Side | Score Long Side | ||||
| 10½” x 5½ Secret Sea cardstock base | 3½” x 7″ | |||||
| 3½” x 5½” Secret Sea cardstock kickstand | ||||||
| ¼” x 5″ Secret Sea cardstock strip | ||||||
| 3¼” x 5¼” Painted Collage patterned paper (cut 2 patterns) | ||||||
| 3¼” x 5¼” Basic White cardstock | ||||||
| 1¾” x 3¼” Two-Tone Secret Sea cardstock (cut 2) | ||||||
| Scrap of Basic White cardstock for sentiment | ||||||
| Scrap of Secret Sea cardstock for die cutting graphic element | ||||||
| Scrap of Textured Canvas for die cutting leaf element | ||||||
| Scrap of Silver Hot Foil |
step by step instructions
Cut all cardstock as noted in the above guide. Lay the card base flat on the work surface. Measure 2″ down from the top edge of the left score line and mark with a pencil. Then measure 2″ up from the bottom of the right score line. Place the base in a paper trimmer and score from the 2″ mark on the left line to the top left corner and to the top of the right line. Score from the 2″ mark on the right line to the bottom of the left score line AND again to the lower right corner. Mountain fold the bottom portion of the left scoreline and valley fold the section in the triangular section. Valley fold the top portion of the right scoreline and mountain fold the section in the triangular section.
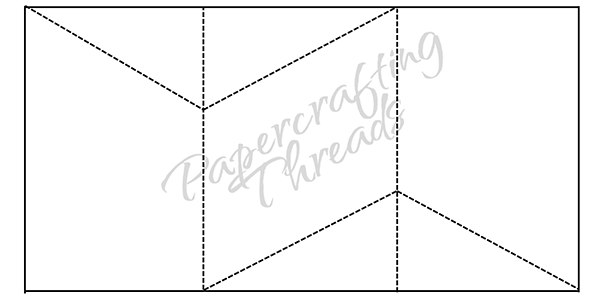
Cutting the Paper Panels for the Miura Fun Fold Card
Rather than measuring with a ruler and then cutting angles, it’s much more accurate to use the card base as the ‘ruler’. Beginning with the left panel pattern, place the patterned paper on the front panel leaving an ⅛” even border all the way around. Using the triangle point, mark the patterned paper so that there will still be an ⅛” border following the angle leading up to the top left corner. Place paper in trimmer and pivot into cutting track from the pencil mark to the top left corner and cut. Adhere the patterned paper to the front panel.
Then adhere the cut off triangle to the top section of the second patterned paper panel. Place the narrow Secret Sea cardstock strip over the seam and adhere, and trim the extended edges to be flush. Repeat the cutting with the modified right panel pattern and place the paper on the inner left panel leaving an ⅛” even border all the way around. Using the triangle point, mark the patterned paper so that there will still be an ⅛” border following the angle leading down to the lower right corner. Place paper in trimmer and pivot into cutting track from the pencil mark to the lower right corner and cut. Adhere to the inner right panel.
Next adhere the 3½” x 5½” Secret Sea cardstock to the back of the card, creating a kickstand. Use the small cut off triangle to decorate the hidden plain triangle.
For the center panel, place the Basic White cardstock over that panel leaving an ⅛” even border all the way around. Using the triangle points, mark the patterned paper so that there will still be an ⅛” border following the angles. Place paper in trimmer and pivot into cutting track from the pencil marks to the edges and cut. Stamp the two abstract images, one in Lost Lagoon ink and the other in Secret Sea ink and adhere to center panel.
Using the Two-Tone Secret Sea rectangles, with the lighter side facing up, cut in half diagonally, with one from top left to bottom right and the other the opposite way, top right to bottom left. Adhere one of the first pieces to the top front panel. Then adhere one of the second pieces to the lower middle panel.
Prepping the Decorating Pieces
Die cut the abstract grid from a scrap of Secret Sea cardstock. Hot foil with silver foil by placing a Reverse Foil plate OR the back side of a large foiling plate on the Hot Foil system base. Allow to heat about a minute longer than usual. Place silver foil face down on the plate. Add the die cut grid face down. Then add a layer of thin copy paper, and completely covering the foil. Add the green hot foil shim and the clear hot foil spacer and holding all the layers in place, run slowly through the Cut & Emboss machine. Remove the layers and peel back the foil.
Die cut the large leaf foliage image from the Notes of Collage dies from the outstanding Textured Canvas specialty paper. Stamp an acrylic block with Lost Lagoon ink, and pool water droplets on top with a Water Brush. Pick up some of the watered down ink and paint the surface of the foliage. Let dry a minute. Then ink the splatter image with Lost Lagoon ink and stamp multiple times randomly on the foliage.
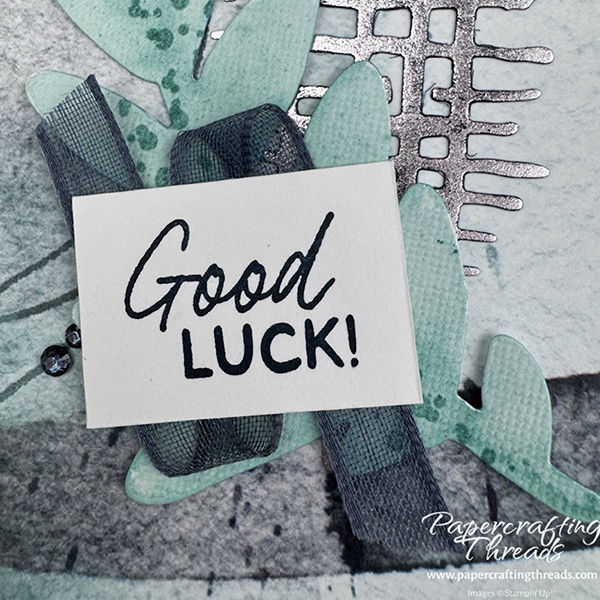
Stamp the sentiment from Help Me Grow on a scrap of Basic White cardstock and trim down close to wording.
Finishing Up the Miura Fun Fold Card
Add a few drops of liquid glue to the center back of the hot foiled grid and adhere to front of card. Adhere the watercolored Textured Canvas foliage with mini glue dots.
Add Seal to the back of the sentiment. Fold a length of Secret Sea ribbon in a zigzag pattern and adhere to the back. Adhere with more glue dots to the front of the card. Color Basic Rhinestones with a Light Secret Sea Stampin’ Blend and scatter two on the front of the card and one on the exposed top right back inner triangle.
If you found this tutorial helpful, consider a contribution to my coffee fund ☕️ Coffee → Creativity → Content → More Coffee (help fuel the cycle!)

Leave a Reply