Papercrafting Threads

  • Tutorials
    • PDF Tutorials
    • 3D Projects
    • Cardmaking
    • Fun Fold
    • Product Tips & Tricks
    • Projects
    • Techniques
  • Catalogs
  • Shop & Specials
    • Shop My Stampin’ Up! Online Store
    • Special Offers
    • Buy Me A Coffee
    • My Favorite Things on Amazon
    • Gift Certificates
  • Contact Me
  • Join the Fun
    • Join the Fun
    • Special Join Offers
  • Calendar of Events
  • Paper Pumpkin
    • Paper Pumpkin Kits
    • Paper Pumpkin Stamp Case Inserts
  • Nav Social Menu

    • Email
    • Facebook
    • Instagram
    • Pinterest
    • YouTube

Candy Bar Wrapper DIY

February 12, 2022 Leave a Comment

12 Feb

Dress up a plain candy bar with just a 6″ x 6″ piece of patterned paper. This Candy Bar Wrapper DIY couldn’t be any easier. And it also takes very little time. Perfect for your sweetheart, a classroom of kiddos or your gal pals!

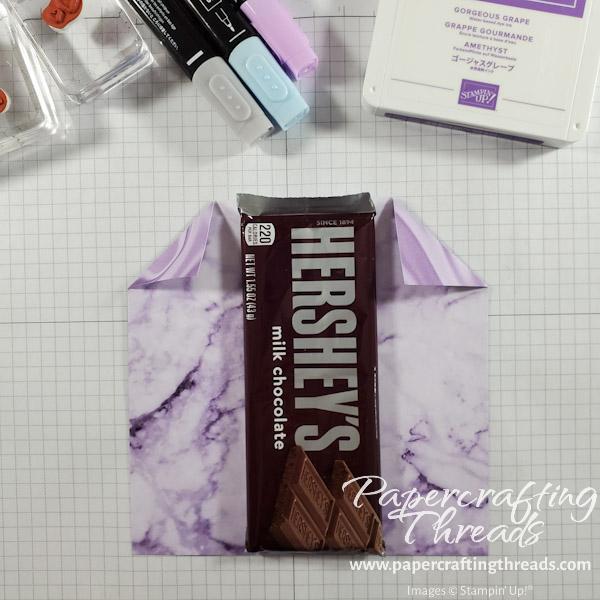
Start with a 6″ x 6″ piece of patterned paper (I used Simply Marbleous, a free Saleabration item). Place your candy bar vertically in the middle. Fold the top left and top right corners in at the 1-1/2″ mark.

Candy bar centered in 6" x 6" piece of patterned paper with top left and right corners folded inwards

Place a strip of Tear ‘N Tape along the right edge, from the bottom of the folded corner to the bottom of the patterned paper. Fold the left side in first, then the right side overlapping, lining up the bottom edges. Press to seal and set aside.

Next, diecut a circle from Basic White cardstock and a scalloped circle from Gorgeous Grape cardstock. Then stamp an otter from the Awesome Otters stamp set in Memento Black Ink on the white circle. Color the otter with Stampin’ Blends. I used Light Petal Pink and Dark & Light Smoky Slate. To ‘ground’ the little dude, scribble with the Light Balmy Blue Stampin’ Blend around his feet. Lastly, stamp some hearts from the Pampered Pets stamp set in Gorgeous Grape and color them in with a Light Fresh Freesia Stampin’ Blend. Glue the otter circle on to the scalloped circle and punch a small hole through both layers. Thread a length of white Baker’s twine through the hole.

The Candy Bar Wrapper DIY is almost complete! Tie a length of Highland Heather 1/2″ Grosgrain Ribbon around the package in a knot. Then thread the white Baker’s twine with the attached circle around the purple ribbon knot. Tie the twine in a knot and trim the ends very short.

And there you have it! Check out my Instagram Reel for a quick visual on my wrapper. All items used (except for the candy bar!) can be found in my online store.

Share:

Leave a Comment
see more related posts: Of Interest

Previous Post: « How to Make a Wine Glass Charm
Next Post: How To Make Diecut Tulips »

Reader Interactions

Leave a Reply Cancel reply

Your email address will not be published. Required fields are marked *

Primary Sidebar

Peri Beal

Cheesehead. Avid reader. Antique hunter.

Shop Online

Shop with me and get a FREE PDF tutorial bundle delivered to your inbox AND a handmade card via snail mail

Search

Papercrafting Threads

Gift Certificates
  • Email
  • Facebook
  • Instagram
  • Pinterest
  • YouTube

Sign up for my Newsletter

Sign up for my newsletter and get a free PDF tutorial as my welcome thank you!

Almost there...

Please check your email to confirm your subscription

Retired Product
Privacy Policy

The Fine Print

Just so you know... This is a personal website and I am responsible for its content. Stampin' Up!® does not endorse the use of or contents of the classes, services, or non-Stampin' Up! products I offer.

Sign up for my Newsletter

Sign up for my newsletter and get a free PDF tutorial as my welcome thank you!

Almost there...

Please check your email to confirm your subscription

Footer

  • Calendar of Events
  • 3D Projects
  • Cardmaking
  • Fun Fold
  • Product Tips & Tricks
  • Projects
  • Techniques
  • Of Interest
  • Catalogs
  • Join the Fun
  • Contact Me
  • Email
  • Facebook
  • Instagram
  • Pinterest
  • YouTube

PAPERCRAFTING THREADS

Copyright © 2025 · Refined theme customized by Catherine Carroll

Privacy Policy · Affiliate Disclosure