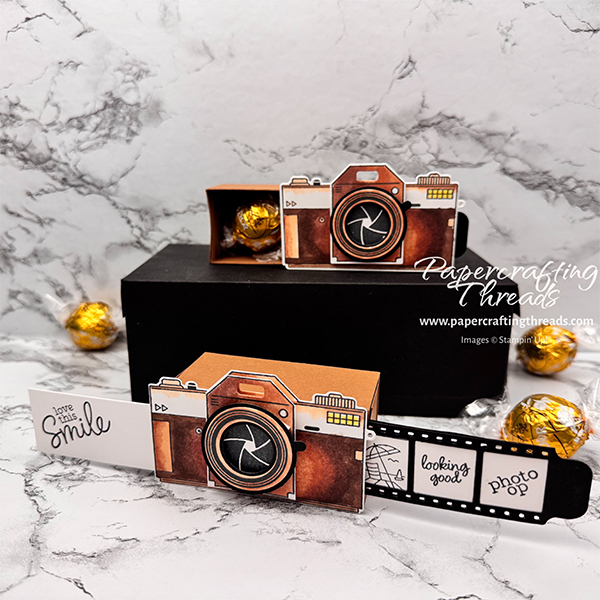
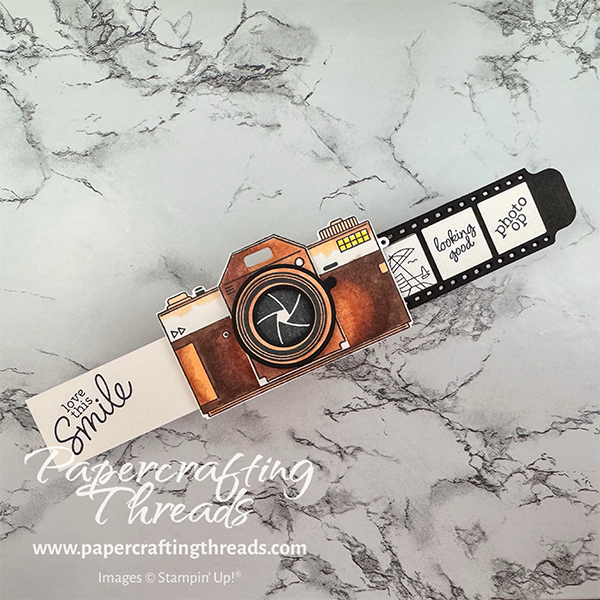
This Matchbox Double Slider Camera reveals two secret messages and a hidden drawer for gifting chocolate truffles. It’s surprisingly easy to make with just cardstock, a paper trimmer, and a piece of plastic (plus the camera stamp & die set). The rich browns bring a bit of nostalgia for the Kodak film cameras, and the film strip cells are stinkin’ adorable. So let’s get started!
cutting & scoring guide
| Paper Dimensions | Score Short Side | Score Long Side | ||||
| 3″ x 5″ Pecan Pie mechanism | 1½”, 3⅛” & 4⅝” | |||||
| 3″ x 5⅞” Pecan Pie wrap | 1¼”, 2¾”, 4″ & 5½” | |||||
| 4″ x 5½” Pecan Pie drawer | *see directions* | *see directions* | ||||
| Scrap of Basic White cardstock for stamping & die cutting camera | ||||||
| Scrap of Basic Black for die cutting filmstrip | ||||||
| 1⅛” x 2¾” Thick Basic White cardstock for slider message | ||||||
| ⅞” x 2¾” Thick Basic White cardstock for film strip cells |
step by step instructions
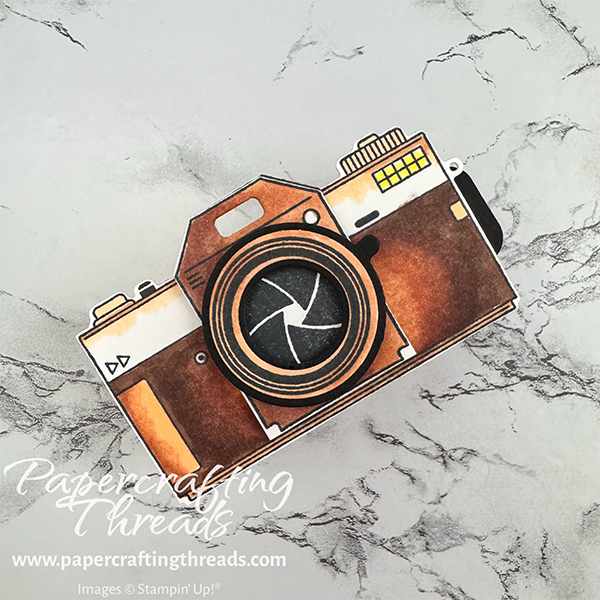
Start with the Capturing Smiles stamp set (& matching dies) by stamping the camera images in Tuxedo Black Memento ink on a scrap of Basic White cardstock. Color in the images with Stampin’ Blends – I used SU200, SU400, SU600, and SU900 for the shades of brown. I also used just a touch of Dark Lemon Lolly and the Color Lifter to soften one of the edges.
Die cut the colored camera pieces, plus two film strips and one focusing ring from Basic Black cardstock, then set aside.
Cut and score the Pecan Pie cardstock for the drawer, wrap and mechanism as noted above.
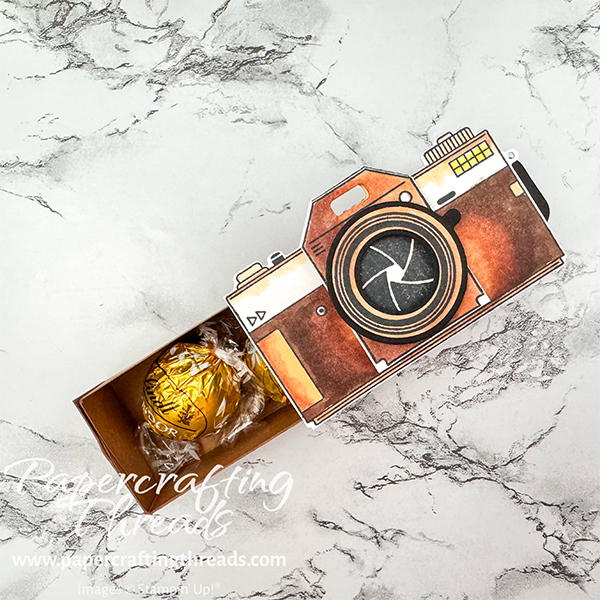
Starting with the drawer, remove a skoche (about 1/16-1/8″) from one long side and one short side. Score all four sides at 1¼”. Cut in to the first scoreline on the four corner tabs and miter each one. Fold and burnish all scorelines and fold into a rectangular box shape. Use liquid glue on the tabs to adhere each end.

Moving on to the wrap, fold and burnish cardstock, mitering the edges of the ⅜” tab. Add liquid glue to the tab and fold over the far edge to adhere into a wrap shape.

Add chocolate truffles (or other treats) to the drawer and insert into the wrap.
Creating the Double Slider Mechanism
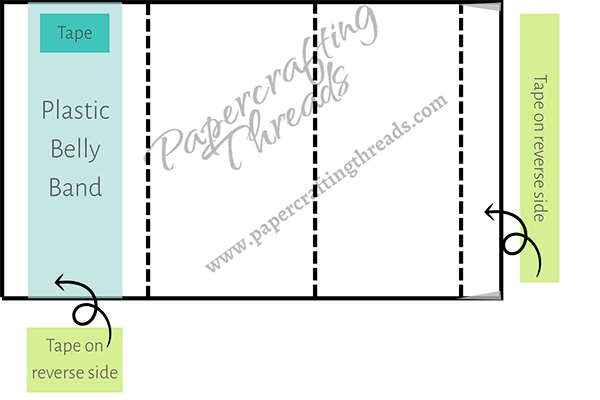
With the remaining piece of Pecan Pie cardstock cut and scored as noted, miter the edges of the ⅜” tab. Working with the 1½” panel on the left and the tab on the right, position a strip of plastic (cut from a sheet protector or plastic baggie or even a grocery bag) that is ⅞” wide and at least 6½ long at the top edge of the panel. Add a piece of Tear & Tape at the top edge of the plastic, taking care not to extend past the plastic in any direction. Holding the plastic with one hand and the cardstock in the other, wrap the plastic strip around the panel like a belly band and secure the end of the plastic to itself. Trim any excess close to the Tear & Tape.
Sandwich the narrow strip of Thick Basic White between the two die cut Basic Black film strips. Place the stamps ‘photo op’, ‘looking good’ and the beach scene on each cell as shown, pick up with a clear block, add Tuxedo Black Memento ink and stamp all three at once. Stamp the greeting ‘love this smile’ on the left half of the remaining strip of Thick Basic White.
Adding the Secret Messages
Place another small piece of Tear & Tape over the piece added earlier to the plastic strip. Turn the film strip face down and adhere to the Tear & Tape, aligning the end with the beach scene with the tape. The tab should extend past the opposite edge.
Flip the mechanism over and add another small piece of Tear & Tape to the plastic strip, on the opposite end from where the film strip side had tape. Position the ‘love this smile’ strip face up, and pressing to adhere the right edge to the tape.
Add Tear & Tape to the long ⅜” tab. Fold and burnish the scorelines, then ‘roll up’ the mechanism starting from the ‘love this smile’ section. Finish by adhering the tape edge to the panel the ‘love this smile’ floats above, being careful not to catch the Basic White cardstock or the plastic. Pull the tab to make sure the mechanism works, revealing the two secret messages.
Glue to the top of the wrap of the matchbox.
Assemble the camera and glue to the top of the mechanism.
If you found this tutorial helpful, consider a contribution to my coffee fund ☕️ Coffee → Creativity → Content → More Coffee (help fuel the cycle!)
What Do You THInk of the Matchbox Double Slider?
I designed this project to hold two of the Lindt Lindor chocolate truffles. I did experiment with a matchbox that is not quite as high (and would therefore hold smaller treats), but found this size to better resemble the chunkiness of the film camera. I’m quite happy with how this turned out. And thanks to Michele Jutresa for the inspiration.
Can you picture these on a table for a special gathering? Would be so cute! And check out my video if you’re having trouble picturing how these came together. 📸
I’ve actually made a double slider card before – I called it a Peekaboo card. The mechanism I used was a little more specialized, but the basic principle was the same. You can check it out here on my website.

Leave a Reply