Papercrafting Threads

  • Tutorials
    • PDF Tutorials
    • 3D Projects
    • Cardmaking
    • Fun Fold
    • Product Tips & Tricks
    • Projects
    • Techniques
  • Catalogs
  • Shop & Specials
    • Shop My Stampin’ Up! Online Store
    • Special Offers
    • Buy Me A Coffee
    • My Favorite Things on Amazon
    • Gift Certificates
  • Contact Me
  • Join the Fun
    • Join the Fun
    • Special Join Offers
  • Calendar of Events
  • Paper Pumpkin
    • Paper Pumpkin Kits
    • Paper Pumpkin Stamp Case Inserts
  • Nav Social Menu

    • Email
    • Facebook
    • Instagram
    • Pinterest
    • YouTube

No Stamp Merry Christmas Card

November 1, 2019 Leave a Comment

1 Nov

No Stamp Merry Christmas Card is quick and easy to make multiples of!

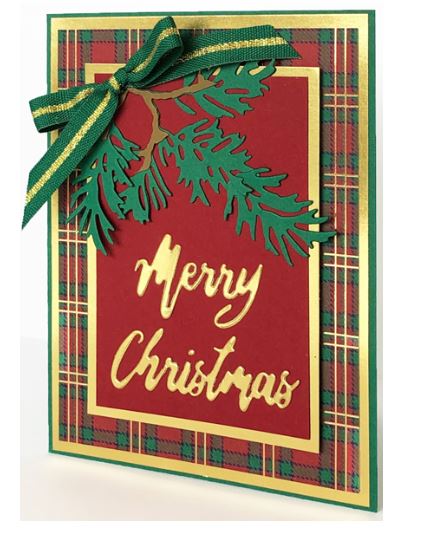
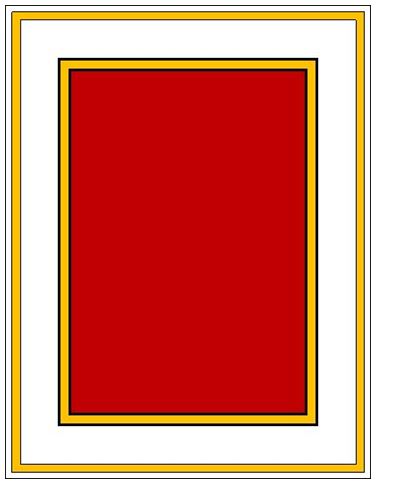
Here’s a project with NO ink, but one that makes a lovely Christmas card. We’ll start with a card sketch for our No Stamp Merry Christmas card:

A very simple card sketch sets the stage for our No Stamp Merry Christmas card

Supplies for No Stamp Merry Christmas Card

Beautiful Boughs Dies
Shaded Spruce/Gold 3/8” Striped Ribbon
Word Wishes Die set
Shaded Spruce Cardstock, 5-1/2” x 8-1/2” folded to make the card base; scrap for die-cutting
Gold Foil Sheet, 5-3/8” x 4-1/8” (first layer); 4-1/4” x 3” (third layer); scrap for die-cutting
Wrapped in Plaid Specialty Designer Series Paper, green and red plaid, 5-1/8” x 3-7/8”
Cherry Cobbler Cardstock, 4” x 2-3/4”
Whisper White Cardstock, 5-1/4” x 4”, for inside the card for stamping/writing
Soft Suede Cardstock, scrap for die-cutting
SNAIL
Stampin’ Dimensionals
Mini Glue Dots

Instructions

Using SNAIL adhesive, adhere the large gold foil piece to the card base and then the plaid piece to the foil.

Adhere the Cherry Cobbler piece to the smaller gold foil piece with SNAIL.

And adhere the small group of cardstock/paper to the card base layers using Stampin’ Dimensionals.

Die-cut the “Merry” and “Christmas” from the Word Wishes set using the Gold Foil Scrap. Adhere the words to the Cherry Cobbler cardstock using Multipurpose Glue.

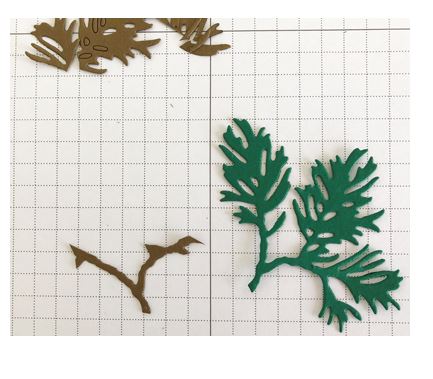
For the “boughs,” cut the middle-sized bough using both Shaded Spruce and Soft Suede Cardstock. Then trim all of the part that should be green from the Suede die-cut before adhering it over the Spruce piece, as shown in the photo below.

Detailed look at how to assemble the boughs for this No Stamp Merry Christmas Card

To finish the card, tie a bow with the Ribbon and adhere it to the top left of the card as shown, using Mini Glue Dots.

Share:

Leave a Comment
see more related posts: Cardmaking

Previous Post: « Celestial Copper
Next Post: Elfie Time »

Reader Interactions

Leave a Reply Cancel reply

Your email address will not be published. Required fields are marked *

Primary Sidebar

Peri Beal

Cheesehead. Avid reader. Antique hunter.

Shop Online

Shop with me and get a FREE PDF tutorial bundle delivered to your inbox AND a handmade card via snail mail

Search

Papercrafting Threads

Gift Certificates
  • Email
  • Facebook
  • Instagram
  • Pinterest
  • YouTube

Sign up for my Newsletter

Sign up for my newsletter and get a free PDF tutorial as my welcome thank you!

Almost there...

Please check your email to confirm your subscription

Retired Product
Privacy Policy

The Fine Print

Just so you know... This is a personal website and I am responsible for its content. Stampin' Up!® does not endorse the use of or contents of the classes, services, or non-Stampin' Up! products I offer.

Sign up for my Newsletter

Sign up for my newsletter and get a free PDF tutorial as my welcome thank you!

Almost there...

Please check your email to confirm your subscription

Footer

  • Calendar of Events
  • 3D Projects
  • Cardmaking
  • Fun Fold
  • Product Tips & Tricks
  • Projects
  • Techniques
  • Of Interest
  • Catalogs
  • Join the Fun
  • Contact Me
  • Email
  • Facebook
  • Instagram
  • Pinterest
  • YouTube

PAPERCRAFTING THREADS

Copyright © 2025 · Refined theme customized by Catherine Carroll

Privacy Policy · Affiliate Disclosure