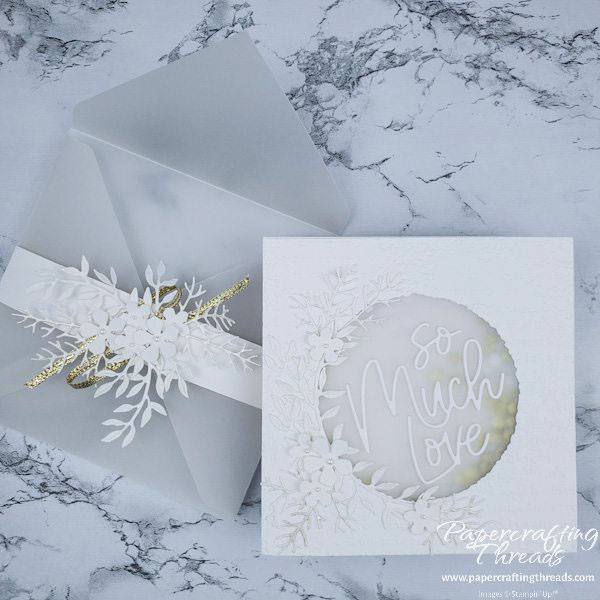
Elegant, with sparkle and glimmer, and a touch of whimsy as it’s a shaker wedding card! Create an extra special square card for that extra special wedding couple. And that thick cardstock is so rich. Let’s get started.
cardstock measurements
Measurements are simple for this card —Thick Basic White cardstock cut 5″ x 10″, scored at 5″ and folded in half. Another piece of Thick Basic White cardstock measuring 5″ x 5″. A piece of vellum cardstock cut to 5″ x 5″. And scraps of standard Basic White cardstock.
I cut the center circle on with the soon to be released Deckled Circles die right in the middle of the Thick Basic White cardstock measuring 5″ x 5″. Then I ran the piece through the embossing machine with the Timeless Type 3D Embossing Folder. Set aside.
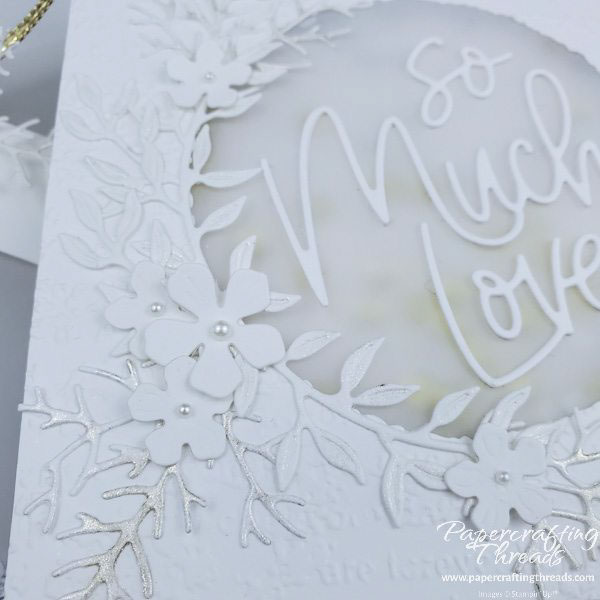
Place an adhesive sheet on the back of scrap of Basic White cardstock. Diecut the sentiment ‘So Much Love” with the word dies from the Love For You die set three times each. Remove the liner on two of the same word and layer the word on itself three times. Repeat for the other two words. The diecut words are now thicker and raised, like chipboard letters!!
Adhere the vellum square on the back of the embossed square with the circle cut out. Then add Foam Adhesive Strips around the outline of the deckled circle, making sure there are no gaps. Next add pieces of Foam Adhesive all over the back of the square, staying outside of the circle. This helps support the card front. Sprinkle a mix of gold, silver and white sequins in the middle of the card base. Remove all of the the liners from the vellum and foam square, and adhere over the pile of sequins. Press down all edges so no sequins escape. The shaker part of the wedding card is done! Test it out.
Apply the three-layered words to the center of the vellum circle.
decorating the shaker wedding card
I decorated around one side of the deckled circle with leafy diecuts and white flowers. I used a retired die set for some of the leaves (the dies matched the Queen Bee stamp set). And I also used three of the sprigs from the Cheerful Daisies die set. Once diecut from scraps of Basic White cardstock backed with adhesive sheet, I painted the leaves with Wink of Stella. My brush was rather dry after I did the largest leaf sprig, so I squeezed the Wink of Stella for more coverage. A big blob of sparkle flooded the sprig I was working on. I kept going over it with the brush and ended up really liking the extra sparkle. So then I dipped my brush in the spilled glitter liquid and added more sparkle to the other thin sprigs.
Once all of the leaves were dry, I peeled off the liner backing of the biggest one first, added a few rolled up glue dots to the center and each end, and applied it to the left half of the circle. Then I added sprigs to each end and the center. And filled in with the medium sized leaves. Finally I added diecut white flowers with pearl centers at the junctions.
I whipped up a matching vellum envelope with the same leaves and flowers. Let me know if you’d like quick tutorial on the square envelope.
What do you think? I hope the wedding couple likes my design. Shop my online store here to get the supplies I used.
Leave a Reply