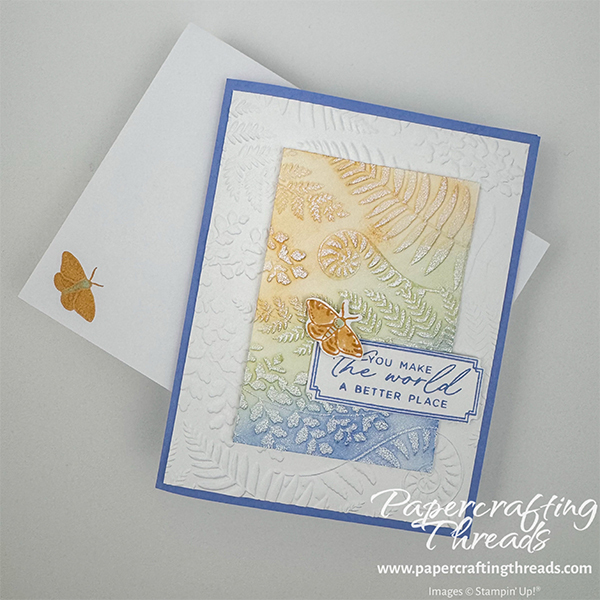
Who says you have to use a circle for the Double Embossed Spotlight Technique? Use this technique with any shape. I used both dry embossing and white heat-set embossing for an extra touch. Let’s get started!
cutting & scoring guide
| Paper Dimensions | Score Short Side | Score Long Side | ||||
| 5½ x 8½” Hydrangea Hue cardstock base | 4¼” | |||||
| 4″ x 5¼” (cut 2) Basic White cardstock for embossing and for liner | ||||||
| 2⅝” x 3⅞“ Basic White cardstock for spotlight | ||||||
| Scraps of Basic White cardstock diecutting and greeting |
step by step instructions
Cut cardstock as described above. My card uses the breathtaking Fern & Flora bundle, available here in my online shop. Center the small piece of Basic White on the larger piece of Basic White. Place into the Fern & Flora 3D embossing folder and run through a cut & emboss machine. (You may need to adjust your ‘sandwich’. Set the larger piece aside for now.
Working with the small embossed piece, use a blending brush to add Golden Glow ink at an angle on the top third. DESIGN TIP: Using an angle instead of going straight across adds more interest and draws the eye through the design. Switch to a different blending brush and add Soft Sea Foam ink to the middle. And finally blend the bottom third angle with Hydrangea Hue. Heat set the ink with a heat tool for a minute or two.
Lightly tap the raised surface with a Versamark ink pad. The goal is to add the ink to the raised surfaces, not the debased portions. Sprinkle with white embossing powder, brush off any stray powder that sticks to the flatter surfaces with a small, dry paintbrush, and heat set.
Fold and burnish the Hydrangea Hue card base. Adhere the large embossed panel with liquid glue to the base. Then add dimensionals to the back of the colored piece, match up the embossed design patterns and adhere.
Adding the Final Touches to the Embossed Technique Card
Stamp the frame and sentiment in Hydrangea Hue ink on a scrap Basic White and die cut. Then stamp the large moth in Golden Glow ink on another scrap, color in with Golden Glow and Soft Sea Foam Stampin’ Blends and die cut. Stamp and color the moth on the Basic White liner as well, and on the lower left corner of a white envelope. (Place a scrap piece of paper inside the envelope before coloring to prevent the Stampin’ Blends ink soaking through to the back of the envelope.)
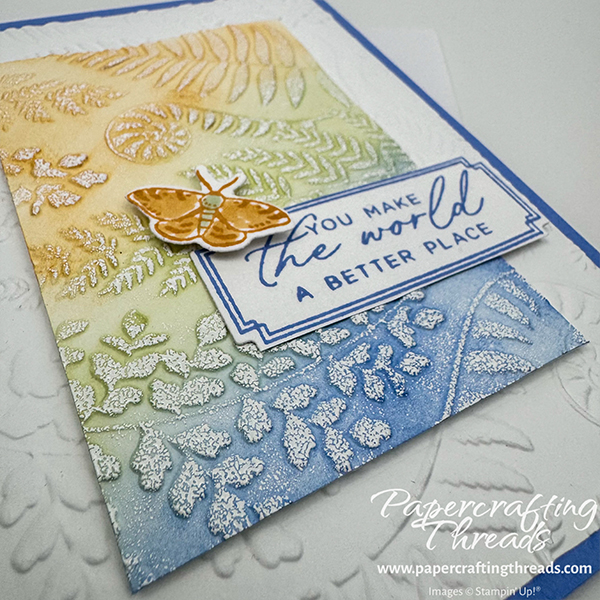
Add a dimensional to the back right side of the label, add glue to the rest of the label and adhere to the front of the card as shown. Gently bend the wings of the moth up a little. Place a mini dimensional close to the body on each side and add to card front. And finally, adhere the liner inside the card base.
If you found this tutorial helpful, consider a contribution to my coffee fund ☕️ Coffee → Creativity → Content → More Coffee (help fuel the cycle!)
I absolutely adore this color combination! And the embossed white looks like a dusting of confectioner’s sugar. I must remember to use this technique on a winter-themed card, as the embossing would be a great stand-in for snow.

Leave a Reply