This easy DIY Graduation Money Holder Card elevates the gift every grad can use with its vellum holder and envelope. Customize yours to match your graduate’s school colors. No need to have a graduation stamp set in your stash – all you need is a sentiment that says ‘Congratulations’. And please forgive my use of fake currency. Apparently my original photo of a fifty dollar bill was so realistic it was getting flagged as an attempt at counterfeiting. So without further ado, let’s get started!
cutting & scoring guide
| Paper Dimensions | Score Short Side | Score Long Side | ||||
| 7″ x 8½” Gorgeous Grape cardstock base | 3½” | |||||
| 3¼” x 8¼” Basic White cardstock for liner | ||||||
| 3¼” x 7″ vellum cardstock for money holder | ||||||
| 1½” x 7″ Gorgeous Grape cardstock for edging | ||||||
| Scraps of Basic White cardstock for diecutting stars and 2026 | ||||||
| Scraps of Gorgeous Grape cardstock for die cutting frame and stars | ||||||
| 8½” x 11″ vellum cardstock for slimline envelope |
step by step instructions
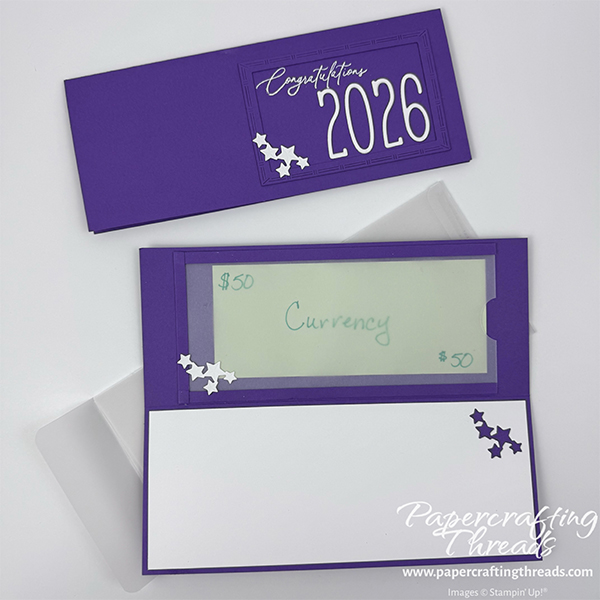
Cut cardstock as described above for card base, vellum holder and inside liner in school colors. Die cut two sets of 2026 numbers from your favorite die set (I used the retired set Alphabet a la Mode) from Basic White cardstock. Die cut a frame to match the card base. Mine measured 2¼” x 4¼” and I used the retired Textured Notes die set with the pretty edgings. Don’t have a die set? Use an exacto blade and cut an opening in a rectangle. Use a star punch or die cut two sets of Basic White stars (I used the retired Wanted to Say dies – balloons would also work) and one set of Gorgeous Grape stars.
Starting with the frame, turn over to the reverse side and adhere narrow strips of cardstock along all four edges to build a little height. Place on folded card base, ink up the sentiment (mine was from Everyday Greetings stamp set) with Versamark ink and stamp. Remove the frame, sprinkle with White embossing powder and heat set. Then adhere the frame in place.
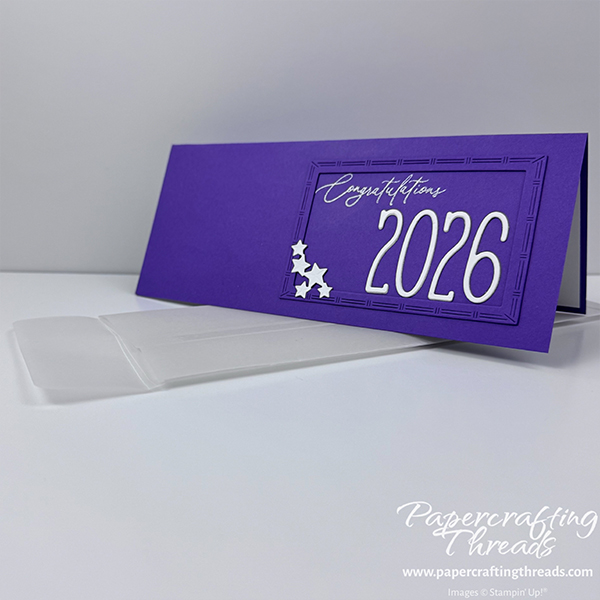
Using liquid glue, adhere the two sets of numbers for the year 2026 on top of each other. Then adhere on the card front within the frame. Start from the 6 and work backwards to get the spacing even. Add a few drops of glue to one set of Basic White stars and place across the lower left corner of the frame.
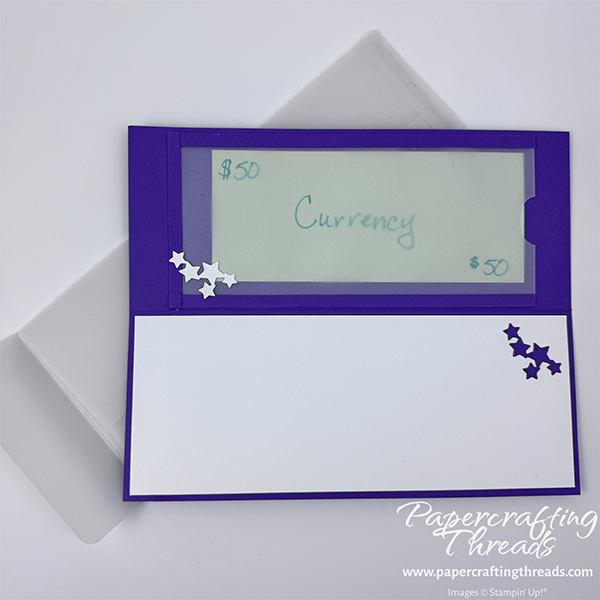
Creating the Vellum Money Holder Pocket
Moving to the vellum piece, punch a notch in one of the narrow ends using a small circle punch. Place the 1½” x 7″ Gorgeous Grape piece in a paper trimmer with the short edge at the top. Score at ¼”, then cut at ½”. Repeat two more times to get a total of three long strips scored down the middle.
Fold all thee of the strips in half on the scoreline and burnish. Open one of the strips, add liquid glue the length of the piece on both sides, and insert one long edge of the vellum piece up to the fold. Close and burnish with a bone folder until the glue sets. Repeat with the second strip of Gorgeous Grape cardstock. For the short edge of vellum, apply liquid glue along the edge on both the front and back. Then sandwich the vellum with the remaining strip and trim any overhang.
Add a line of liquid glue on all three edges of Gorgeous Grape and press to adhere on the inside top flap of the card base. Adhere another set of Basic White stars on the lower left corner. Add the Basic White liner to the inside lower flap of the card base. Glue the Gorgeous Grape stars on the top right corner.
Create a matching vellum envelope following my free PDF tutorial here to really amp up the cash holder. Now you’re all set for those June graduation parties!
If you are finding this tutorial helpful, consider a contribution to my coffee fund ☕️ Coffee → Creativity → Content → More Coffee (help fuel the cycle!)
And by popular request, I did film a long form video on both the money holder and the matching vellum envelope. You can check it out over on my YouTube channel.

Leave a Reply