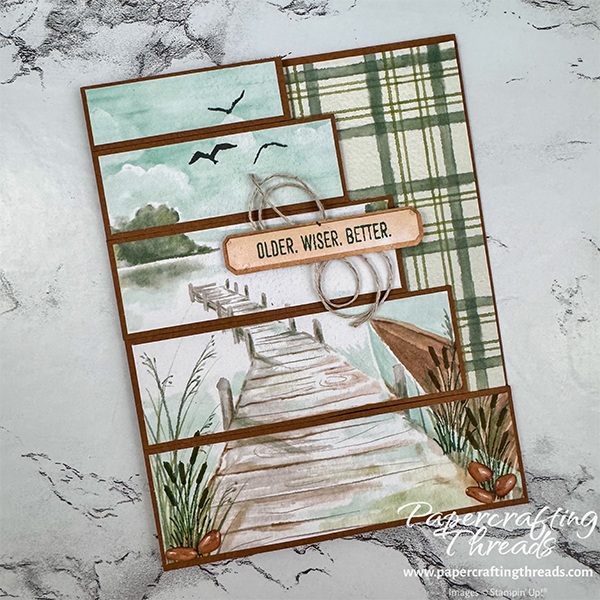
The Staggered Z-Fold or Staircase Card layout is perfect for scenery patterned paper. It really takes it up a notch, it’s easy, and no special dies are needed. Don’t let the different measurements of the strips discourage you. Cut the large pieces first. Then the strips. Then shorten the strips. I’ve also created a downloadable PDF you can print and place right on your work surface so you have an easy reference and can even lay out the pieces in order. So let’s get started!
cutting & scoring guide
| Paper Dimensions | Score Short Side | Score Long Side | ||||
| 5½” x 8½” Pecan Pie cardstock base | 2⅛”, 4¼” | |||||
| 4⅛” x 5⅜” Basic White cardstock for liner | ||||||
| 4¼” x 5½” Pecan Pie cardstock for strips | ||||||
| 4⅛” x 4⅞” patterned paper scenery for strips | ||||||
| 2″ x 5⅜” plaid patterned paper for inside left | ||||||
| 2⅛” x 5⅜” plaid patterned paper for inside right |
step by step instructions
Cut the Pecan Pie card base, the liner and the plaid patterned papers. I used one of the card bases from the stunning Lakeside Retreat Paper Pumpkin Kit from April 2026 for my patterned papers. Feel free to substitute any scenic paper in your craft stash.
Stamp the cattails, greeting, rope and sentiment (from the kit) as desired. Scroll down to see placement photo.
Cut the strips from the Pecan Pie mat cardstock and the scenic patterned paper using my chart below. Click on the picture and you can even print and download so you have a staging area for your pieces.

So that the birds are not cut in half awkwardly, butt the top two pieces of the patterned paper together as if they were still one piece. Then stamp the birds straddling the cut edge.
Adhere each piece of patterned paper to its corresponding cardstock mat.
If you are finding this tutorial helpful, consider a contribution to my coffee fund ☕️ Coffee → Creativity → Content → More Coffee (help fuel the cycle!)
Assembling the Staggered Z-Fold Card
Fold the Pecan Pie card base in half, then fold the right half of the front side over the left, creating a standard Z-fold.
Add liquid glue to the top of the folded panel, and starting at the bottom with the largest strip, adhere to the flap. Work your way up the staircase, recreating the scene, butting up edges to the strip below and aligning the left edges with the left fold of the card base.
Open the card and adhere the 2″ strip of plaid patterned paper to the left most panel. Adhere the liner to the inside back of the card base. Adhere the 2⅛” strip of plaid paper to the right half of the liner.
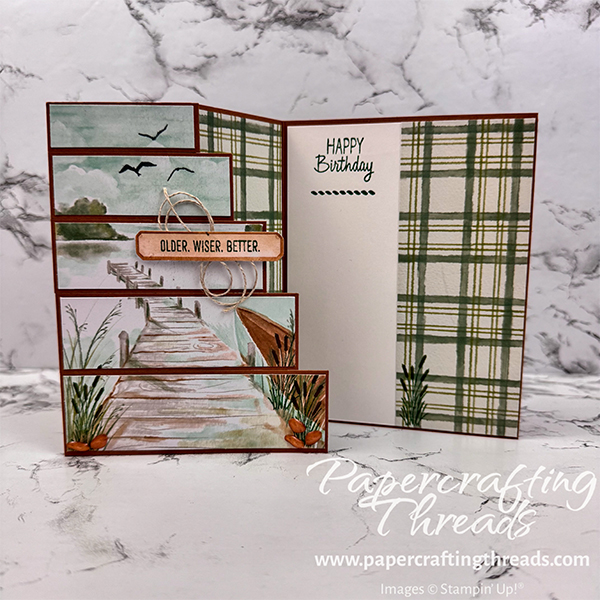
Make a nest from a length of linen thread and attach it to the back of the sentiment strip. Pop up on Stampin’ Dimensionals and adhere to front of card.
Finish off the front with the self-adhesive river rocks from the Paper Pumpkin Kit.
I even made a video showing the entire process. And there is a method to the madness of all the different strip measurements. Five and half (the standard card height) can’t be divided into five equal parts. I could have made the card base taller, or I could have made the middle strips equal height and shortened the upper and lower strips. But because it’s scenic, I thought anchoring the view with the largest piece really grounded everything. Having each strip slightly smaller than the previous strip also moves the eye upward. So win-win, and it’s not hard to cut the strips following my template.

thanks for such a unique card and instrutions
Glad you liked my card – I hope you enjoy making one!